The vast majority of them are quite simple and avoidable, however, when you don’t have somebody guiding you through the process, the errors are easy to make.
Most Common Mistakes Made By Garageband Users
1) Using Bluetooth Headphones For Mixing And Production
2) Mis-Matching the Number Of Measures
3) Not Lining Up Notes on The Grid-Line
4) Not Understanding How to Use EQ
5) Not Using Studio Headphones
6) Not Installing Plug-Ins
7) Not using -10 to -15dB of Headroom
8) Using iOS Garageband
9) Not Using the Time Quantizer
10) Not Panning
1) Using Bluetooth Headphones For Mixing And Production
As I explained in my article on latency, one big mistake that people make when they first start making music with Garageband is using Bluetooth headphones. This is a problem due to the fact it typically creates latency, which is the word describing the time it takes for you to actually hear the note you played.
Bluetooth technology simply isn’t there yet, so if you have your laptop connected to Bluetooth speakers or headphones, there will be some latency every time you press on the MIDI keyboard keys or musical typing. Even worse is if you’re recording a guitar part with iOS Garageband or Mac Garageband.
This will cause serious latency. Whenever you record music or even just noodle around on your DAW, whether it’s with a guitar or the MIDI Keyboard, it’s best to be hooked into an actual pair of studio monitors or headphones.
You’ll avoid a lot of problems doing it this way, however, if you want headphones that can function via a wired connection AND Bluetooth, the ATH-M50xBT are a good choice.
2) Mis-Matching the Number Of Measures
When you first start creating melodies in Garageband, or even just rhythm section parts, you want to make sure that the parts are 4 measures, that way when you loop them, all of the music lines up and remain synchronized.
Once you’ve become more comfortable with using the DAW, including when making melodies and part of your rhythm section, you can start experimenting with much longer sections. For instance, you could make your lines around 5 measures or even 8 measures.
It’s best to make your musical lines divisible of 4, for instance, 2 measures, 4, 8, 16, 32, etc.
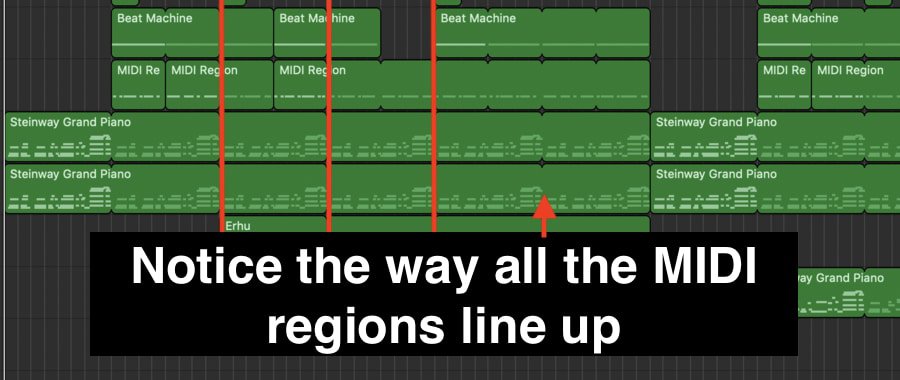
The reason for this is like what I mentioned above, again, to ensure that when you loop the music, everything falls together in the proper place and thus, sounds good.
However, as I just said here and in my mixing tips article, this is more for when you’re first starting out. Once you’ve familiarized yourself with making music created in a way where it’s all synchronized, you can move on to more complicated musical structures.
3) Not Lining Up Notes on The Grid-Line
This one is a little more complicated because once you’ve become more familiar with the DAW, you’ll recognize that notes don’t necessarily have to line up exactly on the grid-line.
However, when you’re first starting out, it’s best to have the notes lined up exactly on the grid-line that way everything is synchronized together. This is especially true for the rhythm section. But like I mentioned, this is just for starting out.
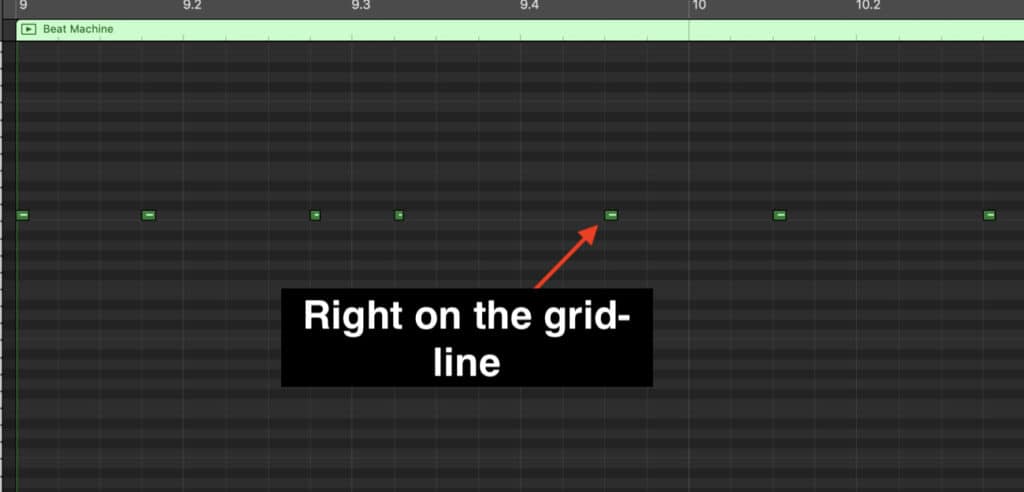
Once you’re more familiar with music production, you can start winging it more and experimenting with the way things sound when notes are played off the grid or in between the beats. The fact music is imperfect is part of what makes it great.
Although, some would argue this is changing every day, especially in the advent of computer technology where everything can be made flawless in post-production and in the mixing process.
4) Not Understanding How to Use EQ
When I first started making songs with GarageBand, I had no idea how to EQ certain parts, so I wound up with mixes with either far too much low-end or way too much mid-range. It ends up sounding really bad.
When it comes to EQ, I would say that it’s best to approach it with two different mindsets, at least if you’re averse to using presets which I recommend in my EQ guide.
a) Less is More
For instance, it’s best to use EQ at certain points of the spectrum and do increases or subtractions at a rate around 3dB.
Obviously, this isn’t set-in-stone; you can experiment with what sounds good – in fact, you can even use better EQ plugins like this FabFilter Pro-Q 3 – however, when I look at some of my EQs, in addition to the Channel EQ Presets, I notice that the subtractions or additions are typically between 1dB and 5dB, maybe 6dB at the max, with the exception of low and high-pass filters.
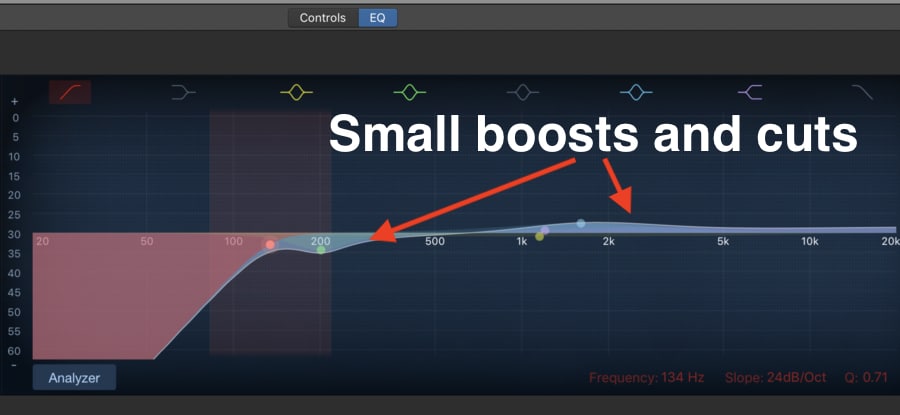
In other words, as a jumping-off point in terms of EQ, keep your boosts and cuts at 3dB or so.
b) Subtractive EQ
This is one of the more commonly suggested tactics for using EQ, and I think for pretty good reason. For instance, when EQing vocals, I find that just dropping out the sub-frequencies of a male singer and attenuating the mid-range frequencies make a huge difference in how the vocals sound.
Everybody has their own way of approaching these things, so you don’t have to follow these guidelines. With that said, I think it’s worth saying that A LOT can be done by just removing certain frequencies rather than increasing the frequencies.
Explained in another way, if you want to increase the mid-range on your guitars, you could approach it in such a way where you actually just decrease the low-range frequencies on the instrument instead.
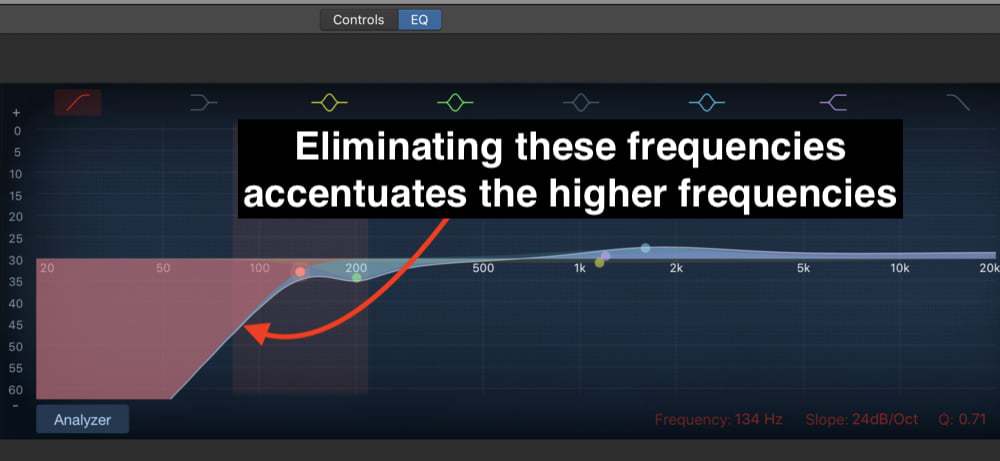
You’ll find it will create the appearence of bringing the mid-range frequencies forward and making them more prominent.
5) Not Using Studio Headphones
I implore you to put away your iPod headphones when it comes to making music and mixing but especially mixing.
I’ve written about this at length in other articles including in my review of the ATH-M50x headphones, but consumer headphones typically come with a boosted low-end or too many highs.
You’ll think something sounds really great on your headphones, but then find out it sounds terrible in a car or in some other speaker system.
Like I mentioned above, check out the ATH-M50x. These are great beginner studio headphones that are going to help you make more informed decisions in the mixing and production process.
Trying to use the wrong type of headphones or monitors is like trying to walk through a dark-hall way with no lights on. It’s best to just turn on the lights. Don’t make it difficult on yourself.
6) Not Installing Plug-Ins
When it comes to using DAWs, every bedroom producer out there knows just how amazing plug-ins are. And there are a plethora of them out there, many of which I discussed in my article on how to install plugins. Additionally, the article features a big list of solid plug-ins people like to use. I believe there are around 20 of them in there, perhaps even more.
Furthermore, I have another article on 6 additional plug-ins that are great to use. There are two things I want to mention, however.
a) Don’t get too caught up in downloading a bunch of plug-ins, it’s best to play around with one at a time until you’ve figured out the ins-and-outs of it.
Moreover, plug-ins can actually take up a lot of space on your computer, so that’s worth mentioning. This can result in a slowed down interface, crashing, and other problems.
In other words, don’t download 20-30 of them at a time.
b) Some free plug-ins are corrupted
By that, I mean some of them don’t actually work the way the person intended. I discovered one plug-in recently that made my tracks sound weird.
I noticed when I used the compressor, it actually eliminated my snare drum entirely and I was wondering why I couldn’t hear it in the mix. It turns out the plug-in was just getting rid of it altogether.
I use too main websites for plug-ins, notably, Plugins4Free as well as Audio Plugins For Free. I would recommend just perusing the “Most Popular” category on each website respectively and finding the ones that are suitable to your tastes.
7) Not using -10 to -15dB of Headroom
When I first started mixing tracks for clients, I ran into this problem repeatedly, and it was my own fault. I was mixing the songs too loud in the individual track regions.
For instance, all of the tracks would be almost clipping, and then when I exported the final project for DAW-Mastering everything would sound not-so-good.
Once your tracks are finished and you’ve created all of the melodies and rhythm sections, just go ahead and drop all of the VU meters down to about -10dB around -15dB. I would even say that the latter is better because then you have PLENTY of space to work with.
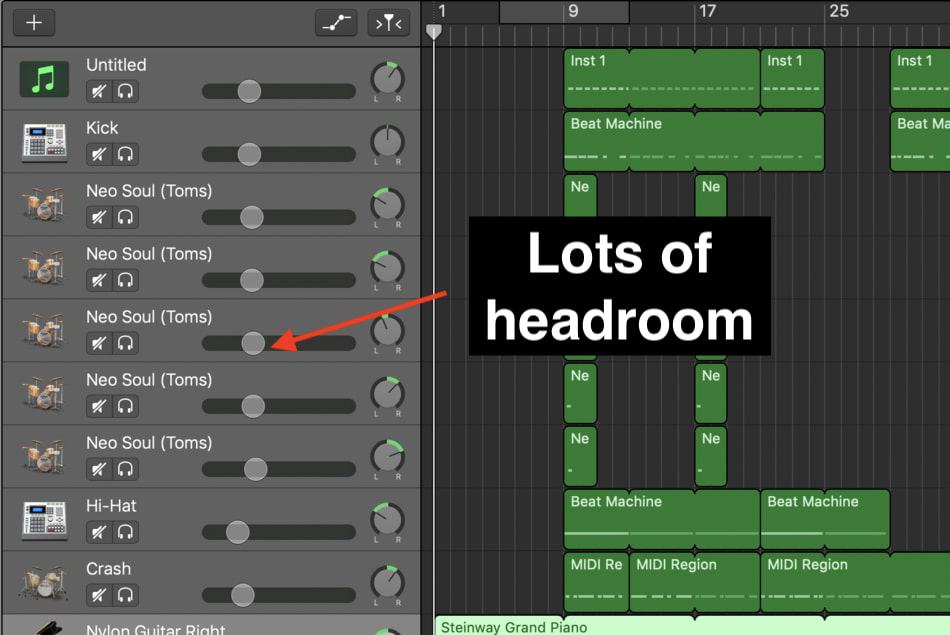
This is one of the more essential tips on this list, I would say because it’s going to save you a lot of time messing around and wondering why your songs always end up clipping or just sounding bad.
As an added point, never have any of your VU meters above 0.0dB. 0.0dB is the point of clipping, so if you have your instruments above that threshold, don’t be surprised if it sounds bad once you’re in the mixing phase.
8) Using iOS Garageband
This is arguably the most controversial point on this list because I know a lot of people love using it. I’m not going so far as to say that you should never use iOS GarageBand on your iPhone.
What I am saying is that it’s best to use iOS Garageband for ideas but not your primary DAW. It’s best to use it for making rough drafts, and then exporting it to your computer and finishing it up in Mac Garageband or another software.
It’s just way easier to do everything in Mac Garageband, including the mixing and “mastering” phase. Moreover, you have access to way more solid features, including the drummer track, the ability to set up around 16 different plug-ins on each track.
The interface is just way easier to use.
And the most important part of all…..
iOS seems like it’s littered with problems. Every time I go over to Reddit or another place where users are hanging out, there is at least one post per day from people who are struggling to get it to work.
iOS Garageband is always crashing, having problems after updates, deleting your music altogether, and it just seems like there is some type of issue on a regular basis. Again, I’m not saying you shouldn’t use it. I’m just saying it’s best to use it for the “rough draft” phase rather than for the entire process.
9) Not Using the Time Quantizer
I honestly can’t believe that I fell victim to this big mistake. Probably for the first year of using Garageband, I almost never used the Quantizer function (my guide on it).
Whenever my notes or beats were off the grid-line, I would actually go through each part individually and snap the parts to the grid manually. What a waste of time that is.
To use the Quantizer function, it’s really just a two-step process, selecting the type of quantization and the strength of it numerically.
10) Not Panning
Panning is another one of those game-changing mixing tools that I skipped out on when I first started. It never even occurred to me that it was important to move certain parts of the sound around in the stereo image, which is another way of describing the position and direction of sounds in the mix.
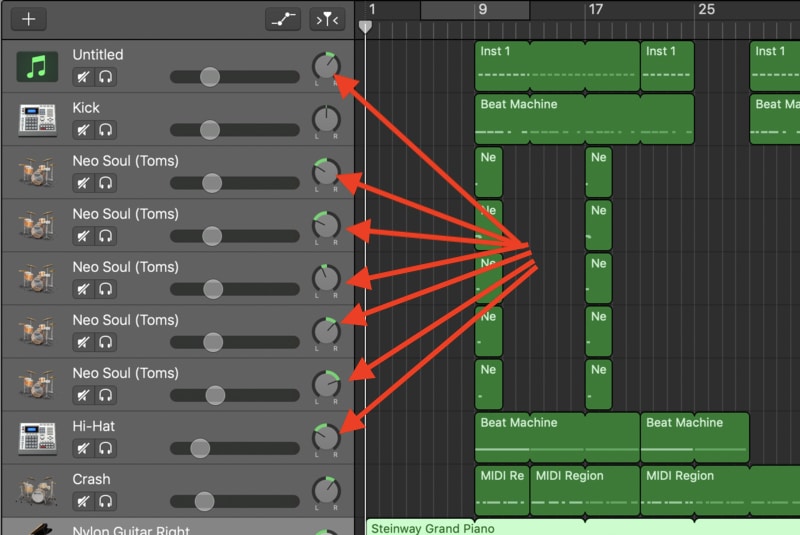
Panning, in layman’s terms, is just repositioning certain sounds at different parts of the mix so you can create room for them all.
For instance, a good panning practice is to have the kick in the center and the snare slightly off-center, with the hi-hats, panned harder to the left or right and the cymbals panned harder to the left or right.
As I’ve explained before in my guide all about it, Panning is a great thing to do for your mixes, and it’s going to make a big difference in how everything sounds, so make sure to check it out.

 Written By :