1) It’s Free (assuming you own an apple product)
The fact that Garageband is free surely carries some significance when deciding on what digital audio workstation to use.
Assuming that the user has access to an Apple product, whether it’s an iPhone or a Macbook Pro, GarageBand is free to download from the App Store.
It’s not going to cost you anything to at least try it out. Even in the case that you don’t like it, there’s no harm done because it didn’t end up costing you anything anyway (I’ve written about this topic before in another guide).
Most other DAWs, especially the premium versions, cost at least a little bit of money, including the most popular options, FL Studio, Logic Pro X, Cubase, Pro Tools, and Ableton.
If you’re new to beat-making, Garageband is a great first step to make, because it has many of the same features of the other most popular DAWs, despite the fact it won’t cost you any money at all.
2) You Can Install Plug-Ins
Contrary to what a lot of people on the internet might say about the software, you can actually install plug-ins in Garageband. It uses the Audio Units file-type, and a lot of plug-ins are compatible with it.
In fact, I have an entire guide on how to install them as well as some of the most popular plug-ins for it.
Plug-ins are a great way to gain access to features, functions, and instruments, that otherwise don’t come pre-installed in the DAW.
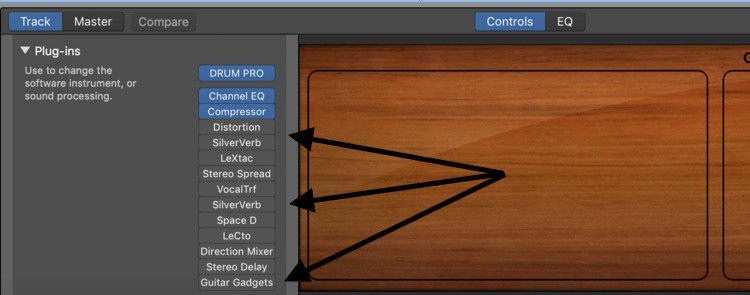
For instance, you can install entirely new drum kits, boutique 808s, drum machines, acoustic guitars, saxophones, and so on and so forth.
Sites like VST4Free or AudioPluginsFor Free have a ton of different quality options to try out. One of my favorite plug-ins to use right now is Initial Audio’s 808 Studio II Synth.
But there are many free ones to test out as well, a few of which I’ve talked about in my article on what I think are some of the coolest plug-ins for Garageband.
Furthermore, there are plug-ins out there that can replace some of the less sophisticated options in Garageband. For instance, if you really wanted to, you could download a new compressor, an EQ with a more accurate spectrum analyzer, and pretty much whatever else you want.
A great piano to install, in case you don’t like the stock piano, is the 4Front Piano, which is a little bit better than what comes as default.
Plug-ins are one of the greatest features of being a music producer, especially a hip-hop producer, and if you have access to a little bit of money, you can buy premium versions which are often significantly better than the free ones.
3) You Can Sample
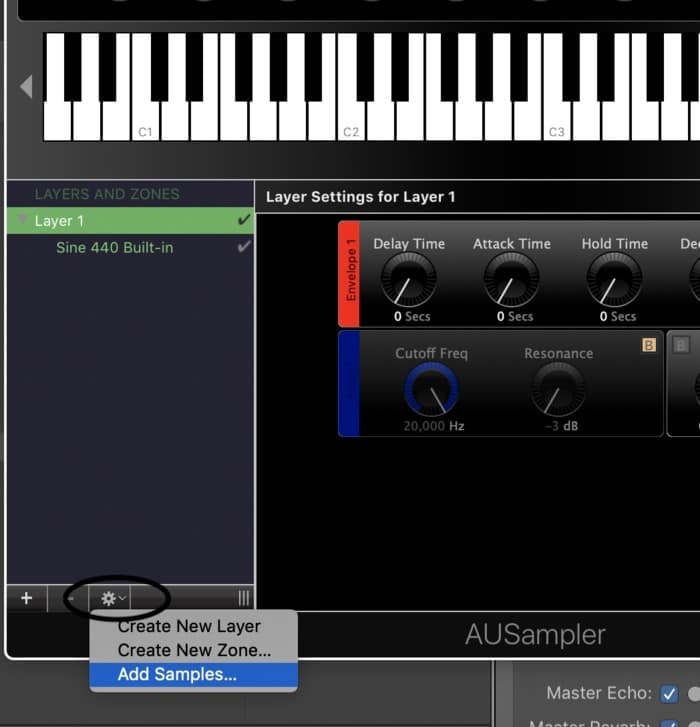
Garageband comes with what’s called the AUSampler, and it essentially gives the user the capacity to upload whatever type of recording you want and then use it in your music, regardless of what it is. It can be a bit tricky to step up when you don’t know how to do it, which is why I have a guide on it.
Sampling is an integral part of hip-hop production. For that reason, it would be insane for Garageband not to come with the function. Moreover, AUSampler has a few different types of controls that allow you to adjust how it sounds.
Sampling can be used in many different ways, including introductions, outros, entire melodic phrases, speeches in the middle of the song, or perhaps even the main chorus. Some of the biggest hip-hop producers of all time are samplers, including Kanye West, and Garageband can meet this need.
4) Apple Loops
Garageband also comes with Apple Loops, which admittedly, isn’t something that I use on a regular basis. However, many other users swear by the Apple Loops and use them all of the time. Truthfully, many of them are quite good and worth checking out.
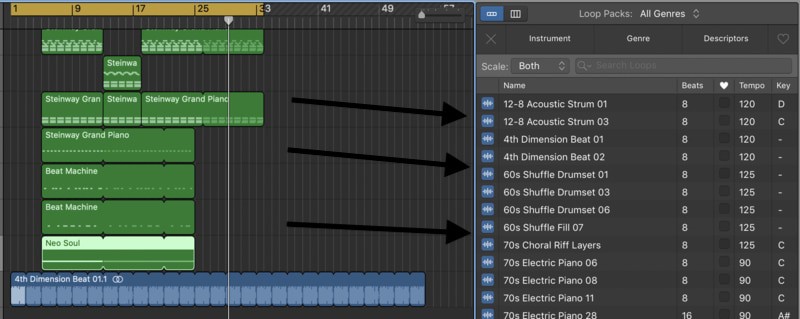
I’ve written a whole article on how to use the Apple Loops, including how to make your own and upload them into the Apple Loops library. The Loops interface also comes with a variety of different parameters, including the genre, the instrument type, the mood, and so on.
Each loop has an easily identifiable name, so you know what you’re getting, and on the right-hand side of the interface, there is also the key signature and tempo, that way you know what you’re getting into, and can adapt the loops to a variety of different songs in a more informed manner.
5) Enable Flex Function
The Enable Flex allows you to adjust the time and tempo of a recorded track.
For instance, if you’ve created a guitar part and it’s slightly off-tempo, you can actually chop up the audio and drag and drop the track to wherever it needs to be.

In other words, Garageband comes with a more thorough post-production editing software, that way errors can be fixed after they’ve been recorded.
6) Time Quantizer
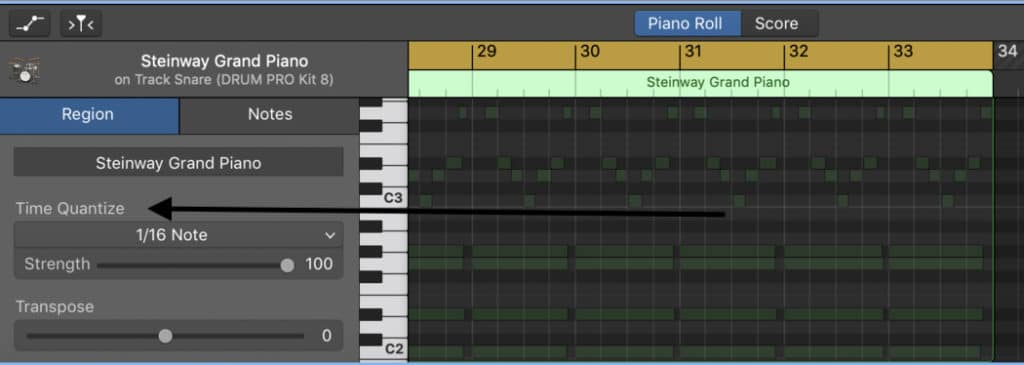
The Time Quantizer, like Enable Flex, is a timing tool that allows you to snap notes to the grid, that way everything is in harmony. Moreover, as I argued in my time quantization article, the parameters of the time quantizer aren’t overly sophisticated, so it’s incredibly easy for beginners to use.
An added benefit of the time quantizer is that it streamlines the process of fixing musical errors. For instance, if you wing it on your MIDI keyboard, you can simply snap some of those notes right back to the grid and it won’t take you that much time.
7) The MIDI Instruments
Garageband also comes with many different types of instruments, especially if you’ve taken the time to download all of the available instruments by going into the preferences and hitting, “Download All Available Sounds.”

Unfortunately, not every single MIDI instrument the software comes with is amazing. However, because you can download new plug-ins if you want, they’re easily replaceable. Spitfire has awesome instruments in their LABS product.
Moreover, if you take the time (and the money) to purchase the Main Stage 3 program, you gain access to many other instruments as well. I believe it costs around $40 a whole new library of instruments.
Surprisingly, Garageband comes with dozens of drumkits, and perhaps the most affluent sub-section is the synth category. It has a synth for nearly every purpose.
I would say that my biggest gripe with Garageband’s instruments is the guitars, which are not that great, with the exception of the acoustic guitar which is actually kind of fun to use.
8) You Can Use Automation
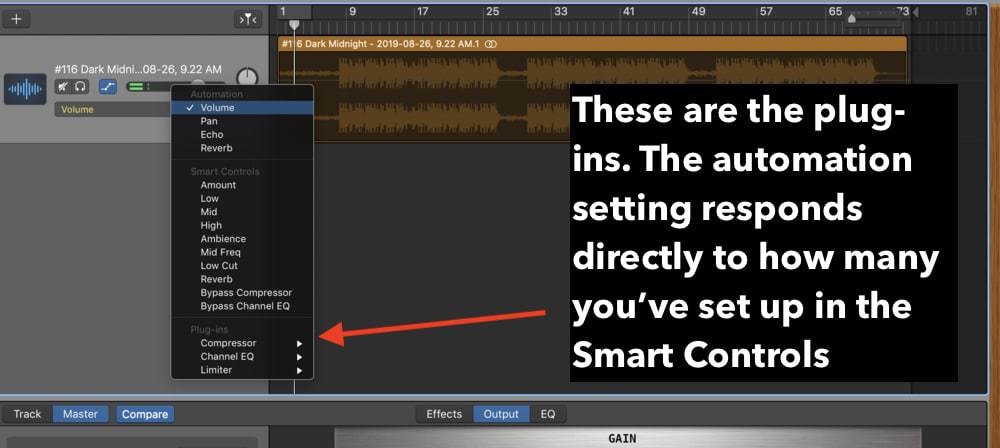
Automation is self-explanatory. Essentially, it’s the ability to make certain features run automatically, whether it’s a Channel EQ, a fade-out or fade-in, or some type of effect, including volume, phasers, flangers, delays, reverbs, and so on and so forth.
If you’ve read my automation article, you’d know I use the volume automation the most, especially during phrases where there needs to be a push in a particular dynamic, for instance, during the part before the chorus.
9) Panning
Panning (my guide) is one of the greatest ways to make a mix actually sound good, because it spreads each instrument or software instrument track across the stereo image, rather than just having all of the sounds located in one place.
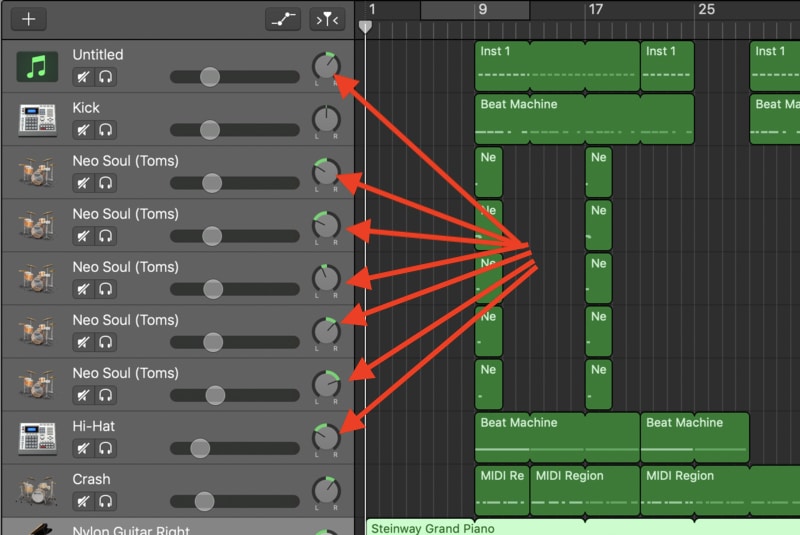
Panning is one of the features of the mixing process that makes a world of difference. For instance, you can pan your hi-hats to the left slightly, the vocals directly in the center, and then the guitars panned to the hard left and right.
In the case of hip-hop production, you might have the hi-hats panned slightly center-left or center-right, the snare slightly off-center and then the kick in the center, with the bass or the boutique 808s running right in the middle.
10) Logic Pro X
And finally, one of the greatest parts of taking your first steps into music production with Garageband is its similarity to Logic Pro X.
The two software are quite similar to one another, so in essence, when you finally decide that you want a more sophisticated DAW with even more features, you’ll already have a firm understanding of how to use Logic Pro X.
Frankly, people that actually use try out Garageband for the first time are shocked by the number of features and functionalities it has.
For instance, popular music-producing YouTubers will make videos of themselves trying out Garageband, and it’s not uncommon for them to say that it actually has almost everything that one would need.
At some point, you might be ready to move on to Logic Pro X, but until you find yourself actually limited by the features of the DAW, you could probably just stick with Garageband in the meantime, and nobody would even know the difference.
However, if you’re into hip-hop primarily, FL Studio is probably a better choice. Logic Pro X is a jack of all trades, but FL is a main-stay for hip-hop producers.
11) The Drummer Track
I was hesitant to include the Drummer Track simply because I find it’s the best for other musical styles, rather than hip-hop production. With that said, I’ve seen many beat-making YouTubers implement the hip-hop drummer track and ultimately come out with something that sounds pretty cool.
For that reason, I chose to include it because some people like using the drummer track including myself (my tutorial).
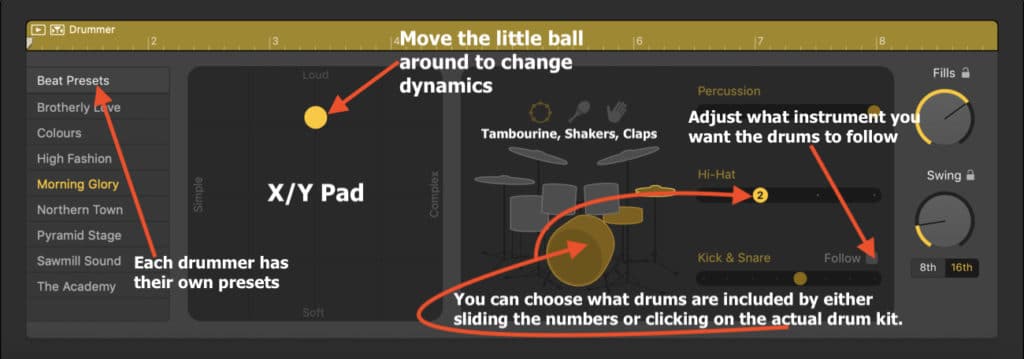
It’s worth mentioning that the Drummer Track has an incredibly useful feature where you can actually convert the Drummer Track file region into the MIDI format.
This has a number of different uses, including the ability to customize a drummer track as much as you’d like, but also to show you how to program particular sounds yourself, manually.
In other words, if you hear a drum roll in the drummer track and wonder how it’s done, you can convert it into a MIDI file and see how it’s programmed.
12) Pitch Correction/Auto-Tune
Although I strongly recommend using Melodyne 5 instead, the pitch-correction that Garageband comes with is a great way to step into the world of audio editing.
It also comes with a pitch correction software in case the rapper you’re working with needs a bit of correction on his/her vocals. The Pitch Correction plug-in is quite simple to use.
The primary thing you need to know in order to use the pitch correction software is the key signature of the song. Once you’ve figured that out, you can just move the slider in relation to how much pitch correction you want.
I would argue that it’s the best not to use too much because otherwise, you end up with a vocal track that sounds like a robot unless you’re actually going for a Travis Scott style vocal track which I showed you how to do in my article on pitch-correction.

YouTube Video Tutorial
Admittedly, Garageband is not the best DAW out there, but it certainly is the best DAW in terms of price: free. There aren’t nearly as many limitations as people like to say, and it’s going to work just fine for the first few years of music production.
Like I mentioned in #10, at some point, it wouldn’t be a bad idea to update to a better DAW.

 Written By :