Adjusting the pitch of your imported audio tracks in GarageBand iOS isn’t that intuitive, however, there are some workarounds for it.
To slow down or speed up an audio file in GarageBand iOS, download the Media Converter and Files App from the App Store, and then navigate to the Twisted Waves website. Upload your audio to Twisted Waves, change the pitch, and then export it to your Files app. Open the file with GarageBand iOS.
4 Ways to Slow Down/Speed Up An Audio File in GarageBand iOS
![How to Slow Down/Speed Up A Song in GarageBand iOS [EASY]](https://producersociety.com/wp-content/uploads/2022/07/How-to-Slow-DownSpeed-Up-A-Song-in-GarageBand-iOS-EASY-.jpg)
2 Free Applications Every GarageBand iOS User Needs to Have
Before we really begin, there are two applications that every GarageBand (and probably every iOS user) should have, and that’s the Media Converter and the Files App. You should have these applications anyway which is why I’m mentioning them to you now.
These applications are essential for converting files to codecs that GarageBand and other software like to work with. They’re also very useful for organizational purposes because it can be a challenge sometimes to find where the iOS operating system sends files after downloading, exporting, or importing.
Make sure you download both of them from the App Store before we start and don’t delete them after you’re done.
A) Media Converter

The Media Converter is a tool that not only can convert almost any kind of file format that you have, including video, but it also acts as an intermediary between applications.
For instance, it’s not always possible to ”Save to Files” depending on where you’ve downloaded the file. The Media Converter can be used in those cases where the Files app can’t reach. I’m not sure why iOS works in this way, but it is what is.
B) Files Application

The next app is the Files application, which many iOS users probably already have on their phone or iPad. If you don’t have it, make sure you get it. Now that we’ve got that out of the way, let’s get into the actual tutorial.
1) Using the TwistedWave Audio Editing Website (Web App)
![Twisted Wave Audio Editor - How to Slow Down/Speed Up Audio in GarageBand iOS [Simple]](https://producersociety.com/wp-content/uploads/2022/07/Twisted-Wave-Audio-Editor-How-to-Slow-DownSpeed-Up-Audio-in-GarageBand-iOS-Simple-.jpg)
The first way of pitch-shifting your audio is with the TwistedWave audio editing website which can be used either as an application for iOS/iPadOS, or as a browser-based application. This means you could download it if you wanted or just use the browser version.
We’ll start with this one because it’s the only software in this list that doesn’t require you to download an app. Admittedly though, it’s not as good or as smooth as the second editor on this list: WavePad, which is much better to use. But I digress. Go to the Twisted Wave website.
You Have To Enable Pop-Ups First in Safari
Before I show you how to do this though, make sure you’ve enabled Pop-Ups in your iOS device’s settings, otherwise, Twisted Wave won’t work the way it should. To enable Pop-Ups, go into your device’s settings, scroll down to Safari, go to General within Safari, and then turn off the ”Block Pop-Ups” option.
![Enable Pop-Ups in Safari - How To Slow Down/Speed Up Audio in GarageBand iOS [EASY]](https://producersociety.com/wp-content/uploads/2022/07/Enable-Pop-Ups-in-Safari-How-To-Slow-DownSpeed-Up-Audio-in-GarageBand-iOS-EASY-1-1.jpg)
Once we’ve finished using TwistedWave to slow down or speed up the audio file, you can go back into your settings and turn ”Block Pop-Ups” on again. Without further ado, let’s get into how to actually use TwistedWave.
A) Upload Your Audio File to the Online Version of TwistedWave
![Upload to Twisted Wave - How to Slow Down/Speed Up Audio in GarageBand iOS [EASY]](https://producersociety.com/wp-content/uploads/2022/07/Upload-to-Twisted-Wave-How-to-Slow-DownSpeed-Up-Audio-in-GarageBand-iOS-EASY-.jpg)
Select the file from the menu and wait for it to upload. It usually takes a moment. After it’s done processing, Twisted Wave will tell you that the browser is trying to send you a pop-up. Allow it to pass through because it’s trying to open a new tab with your imported audio file.
B) Allow the Pop-Up to Appear, Select ”Effects” > then ”Change Pitch and Speed”
![Select Effects > Change Pitch and Speed - How to Slow Down/Speed Up A Song in GarageBand iOS [EASY]](https://producersociety.com/wp-content/uploads/2022/07/Select-Effects-Change-Pitch-and-Speed-How-to-Slow-DownSpeed-Up-A-Song-in-GarageBand-iOS-EASY.jpg)
If you don’t have a subscription to TwistedWave, you have a 5-minute maximum. Additionally, if the audio track is in stereo, TwistedWave will buffer it down to Mono instead.
C) Decrease or Increase the Speed According to the Percentage
![Slow Down/Speed Up - How to Slow Down and Speed Up An Audio File in GarageBand iOS [EASY]](https://producersociety.com/wp-content/uploads/2022/07/Slow-DownSpeed-Up-How-to-Slow-Down-and-Speed-Up-An-Audio-File-in-GarageBand-iOS-EASY-.jpg)
I usually preview the file first to make sure I’m getting the right tempo. I also choose the option ”Best” from the quality list, that way I get the highest quality available.
Unfortunately, you can’t adjust the speed of the audio file by beats-per-minute, but if you wanted to figure that out after the fact, you could upload the processed file into TuneBat or a similar website, a few of which I’ve mentioned before in my guide on how to find the key.
D) Click the Export Button > Choose WAVE Format > Zero Compression > 16 Bit-Depth
![Download to Files - How to Slow Down/Export Audio in GarageBand iOS [EASY]](https://producersociety.com/wp-content/uploads/2022/07/Download-to-Files-How-to-Slow-DownExport-Audio-in-GarageBand-iOS-EASY.jpg)
GarageBand really likes to work with WAVE, so I almost use this file format when exporting and importing audio. In cases where GarageBand won’t take the file, you can even change the file extension with the right-click so that the macOS/iOS operating system has an easier time reading the codec.
E) Press the Download Option > Click the Share Button > Then ”Copy to Media Convert”
![Copy to Media Convert - How to Slow Down/Speed Up An Audio File in GarageBand iOS [EASY]](https://producersociety.com/wp-content/uploads/2022/07/Copy-to-Media-Convert-How-to-Slow-DownSpeed-Up-An-Audio-File-in-GarageBand-iOS-EASY-.jpg)
As I was saying to you at the start of the article, you don’t always get the option to Save to Files, so MediaConvert is convenient to have in those cases.
F) Press the Info Icon in Media Convert > Select Send/Open In > then ”Save to Files”
![Send/Open In > Save to Files - How to Slow Down/Speed Up An Audio File in GarageBand iOS [EASY]](https://producersociety.com/wp-content/uploads/2022/07/SendOpen-In-Save-to-Files-How-to-Slow-DownSpeed-Up-An-Audio-File-in-GarageBand-iOS-EASY.jpg)
Use Media Convert to process the file and then send it to your Files App so that you can use GarageBand iOS to open it. Make sure you don’t save it to iCloud.
G) Import the Audio File into GarageBand iOS

It’s not hard to get files into GarageBand iOS (my full guide), however, you can run into issues like greyed-out files as I discussed here. And this is the long and short of how you change the speed of files with GarageBand iOS without installing any other software.
If you are willing to use another audio editor though, I highly recommend the WavePad audio editor app, because it’s much better at importing, exporting, and adjusting the speed of the audio. Additionally, it isn’t nearly as glitchy as Twisted Wave. After all, Twisted Wave is just a website. Let’s use WavePad now.
2) Using the WavePad Audio Editor Application
![Wave Pad - How to Slow Down/Speed Up A Song in GarageBand iOS [EASY]](https://producersociety.com/wp-content/uploads/2022/07/Wave-Pad-How-to-Slow-DownSpeed-Up-A-Song-in-GarageBand-iOS-EASY-.jpg)
A) Open WavePad and Import the Audio File
![Open File - How to Slow Down/Speed Up An Audio File in GarageBand iOS [EASY]](https://producersociety.com/wp-content/uploads/2022/07/Open-File-How-to-Slow-DownSpeed-Up-An-Audio-File-in-GarageBand-iOS-EASY-.jpg)
As per usual, you want to have your audio file sitting somewhere nicely where you can find it. I have a file folder I created in the Files App called ”Audio Files.” I suggest you do something like that.
B) Select ”Effects” > And Then ”Speed Change”
![Effects > Speed Change - How to Slow Down/Speed Up An Audio File in GarageBAnd iOS [EASY]](https://producersociety.com/wp-content/uploads/2022/07/Effects-Speed-Change-How-to-Slow-DownSpeed-Up-An-Audio-File-in-GarageBAnd-iOS-EASY.jpg)
It’s important that you choose Speed Change, and not the other ones, because we don’t want to change the pitch. We just want to adjust the speed of the clip.
C) Increase or Decrease the Percentage in the Speed Adjust Percentage > Then Select Apply
![Speed Adjust - How To Slow Down/Speed Up An Audio File in GarageBand iOS [EASY]](https://producersociety.com/wp-content/uploads/2022/07/Speed-Adjust-How-To-Slow-DownSpeed-Up-An-Audio-File-in-GarageBand-iOS-EASY-.jpg)
It’s unfortunate that it doesn’t allow you to adjust by BPM either, but it’ll do. Wait for a moment for the Preview file to load, and then you can drag the slider to see how it sounds.
Click on the Play icon like what’s pointed out in the image above, and you’ll get a taste of the result before processing.
D) Process the File > Send the File
![Send File - How to Speed Up/Slow Down An Audio File in GarageBand iOS [EASY]](https://producersociety.com/wp-content/uploads/2022/07/Send-File-How-to-Speed-UpSlow-Down-An-Audio-File-in-GarageBand-iOS-EASY-.jpg)
You could probably use Save As or something like that too, but I prefer to use Send File.
E) Choose Save As > Change File Name > Choose WAVE File > Save to Device
![Save As > Save to Device - How to Slow Down/Speed Up Audio in GarageBand iOS [EASY]](https://producersociety.com/wp-content/uploads/2022/07/Save-As-Save-to-Device-How-to-Slow-DownSpeed-Up-Audio-in-GarageBand-iOS-EASY-.jpg)
Make sure you give your file an identifiable name that distinguishes it well from other audio files. You don’t want to hunt around for it.
F) Save the WAVE to Your Files > Then Open It With GarageBand iOS With the Loops Icon
![Import the Audio File - How to Slow Down/Speed Up An Audio File in GarageBand iOS [EASY]](https://producersociety.com/wp-content/uploads/2022/07/Import-the-Audio-File-How-to-Slow-DownSpeed-Up-An-Audio-File-in-GarageBand-iOS-EASY-.jpg)
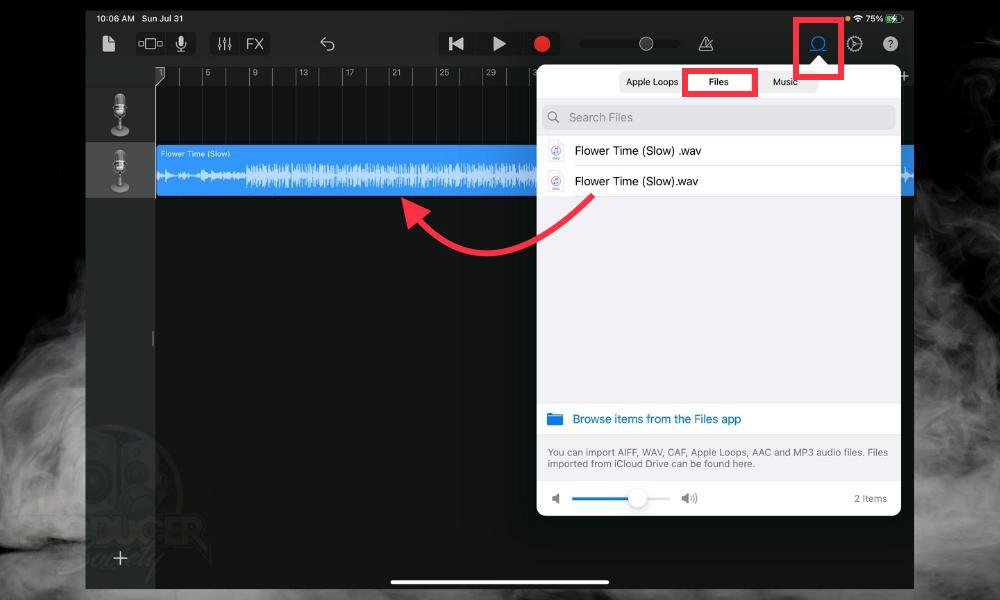
It’s the same old story with importing the file. Open your project, click the Loops icon, select Files, and then go to Browse Items from the Files App to find the file so it’s buffered and ready to be dragged into your project.
As I’ve said twice already, WavePad is the best way of changing the speed and editing audio on an iPad. It can do a lot of great stuff, all while retaining the audio quality as best as it can. I doubt it’s as good as Audacity, but it does work pretty well.
The next way that I’m going to show you is with the Lexis Audio Editor. It’s last on the list because it’s my least favorite way to do it.
3) Using the Lexis Audio Editor Application
![Lexis Audio Editor - How to Slow Down/Speed Up A Song in GarageBand iOS [EASY]](https://producersociety.com/wp-content/uploads/2022/07/Lexis-Audio-Editor-How-to-Slow-DownSpeed-Up-A-Song-in-GarageBand-iOS-EASY-.jpg)
You can find the Lexis Audio Editor in the App Store just like the WavePad.
A) Open the Lexis Audio Editor, Select Open, Choose Browse and Select Your Audio File
![Open the File > Select Browse > Import - How to Speed Up/Slow Down A Song in GarageBand iOS [EASY]](https://producersociety.com/wp-content/uploads/2022/07/Open-the-File-Select-Browse-Import-How-to-Speed-UpSlow-Down-A-Song-in-GarageBand-iOS-EASY-.jpg)
Don’t let it confuse you. You won’t actually import from the iCloud Drive if you don’t want to. When you use the Browse option, you’ll be given the option to choose whichever directory you want to pull files from.
B) Click the Menu > Select Effects > Change Tempo
![Effects > Change Tempo - How to Speed Up/Slow Down An Audio File in GarageBand iOS [EASY]](https://producersociety.com/wp-content/uploads/2022/07/Effects-Change-Tempo-How-to-Speed-UpSlow-Down-An-Audio-File-in-GarageBand-iOS-EASY.jpg)
After the file has been imported into Lexis Audio, you can press on the menu icon, then Effects and Change Tempo. Again, make sure you choose Change Tempo and not Change Speed.
C) Select A Percentage By Which You Want to Increase or Decrease the Tempo
![Change the Tempo - How to Slow Down/Speed Up an Audio File in GarageBand iOS [EASY]](https://producersociety.com/wp-content/uploads/2022/07/Change-the-Tempo-How-to-Slow-DownSpeed-Up-an-Audio-File-in-GarageBand-iOS-EASY-.jpg)
Once you’ve found the sweet spot, hit the ”Apply” button and then we can move onto the next step.
D) After the File Has Processed, Select the Menu Button, Then Choose Share
![Share - How to Slow Down/Speed Up An Audio File in GarageBand iOS [EASY]](https://producersociety.com/wp-content/uploads/2022/07/Share-How-to-Slow-DownSpeed-Up-An-Audio-File-in-GarageBand-iOS-EASY-.jpg)
E) Choose Save to Files and Save It Somewhere Easy to Find
![Save to File Lexis Audio Editor - How to Slow Down/Speed Up A Song in GarageBand iOS [EASY]](https://producersociety.com/wp-content/uploads/2022/07/Save-to-File-Lexis-Audio-Editor-How-to-Slow-DownSpeed-Up-A-Song-in-GarageBand-iOS-EASY.jpg)
F) Open The Audio File in GarageBand with the Loops Icon
![Import The File into GarageBand iOS - How to Speed Up/Slow Down An Audio File in GarageBand iOS [EASY]](https://producersociety.com/wp-content/uploads/2022/07/Import-The-File-into-GarageBand-iOS-How-to-Speed-UpSlow-Down-An-Audio-File-in-GarageBand-iOS-EASY.jpg)
And that’s it for changing the speed of audio with GarageBand iOS and iOS applications only. If you also have a macOS device, there are many other ways of doing this too.
I’ll show you a few of them now. Additionally, it’s important to note that many of the apps I just mentioned here can also be used on macOS.
4) Transferring the File from macOS To Your iOS Device
![Transferring macOS to iPad/iOS - How To Slow Down/Speed Up A Song in GarageBand iOS [EASY]](https://producersociety.com/wp-content/uploads/2022/07/Transferring-macOS-to-iPadiOS-How-To-Slow-DownSpeed-Up-A-Song-in-GarageBand-iOS-EASY-.jpg)
Because this article is about changing the speed using iOS software only, I won’t dive into an in-depth tutorial for each of these programs.
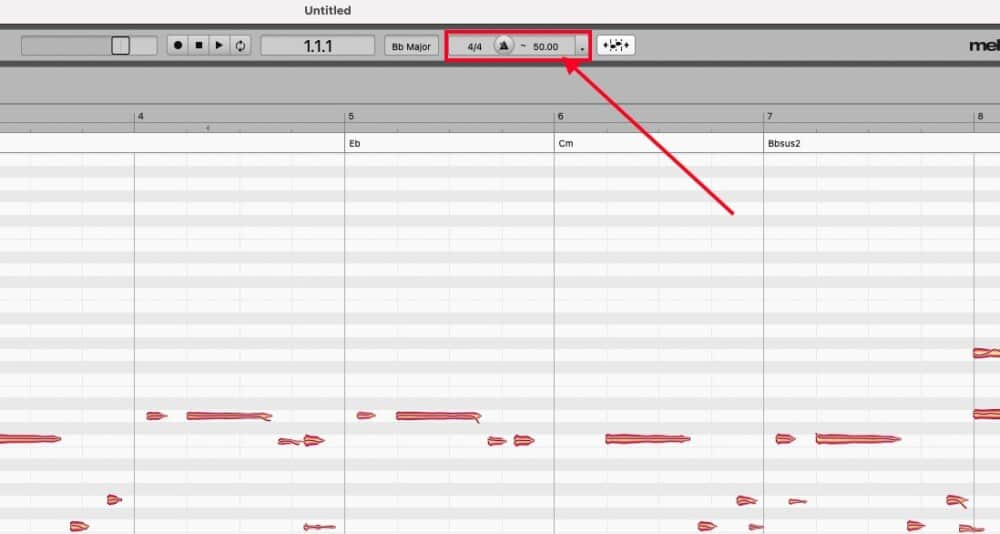
Just know that you can do a lot with each of these programs, although, Melodyne is undoubtedly the most capable. That’s also why it costs $$$$.
GarageBand macOS (App)

There are a couple of ways of speeding up or slowing down audio in GarageBand macOS, and when you include the third-party plugins you can get for it, there are even more.
The tempo track as is shown in the image above is one good way, however, it’s global and it’ll effect every track. The other way is to just change the BPM in the center of the console as well.
Audio Mass (Web App)
![Audio Mass - Change Speed - How to Slow Down/Speed Up An Audio File in GarageBand iOS [EASY]](https://producersociety.com/wp-content/uploads/2022/07/Audio-Mass-Change-Speed-How-to-Slow-DownSpeed-Up-An-Audio-File-in-GarageBand-iOS-EASY.jpg)
Unfortunately, I wasn’t able to get Audio Mass to work on the iOS operating system. It works great on PC. Maybe there will be a day where Audio Mass works on mobile devices. As of now, it doesn’t.
Audacity (App)

As I’ve said before in my article comparing GarageBand and Audacity, the latter is more of an editing tool whereas GarageBand is a digital audio work station.
Over the years, Audacity has noticeably improved which probably has to do with the fact it’s open-source software as this user points out on my YouTube channel.
![YouTube Comment on Audacity - How to Speed Up/Slow Down An Audio File in GarageBand iOS [EASY]](https://producersociety.com/wp-content/uploads/2022/07/YouTube-Comment-on-Audacity-How-to-Speed-UpSlow-Down-An-Audio-File-in-GarageBand-iOS-EASY-.jpg)
The same rule applies with Audacity. You’ll probably want to use Change Tempo rather than Change Speed, as Change Tempo can increase/decrease the speed without messing with the pitch at all.
Melodyne 5 – Editor (Stand-Alone App)

I use Melodyne 5 – Editor at the moment, and I would say for certain that it’s the best way of adjusting the tempo and pitch of audio files.
It does so in a way that retains the quality while avoiding all of the usual worbiliness, pitch changes, and other problems you’ll run into when changing the tempo. Much can be done with Melodyne and I couldn’t recommend it enough, especially for vocals.
Similar Articles
Important Things to Note About Slowing Down Songs in GarageBand iOS
1) It’s Possible GarageBand iOS Will Have The Capability By Default With Future Updates
I once stated in my guide on GarageBand macOS vs iOS that the iOS and iPad versions are probably the future of GarageBand. And there’s no doubt that music production, in general, is about to become a lot more mobile. For one, Apple continuously releases sound packs and updates for iOS GarageBand.
They don’t release the same updates and sound packs for GarageBand macOS, although, their most recent update did include a swath of great instruments.
Simply put, I think that it won’t be long before GarageBand iOS/iPadOS will be able to do everything and more that the macOS version can do, so stay tuned.
Gear Mentioned
1) 2021 iPad Pro 11” 1TB
2) Melodyne 5 – Editor

 Written By :