In most cases, it’s as simple as just dragging and dropping the file into the interface. This isn’t always the case though, usually due to file incompatibilities and other issues. I’ll put it to you in simple terms first.
To import audio files in GarageBand
1) Open the Finder on your device
2) Find the file in your library and drag it onto a new or existing track. GarageBand supports AIFF, CAF, WAV, AAC, Apple Lossless, MP3, MP4, and MIDI.
3) Change the file extension to .wav if GarageBand won’t import it.
How to Import Your Own Audio Files in GarageBand macOS?
GarageBand supports a number of file formats, including the most common ones: AIFF, CAF, WAV, AAC, Apple Lossless, MP3, MP4, and MIDI. What people don’t know (including myself at one point), is that GarageBand supports MP4 which are video files.
You can use GarageBand as a basic audio editor for videos. While you can’t really edit the videos very well, you can add all kinds of music underneath them, which is convenient.
1) Drag and Drop The File from the Finder onto A New Or Existing Track
![Drag the File Into the Workspace - How to Import Audio Into GarageBand (iOSmacOS) [SIMPLE]](https://producersociety.com/wp-content/uploads/2022/05/Drag-the-File-Into-the-Workspace-How-to-Import-Audio-Into-GarageBand-iOSmacOS-SIMPLE.jpg)
And really it’s just as simple as this. Another way to import files into GarageBand is to use the keyboard shortcut, (Command + Shift + i), in order to bring up the Finder. From here, you can switch through your files and find the one you want to import. I have more keyboard shortcuts in my guide, by the way.
2) How to Import Files from iCloud
Another way to import files into your GarageBand project is to use the File > iCloud option. This just means that you’ll be taking the files from your iCloud drive instead of your local files.
This also means you’ll have to download them as local files first, and then import them into the library.
You can’t drag files into your project when your computer hasn’t processed them. So make sure you’ve clicked on it and downloaded it first, before you try.
Additionally, if you’re importing files from iOS GarageBand into the GarageBand macOS version, you’ll have to save the project as a new file first, and then open it.
Another thing I’ll say about this is that you get 3 different options when you want to use iCloud for importing files. You get 1) Open iCloud Song, 2) Import GarageBand for iOS Song, and 3) Import Music Memos File. I’ll show you what each of these does now.
A) File > iCloud > Import Music Memo > iCloud Drive
![iCloud > Import Music Memos File - How to Import Audio Into GarageBand (iOSmacOS) [SIMPLE]](https://producersociety.com/wp-content/uploads/2022/05/iCloud-Import-Music-Memos-File-How-to-Import-Audio-Into-GarageBand-iOSmacOS-SIMPLE.jpg)
If you want to open up your whole iCloud Drive, including other documents from other programs and software, then use the Import Music Memos option. This will show the whole directory to you, and then you’ll have the ability to choose whatever you want.
B) File > iCloud > Import GarageBand for iOS Song

As you may be able to guess, GarageBand for iOS means you’ll be taking GarageBand iOS files from your iCloud Drive, assuming you’ve set up your GarageBand iOS to use the iCloud Drive (which I have, for example).
There is an added step with this method, however, in the sense that not only do you have to download the file from the iCloud Drive as I said to your earlier, but you also have to open a new project.
Download the iCloud GarageBand project file > open it > give it a new name, and then save it. You can then open it to use your GarageBand iOS file in the macOS version instead. This is an incredibly useful tool that makes music production a lot simpler, in my opinion.
I find it’s really handy for when I want to quickly create or record an idea in GarageBand iOS, and then open it up in Garageband macOS later when I want to get a lot more serious about it.
On the other hand, you can also use this for sending a GarageBand macOS project to your iOS GarageBand project. Be careful with what kind of instruments and sounds you use though because GarageBand iOS can’t host all of them. For example, if you’ve used a Kontakt instrument, you’ll probably have to use an audio file of it instead.
C) File > iCloud > Open iCloud Song > GarageBand for macOS

The GarageBand for macOS file folder in iCloud Drive is for people who separate their iOS and macOS projects. Personally, I don’t do this, but I imagine there are some more organized people out there who do this kind of thing.
How to Import Audio Files to GarageBand iOS?
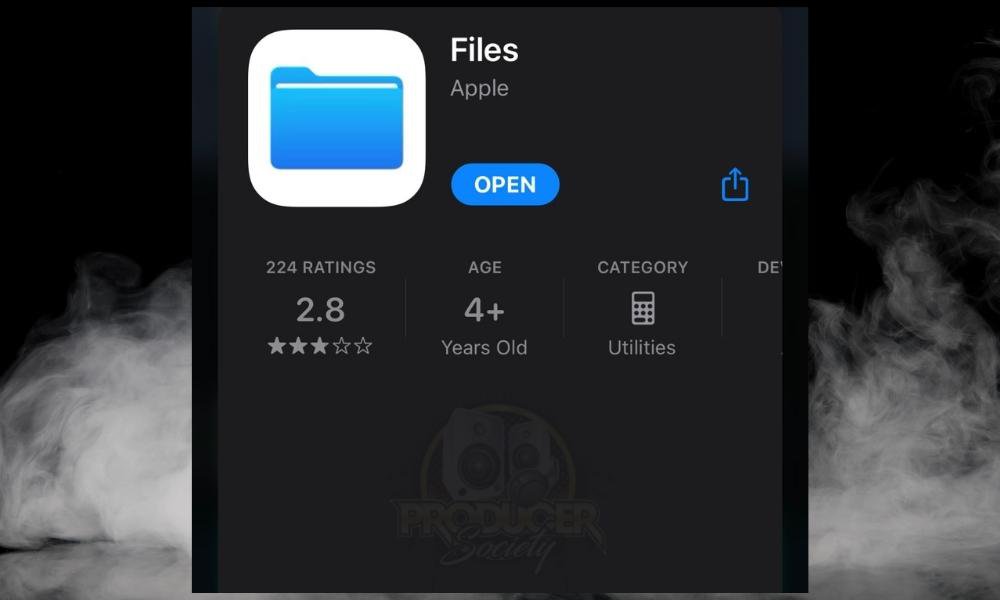
One thing I’ve discovered in recent weeks is that it’s wise to use the Files application which you can download from the App Store.
Without this handy little app, I feel like Files go to weird or unexpected places, and sometimes this makes them a bit of a challenge to find later.
1) How to Import Audio to GarageBand iOS From Your Files
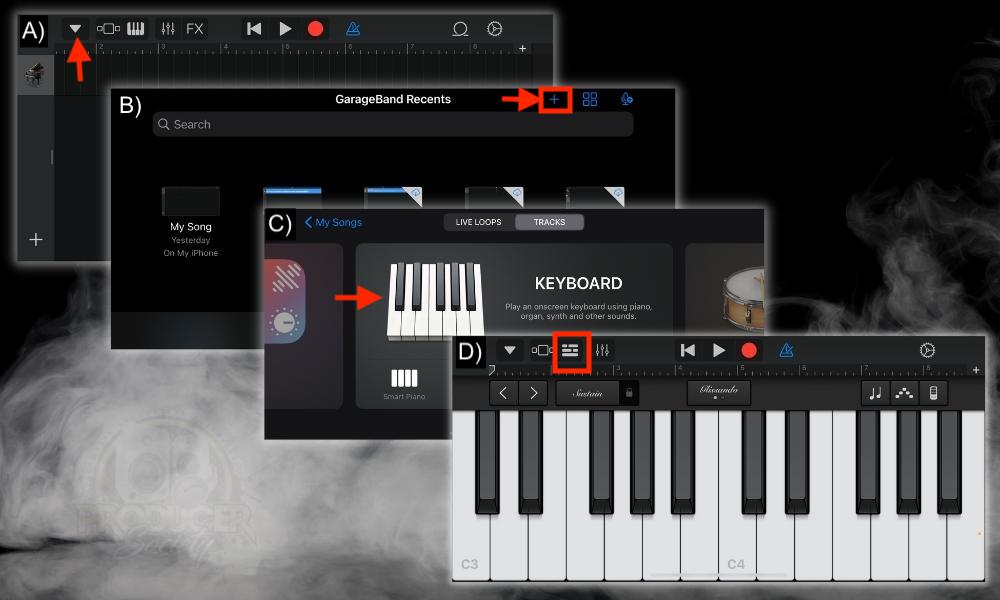
A) Click the Downward Arrow to Open Old Projects
B) Click the “+” Symbol to Open A New Project
C) Choose Keyboard
D) Then Click on the Stacked Bars
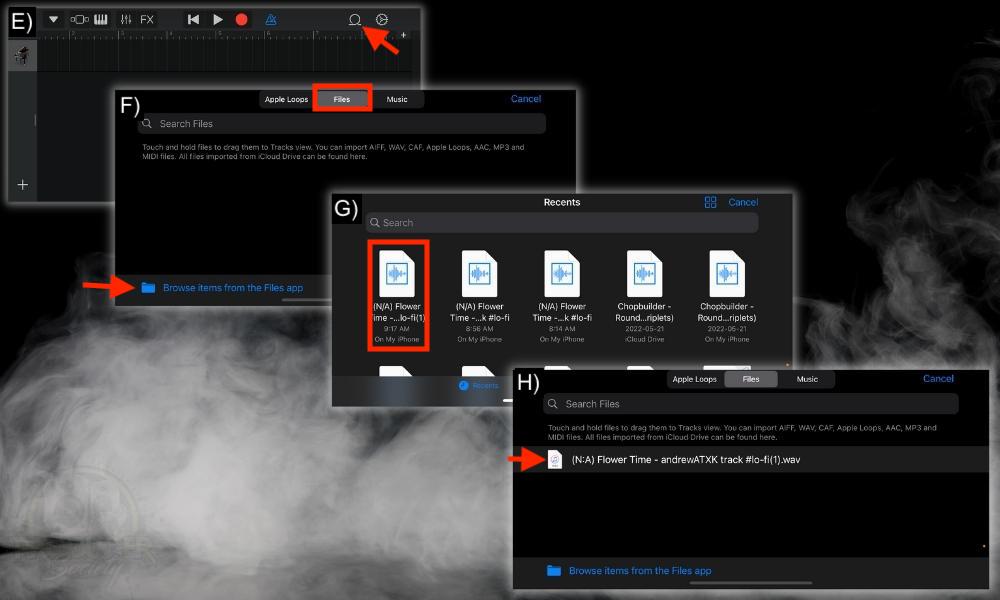
E) Click the Loop Icon
F) Select Files
G) Choose the File You Want to Import To Make It Accessible
H) Drag the File Into Your Workspace
2) How to Import Files Into GarageBand iOS From Your Email
A) Open The Email and Long Press on the File
B) Select “Save to Files”
You can also save it to your iCloud as well which will work just fine, but it’ll just take an extra step when it’s all said and done.
C) Choose GarageBand for iOS
D) Select GarageBand File Transfer and then Press “Save”
![GarageBand Project - How to Import Audio Into GarageBand (iOSmacOS) [SIMPLE]](https://producersociety.com/wp-content/uploads/2022/05/GarageBand-Project-How-to-Import-Audio-Into-GarageBand-iOSmacOS-SIMPLE.jpg)
If you’ve used the GarageBand File Transfer option, the file will automatically load into your GarageBand project files. This means when you open up your files by clicking on Loops > then Files, your new recording will be sitting there waiting for you.
3) Uploading Files to macOS iCloud for Importing in GarageBand iOS
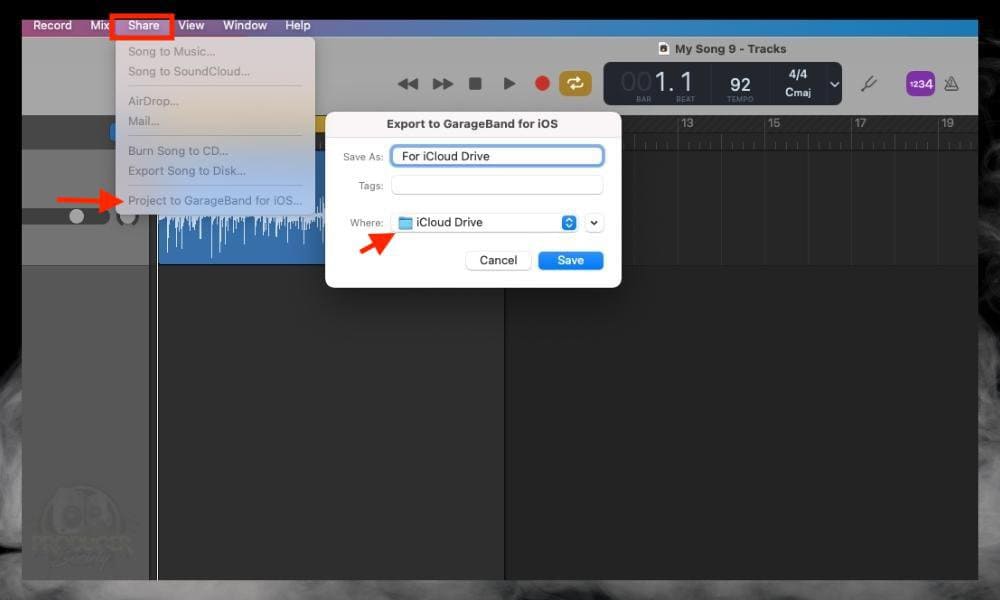
Click on Share > Project to GarageBand for iOS > Save to iCloud Drive. Open up your GarageBand iOS and find the file in the iCloud Drive section. It may take a second for it to load, depending on your internet. Additionally, you may have to restart GarageBand, if, for whatever reason, the file won’t load.
As I said earlier, it’s fairly easy to transfer files from your macOS to your iOS GarageBand. However, I find that because there are so many different file folders, iCloud and non-iCloud, macOS to iOS, etc, finding things can be inconvenient.
For instance, for whatever reason, whenever I upload to GarageBand for iOS in this way, it doesn’t actually send that file to the specific folder on my iOS device, “GarageBand for iOS.”
It just drops it into the regular iCloud Drive in an unorganized fashion. I’m sure there is a way to fix this, but I haven’t taken the time to do so yet, because this works fine for now.
4) How to Import Files From the Music App (Files Must Be Local)
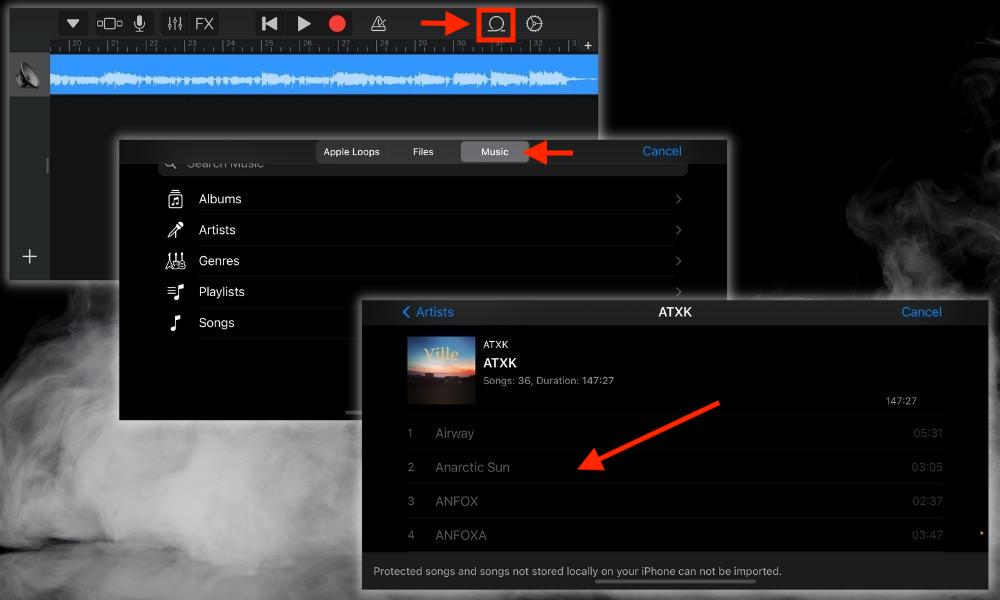
To import files from the Music App into your GarageBand iOS project, click on the Loops icon on the top-right of the interface. Select “Music,” then “Songs,” and then choose the song you want to import.
However, it’s important that you actually have a copy of the music file in your local files. In other words, you can’t import a song that’s only available by streaming. Apple has that written right underneath the song titles as well.
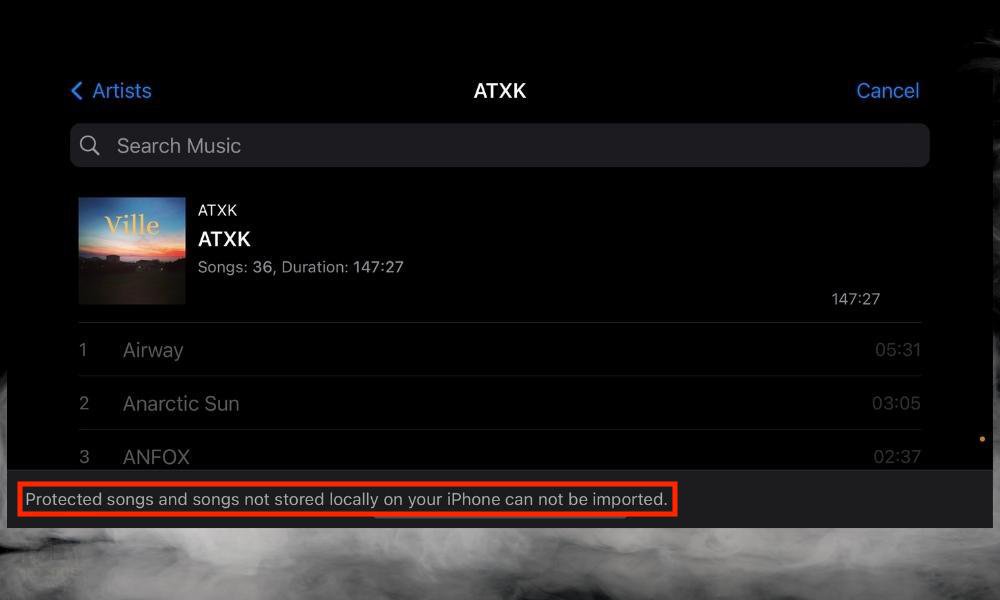
The next question you’ll probably ask is how do you actually import these unavailable Apple Music songs into your GarageBand project? And the answer is simple: you have to download them from Apple Music first, and then save them to your local files.
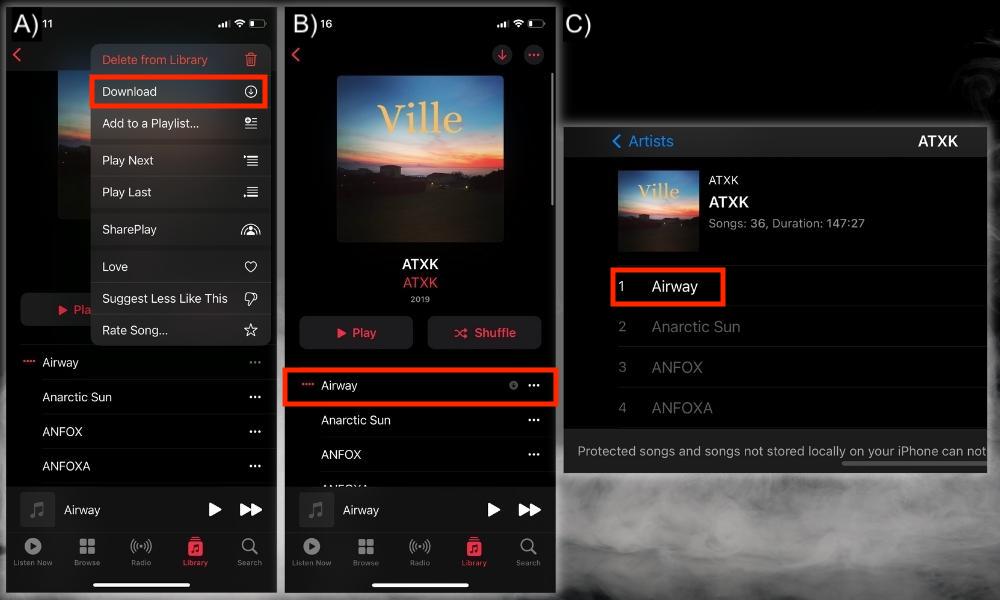
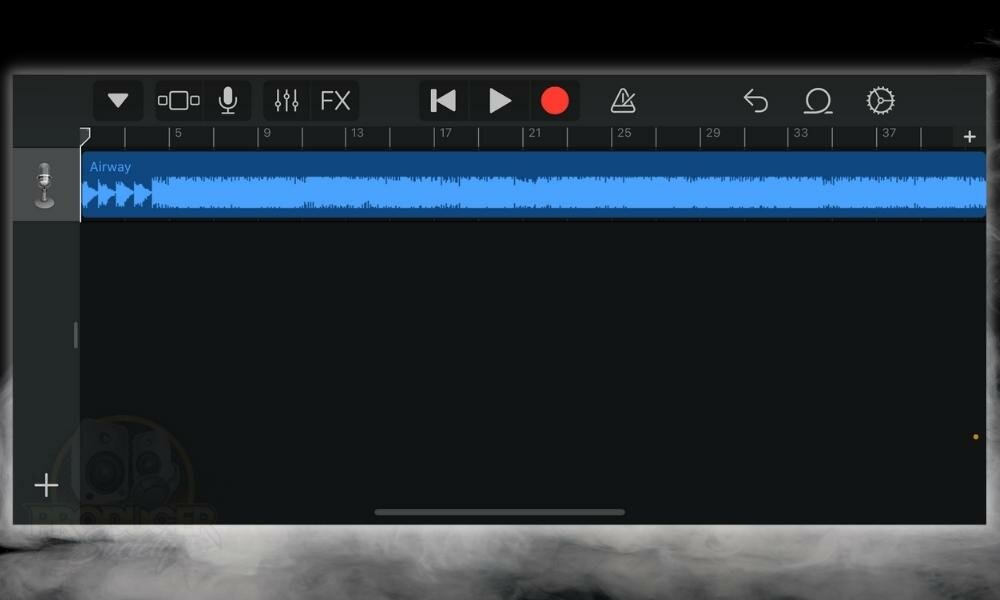
Another thing you can do, which applies to other platforms like Spotify (my guide on this), is screen record the song and then convert the video file into an MP3.
Using this method, you can take any song from your Apple Music and then import it into your GarageBand project. Make sure you own the copyright to the song though.
5) How to Import Voice Memos into GarageBand iOS
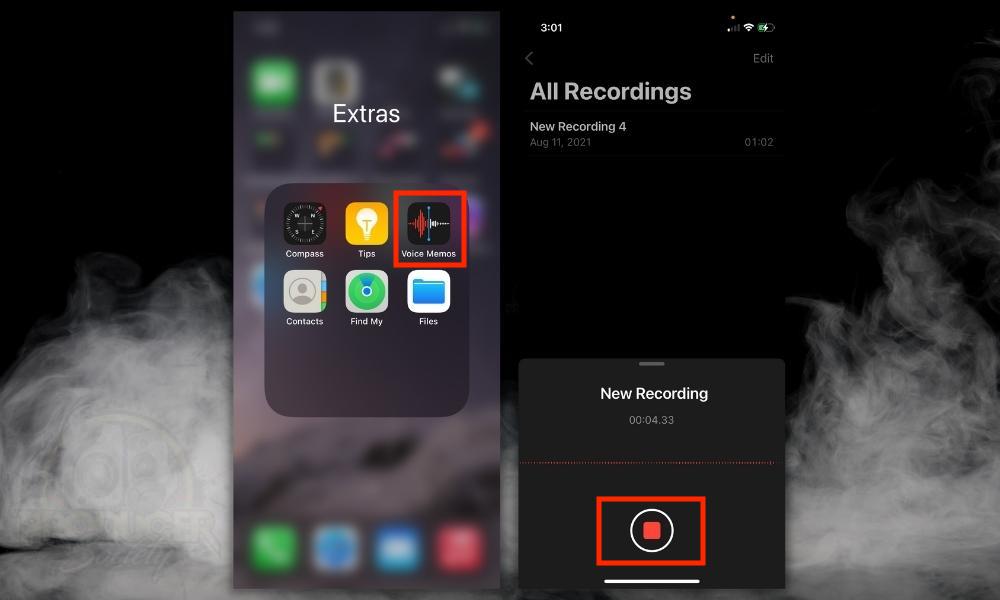
Using the voice memo feature is another great way to record audio and import it into your GarageBand project, particularly for GarageBand iOS because the feature is right there.
Voice memos are great for sampling too, for example, if you wanted to sample someone talking for your project. Here’s how to do it.

Why Can’t I Import MP3s Into GarageBand?

The reason you can’t import certain mp3 files into GarageBand is due to the codec used to compress them. Some mp3s are not standardized in terms of how they are compressed. As a result of this, they won’t import properly into the workspace which is usually indicated by the file refusing to turn blue while importing.
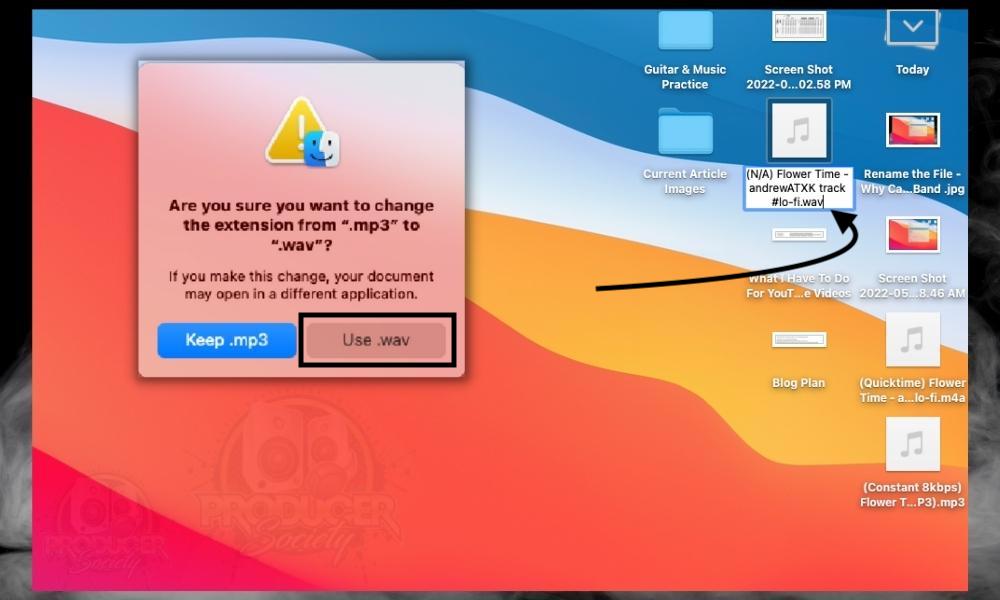
As I’ve already explained in my guide all about this, simply changing the file extension to .wav instead of .mp3 will usually fix the issue. If this doesn’t fix the problem, you can convert the file with Media Converter or File Converter (iOS), or you can use Online-Convert, Audacity, Quicktime Player, or even Melodyne (macOS).
One thing that’s important to mention here is that simply changing the file extension name will not work in GarageBand iOS, while it does work, however, in GarageBand macOS.
The reason for this is that changing the extension doesn’t actually convert the file into a new file. It just changes how the computer’s operating system deals with it.
How to Fix Greyed-Out Files in GarageBand iOS?
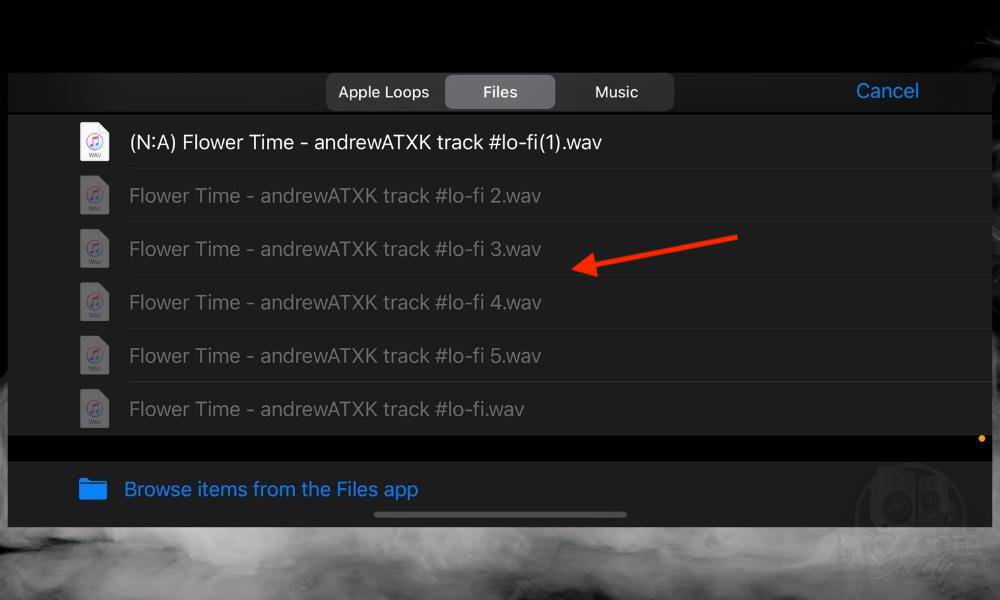
Another issue users commonly run into while trying to import files into GarageBand, particularly GarageBand iOs, is the “greyed-out” audio file problem.
This is happening, as I just explained, due to an incompatible mp3 or another audio file. I explained this issue in my other article as well.
Fixing the problem is just like I explained above (with the exception of the file extension solution), however, how we go about it will be different on account of the fact we’ll be using an iOs device instead of a macOS device.
To fix greyed-out files in Garageband iOS, convert the file with File Converter or Media Converter, which are both iOS applications available in the App Store. Convert the .mp3 file into a .wav file – which GarageBand will almost always accept – to avoid possible compatibility issues.
Important Things to Note About Importing Files in GarageBand (iOS/macOS)
1) GarageBand File Browser and iTunes (GarageBand File Sharing Area) Don’t Exist Anymore
As far as I know, iTunes can’t be used on the latest versions of the macOS and iOS operating systems. Additionally, I know that the latest version of GarageBand also no longer has the File Browser on the top-right of the interface. You can see that in this image here:

2) Apple Music Can Receive Music Files from GarageBand Easily But Not Export
One thing I’m sure you’ve noticed before when trying to import files into your GarageBand iOS project from the Files > Loops tab is that you can’t take music from Apple Music. Apple says this right on their page as well. Unless you already own the local file of that same song, you can’t import files from Apple Music.

 Written By :