 Written By :

Changing the tempo in Garageband is as easy as walking and chewing bubble gum.
Let’s do like DeFranco and just jump right into it.
To change the tempo in Garageband
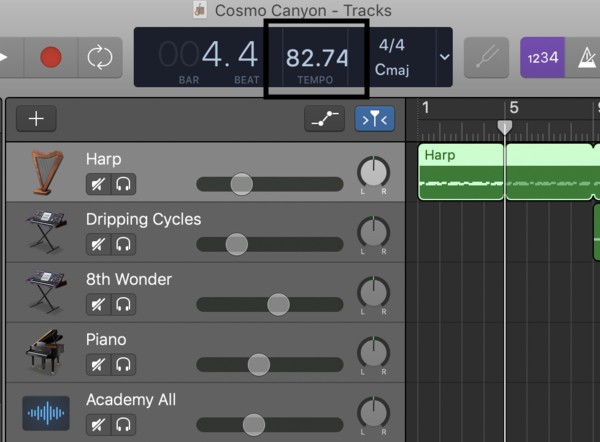
1) Click on the number in the Tempo Display which sits at the top-center of Garageband in between the Key Signature, Time Signature, and Beats Position display
2) Double-click on the Tempo number to highlight and then delete it
3) Type in the desired tempo.

Now, using this tool is helpful in a number of different ways, but for the moment, we’ll talk about another handy feature recently introduced into the Garageband user’s arsenal.
I believe in 2014 (although I could be wrong), Apple released the new tempo system where you can introduce different tempos at different times of the song.
That’s right, you can actually play a song at separate tempos in corresponding regions of your music, and if you have one of the newer iPad Pros like the one I recommend, there are even more things you can do.
In fact, you can change the tempo of your track as many times as you’d like or even in the middle of the song like I showed in my other guide. It doesn’t all have to be the same pace.
How To Change Only A Portion Of A Song’s Beats Per Minute
First things first.
1) Head into the Garageband settings where it says, “Track.”
2) Select, “Show Tempo Track” (or use the ‘Shift + Command + T’ shortcut)

3) Now, you’ll see that Garageband has shown the tempo track where you can adjust at which point precisely, the tempo will change.

4) Similar to the volume automation function, create automation dots wherever you want to begin.
5) Create one dot where you want the automation to begin. Click the other dot where you want the automation to end.

6) Now, drag and drop the line created to your desired tempo, and you can turn off the ‘Tempo Track.’
It functions a little bit different than the yellow Automation lines which I explored more in-depth in my automation tutorial, but it still works perfectly, nonetheless.
*Unfortunately, you can’t adjust the tempo by decimal places in the same way that you can with volume automation. Although, minuscule changes in tempo aren’t particularly useful anyway.
Tips and Tricks Involving Tempo Changes
The ‘Enable Flex’ button.
This button down below in the smart controls allows one to do a couple of different things.
1)To bring up the ‘Enable Flex’ option, double-click on your ‘MIDI Region’ within the DAW’s ‘Workspace.’
2) Then, click on the option, ‘Track,’ rather than ‘Region,’ and you’ll see right away three different options, ‘Pitch Correction,’ ‘Limit to Key,’ and ‘Enable Flex.’

The ‘Enable Flex’ function is useful for changing the tempo and key signature of an uploaded sample – or un-checking the box in case of the opposite, which we’ll explore right now.
How To Change The BPM of an Audio Recording
Firstly, you can change the BPM of an audio recording by hitting the “Enable Flex,” and then adjusting the BPM at the top centre of the DAW.
1) Click “Track” down in your smart controls.
2) Check the box “Enable Flex.”
3) Change the BPM at the top-center of the DAW.
You’ll notice that it’ll actually change the BPM of the audio recording now, rather than just adjusting the track’s position in the Workspace according to each beat and time signature.
*It’s worth noting that if you don’t want to change the audio recording at all, and just want to re-arrange the way in which the recording falls in time for the sake of synchronization, just don’t hit the ‘Enable Flex’ button. But we’ll explore that in the next section below.
How To Change The Song’s BPM Without Changing The Audio
From what I understand, it’s not actually possible to do this in Garageband without jumping through significant hoops. However, there is a way of doing it in a way that takes a bit of time.
You can’t adjust the beats-per-minute without changing the way the audio sounds in the DAW, unless, it’s an audio recording, rather than a MIDI file. However, through the use of Apple Loops, one can actually do this (more on what can be done with Apple Loops in my guide).
If you adjust the beats-per-minute then pretty much every sound in GarageBand will change unless you’ve used loops.
Let’s say, for example, you’ve just uploaded an Apple Loop in your Workspace.
If you want to adjust the tempo of your music, without touching the tempo of the Loop, it’s as simple as changing one of the settings in the Smart Controls.
Down in the Smart Controls, in the ‘Region’ section, there is a button that says, “Follow Tempo and Pitch.” If you haven’t checked the box, the Loop won’t change in accordance with Tempo and Key Signature adjustments
For a step-by-step process:
1)Highlight the Track and Go into the Smart Controls.
2) Click on ‘Region.’
3) Uncheck the box, “Follow Tempo and Pitch.”

This should allow you to change the rest of the song, without messing with the tempo and pitch of the Loop. Unfortunately, however, we can’t use this feature for MIDI or audio recordings.
How To Change The Tempo Of Just One Track
Due to the limitations of GarageBand as a software, there are some things we cannot do, but on the other hand, many we can. With that said, it’s still a great program for a beginner or intermediate music producers and musicians.
Fortunately, through trial-and-error, there are ways of making things possible with a little bit of innovation, initiative, or even just practice – on that note, PianoForAll, is one way to brush up on your MIDI keyboard skills.
While it’s technically “not possible” to change the tempo of just one track region in GarageBand, it actually is if we create Apple Loops.
It takes a little bit of work to make this happen, but it is possible. Basically, what you want to do is upload a MIDI region into Apple Loops, save it as a “One Shot” loop, rather than a “Loop.” And once the Loop has been added to the Loop Library , you can add it to an Audio Track Region in your DAW without worrying about pitch or key signature adjustments.
Without further ado, here is the step-by-step process:
1) Highlight the track of which you want to change tempo.
2) Now click “File” in Garageband’s Toolbar.
3) Click the button, “Add Region to Loop Library,” or, you can use the Keyboard Shortcut, “Control + Shift + o” (the lower-case letter not the number).”

4) It’ll bring up the options for adding loops to the library, and you want to click on the check-box that says, “One-Shot.” So now you’ve created your loop.

5) Make a new “Audio” track as you normally would: (I use the Shift + Command + A option because it’s a lot faster).
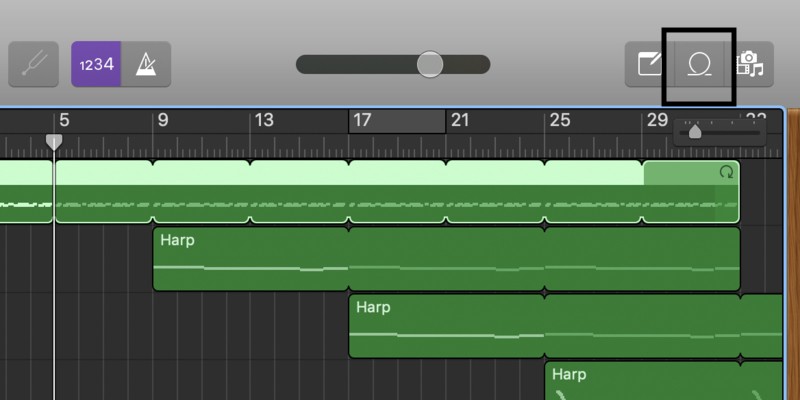
6) Go into your Loop Library now by clicking on the “Loop” icon that looks like a hose on the top-right-hand side of the DAW.
7) Find the loop you just created.

8) Now, drag and drop the loop into the Audio Track that you just created. *It’s important to note that you have to drag and drop the Loop into an Audio Track Region rather than a MIDI one.
9) And voila! Now you have a region of music in your DAW that won’t change whenever you adjust the tempo (beats-per-minute) or the key signature.
How To Change The Tempo By Just One Decimal Point
This is quite straightforward, but it’s a feature that not a lot of people are aware of. GarageBand users can actually adjust the tempo of the music by decimal points, rather than just whole numbers.
It’s intuitive. Just type in the number including the decimal places you want where you normally would in the BPM/Tempo part of the DAW.
How To Identify The Tempo Of A Song
As I explained in my editing guide, identifying the tempo of a song can be challenging as a beginner, but after a few tries, you should be able to figure it out.
Every person, or most of them anyway, has the ability to find the beat of music naturally.
For instance, when a person nods their head to the beat or dances to the music, one has to have a natural feel for the tempo and beats-per-minute to do so.
There are a number of different ways of determining the tempo, but for the sake of brevity, I’ll outline how I do it.
Essentially, what I do is I tap my finger on the desk along to the beat of the track, and then I begin typing in the number that I feel is the closest to the Tempo, then I turn on the metronome in GarageBand and make sure that it matches the music.
Usually, it takes more than one try, but I’ll continue typing numbers until it has matched completely.
If you don’t already own a metronome, I highly recommend getting one. They’re great for practicing as well as recording.
Even though Garageband comes with one built in, an authentic wooden metronome like this one is a lot better to use.
In my editing guide, I explained that you can tell that the song/sample/track is perfectly in time based on how the region lines up in the DAW. It works the same way as it does in more advanced DAWs.

In the image above, you can see that the sample doesn’t line. up perfectly because the tempo hasn’t been set correctly. *It’s important to note, however, that this won’t work if you have the option, “Follow Tempo and Pitch,” turned on.

As you can see, the tempo is set at 90 beats per minute, the correct BPM, so the sample lines up perfectly in the DAW.
What Is The Best Tempo For GarageBand
For obvious reasons, this is a question whose answer depends almost entirely on what kind of person you are and the style of music you’re into.
Because I’ve been making a lot of hip-hop/jazz/rock style tracks lately, I usually create songs between 90 and 120 beats per minute.
Some people choose 150 beats-per-minute. For reference, I’ve included a chart below to illustrate each BPM setting.
You’ll notice that the terminology is in Italian, which is normal for standard musical notation due to its origins in Italy and Germany.
| Term | English Meaning | Designated BPM (Beats-Per-Minute) |
|---|---|---|
| Largo | (Super slow) | 40 – 60 BPM |
| Larghetto | (Still extremely slow but not as much) | 60 – 66 BPM |
| Adagio | (Slow but slowly speeding up) | 66 – 76 BPM |
| Andante | (Moderate speed) | 76 – 108 BPM |
| Moderato | (Considered as moderate speed but it’s faster than Andante) | 108 – 120 BPM |
| Allegro | (Quite fast) | 120 – 168 BPM |
| Presto | (Very fast) | 168 – 200 BPM |
| Prestissimo | (Extremely Fast) | 200+ BPM |
As you can see from the tempo ranges I’ve laid out, each range has a specific quality, and it’s up to you to figure out what tempo you want.
However, a good rule of thumb is in between 90 and 120 beats per minute, although, truthfully, it doesn’t matter that much, because the tempo is just how fast the beats are counted.