In recent updates, Apple introduced Flex Time for GarageBand users which was a welcome addition. There was a time when only Logic Pro X users had it. This means you can slow or speed up the audio that you need in a fairly intuitive and convenient way. So how do you speed up your audio then?
To speed up audio in GarageBand
1) Open the Editor with ‘E’
2) Select “Enable Flex”
3) Go to the Tempo display
4) Increase the number to raise the tempo
5) Use (⇧ + ⌘ + T) to enable the Tempo track & raise the BPM with automation points
6) Use a new project, to speed up one track individually.
How to Speed Up Your Audio With the BPM in GarageBand
I’m going to show you at least 5 methods. I imagine there are other ways too, but I think 5 is enough for today. The first way will be how to change the tempo as a whole using what’s called the “Tempo display.”
The next way is with the tempo track. Then, I’ll show you how to speed up the BPM of an audio track (which I also have a separate guide on by the way), without affecting the others.
And finally, I’ll show you how to do it with Audacity and Melodyne 5. It’s a very similar process to what I showed in my article on how to slow down audio in GarageBand.
1) Bring Up the Audio Editor by Pressing ‘E’ on Your Keyboard
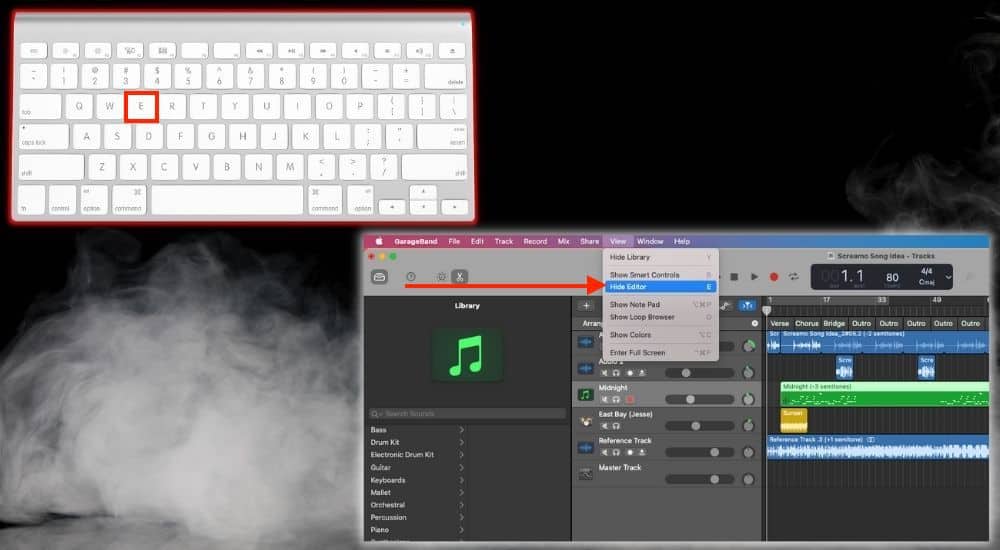
Like many other GarageBand features (my list of all the best), there are a number of ways of opening the Audio Editor. One method is just by doing what I mentioned earlier and hitting the ‘E’ key on your keyboard which I showed you how to do in my keyboard shortcuts article.
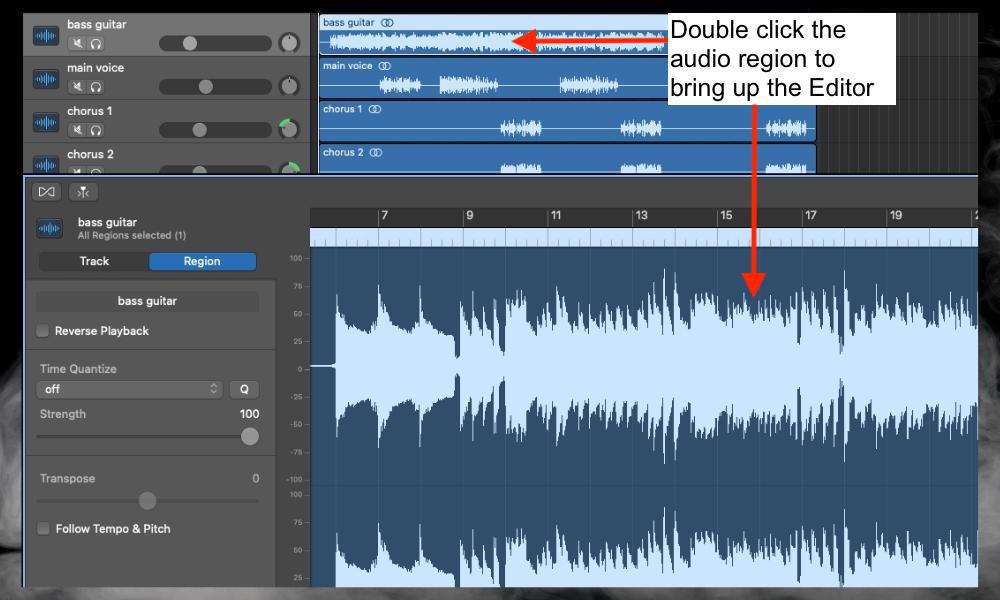
The other way is to double click on the Audio File and it’ll bring up the Editor automatically. The 2nd last way of bringing up the audio editor is to click on the Scissors icon on the left-hand side of the Tempo Display.
And finally, you can actually click the “View” icon in the top toolbar and then press the “Show Editor” button.
2) Click Track > Select the Box “Enable Flex”
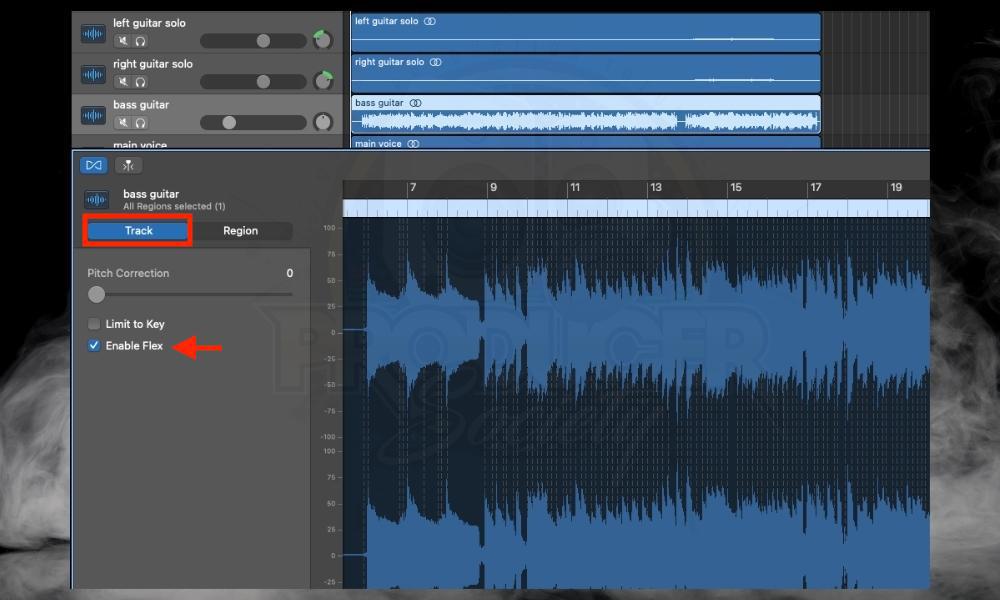
Ensure you “Enable Flex.” This is what’s going to allow you to make changes to your audio file.
3) Navigate to the Tempo Display
![Speed Up the Audio - How to Speed Up Audio in GarageBand [SIMPLE]](https://producersociety.com/wp-content/uploads/2022/05/BPM-191-How-to-Speed-Up-Audio-in-GarageBand-SIMPLE-.jpg)
Now go to the Tempo display and change the BPM. Obviously, you want to increase the number to raise the tempo and decrease it to lower it.
This will change the tempo of the whole project, which you might not want. I’ll show you an alternative to this in a minute.
What Happens If You Don’t Enable Flex Though?
One thing you should know is that if you don’t “Enable Flex,” you won’t create an adjustable audio file. Instead, a change in the Tempo display (the BPM) will just slow down or speed up the MIDI tracks while doing nothing to the audio tracks.
Now, if this is what you’re going for, then that’s perfect. But if you want to change the BPM of the audio files, the “Enable Flex” function is essential. Put another way, if the region is blue, you’ll need to Enable Flex to change the tempo of the file.
How to Speed Up Audio With the Tempo Track
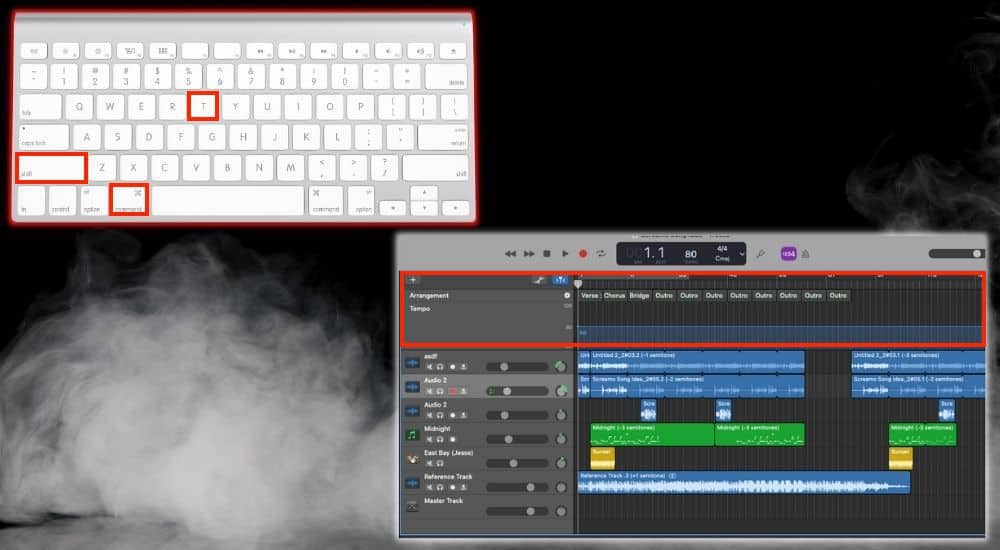
The Tempo track isn’t much different from the Tempo display. What separates the two is that the Tempo Track can be controlled with automation. As I showed you in my automation guide, you’ll have to use automation points which are pretty straightforward to set up.
You just have to drop them in areas where you want to make changes. That said, the Tempo Track and the Automation lines are actually different parameters.
The Automation points are indicated with a yellow line and yellow dots, whereas the Tempo Track is always blue. Anyway, I’m going to show you how to do it now.
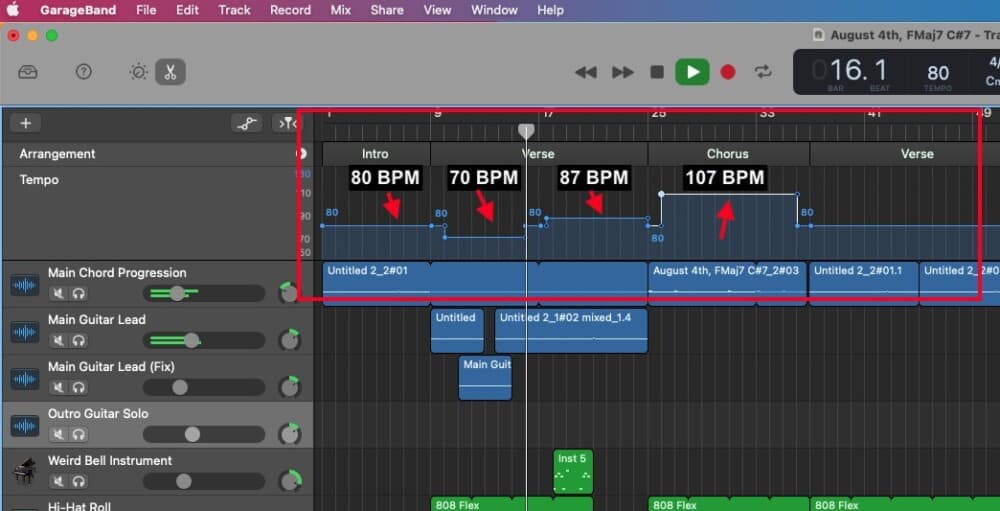
The unfortunate thing about the tempo track is that you can’t get quite as surgical as you’d like. It would be nice if they changed it so you could actually type in the time value.
1) Open the Tempo Track With (Shift + Command + T)
2) Drop Automation Points Wherever You Want to Make Changes

While you probably wouldn’t need to do such a thing, you can add as many points as you want. Feel free to speed up the tracks wherever and however often you’d like.
3) Pull Up On the Lines to Increase the Tempo
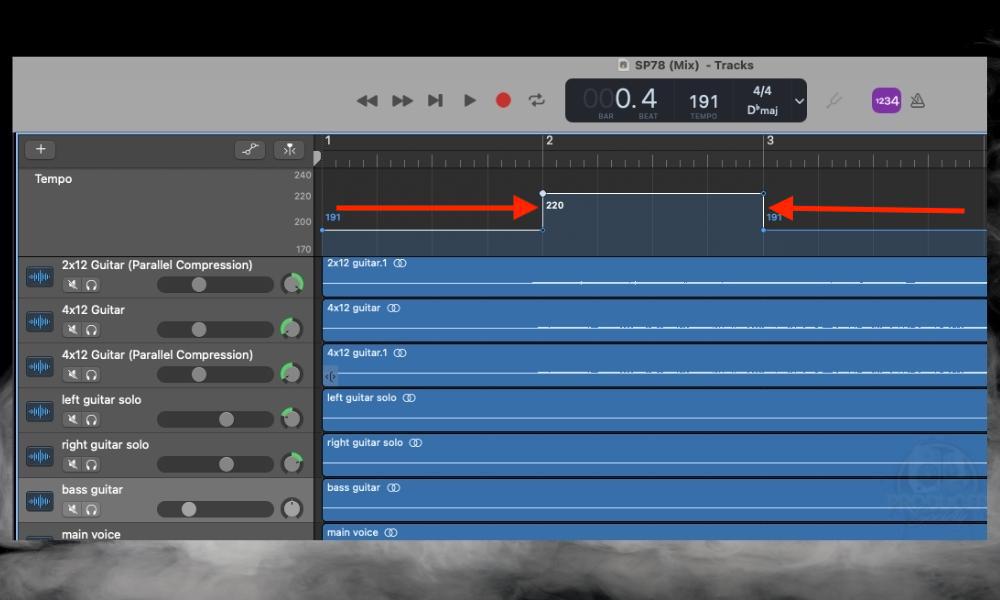
Once you’ve dropped your Tempo Track points down, you can pull up on the line to increase the tempo by however much you want.
4) Add An Additional Point To Make the Change Gradual
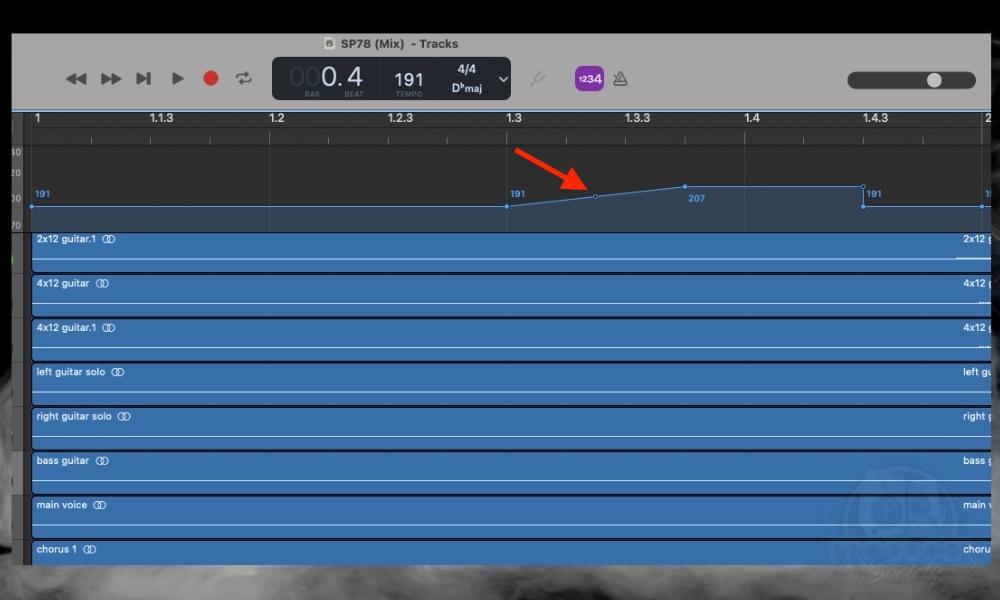
If I’m not mistaken, there was a time when you couldn’t adjust the tempo gradually like this. Now, the Tempo Track can work very fluidly in this way. Just drop another point in between the two points and then make it gradual and slow as you would with automation points.
In essence, this is how you speed up your GarageBand track with the Tempo Track, which is just automation for the Tempo display. The limitation to this method, however, is the same limitations as before – you can’t do it to tracks in isolation. Thankfully, there is a workaround though.

How to Speed Up Audio Of One Track Separately
To speed up one audio file in GarageBand, first, save your project, then ‘Solo’ the track. From the toolbar, select Share > Export Song to Disk > Desktop. Open a new GarageBand project and import the audio file. Increase the BPM to a higher value. Export it, then import it to the original project.
This is the long and short of how you get this done, however, I understand if you need a more in-depth tutorial. Let me take care of that for you now.
1) ‘Solo’ The Desired Audio Track
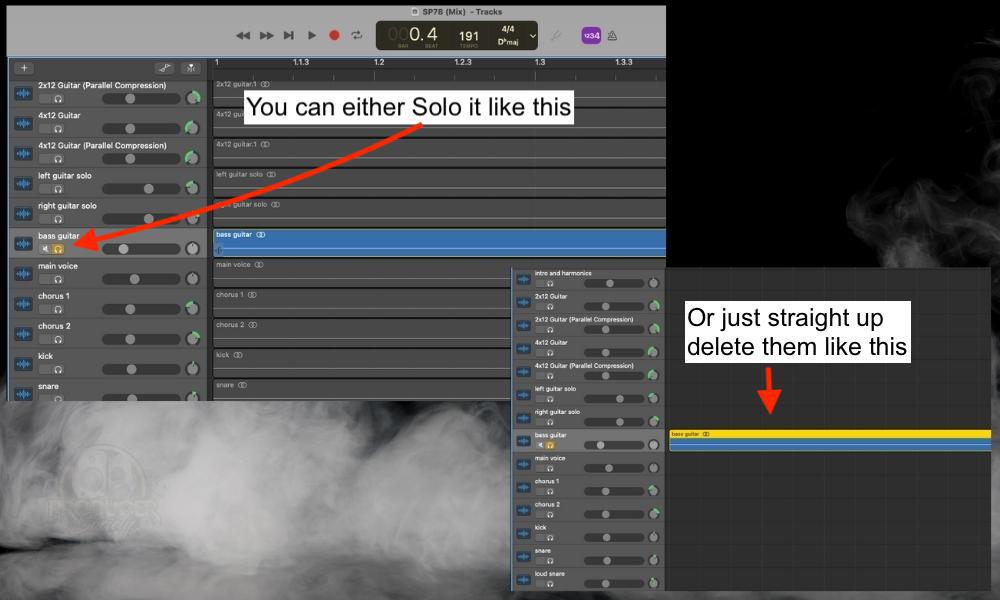
The first thing you want to do is actually “Solo” the audio track in question. In effect, you’ll mute every other track so you won’t include them in the exported file.
Another alternative to this, by the way, is to first save your project. Then, delete all of the other tracks and Export the track you want to change. This will make the export go a lot faster, assuming speed is an issue for you.
If speed is an issue, the brand new M1 chip MacBooks like this one on Amazon will be a solid choice. I know I need a new computer due to speed and latency issues, and iamamusicmogul’s YouTube video has me convinced I would benefit from a new one.
2) Go to the Toolbar and Click Share > Export Song To Disk > AIFF
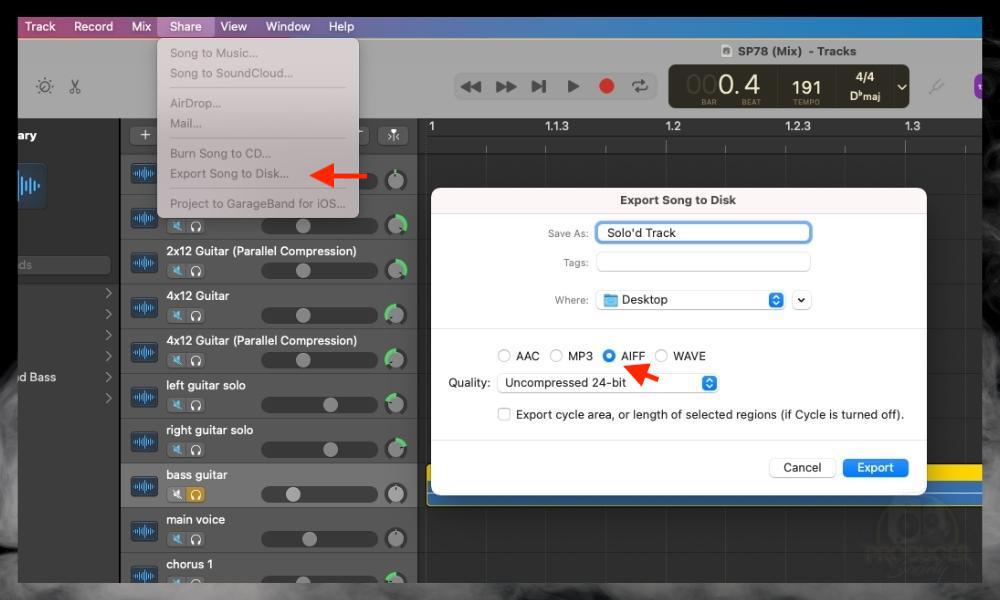
This part is self-explanatory. The one thing I will say is to make sure you use the AIFF file format because it’s the highest quality you can get.
3) Save the GarageBand Project > Close It > Open A New Project
4) Import the Audio Track into GarageBand
5) Select “Enable Flex”
6) Increase the BPM in the Tempo Display or Use the Tempo track
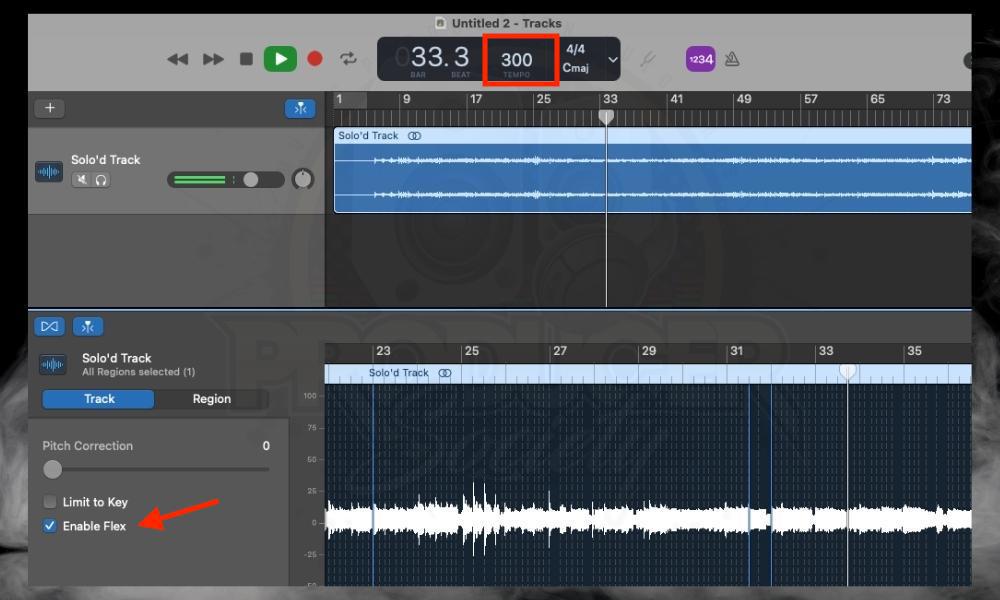
7) Click “Share” > Export Song to Disk > Desktop
8) Open The Original GarageBand Project And Import Your New Sped-Up Audio File
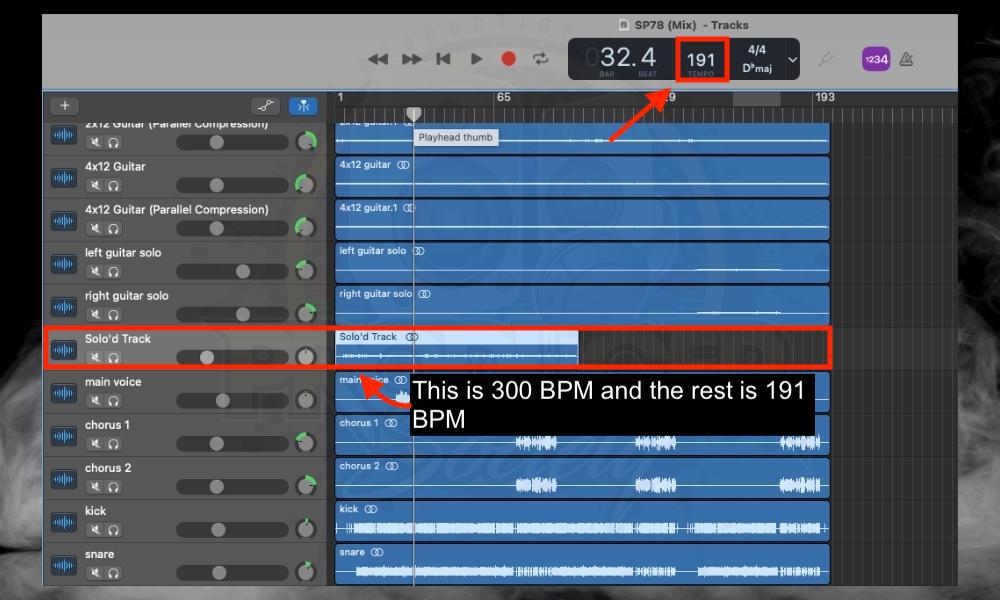
Once you’ve finished importing the audio file, you’ll recognize that it has now been sped up. That’s the reason why the bass track is much shorter now than all of the other tracks.
Anyway, now that I’ve effectively shown you how to speed up your audio tracks in GarageBand, I think we’re ready to move on to the other methods.
How to Use Audacity to Speed Up Your Audio
As I’ve said in a few articles now, including in my article comparing and contrasting Audacity and GarageBand, Audacity is a tool for manipulating pre-existing audio files, compared to GarageBand which is a workstation designed to create music from scratch rather than just edit it.
As a result of its open-source nature and its stock audio editing features, it’s a little bit better at speeding up and slowing files down. Moreover, you have a few options that are worth taking a look at.
Without further ado, let’s get into it, but first, download Audacity from the .dmg file on their website if you don’t own it already. Go through the installation step as you would with any other software. The first few steps are the same as earlier, so I won’t talk about them so much.
1) Export Your Track Either Solo’d Or On Its Own
2) Drag Your File Into Audacity After Opening It
3) Use (Command + A) Shortcut to Select the Audio
4) Select “Effect” From the Toolbar > “Change Tempo” (not “Change Speed”)

5) Change the Tempo With The Slider Bar
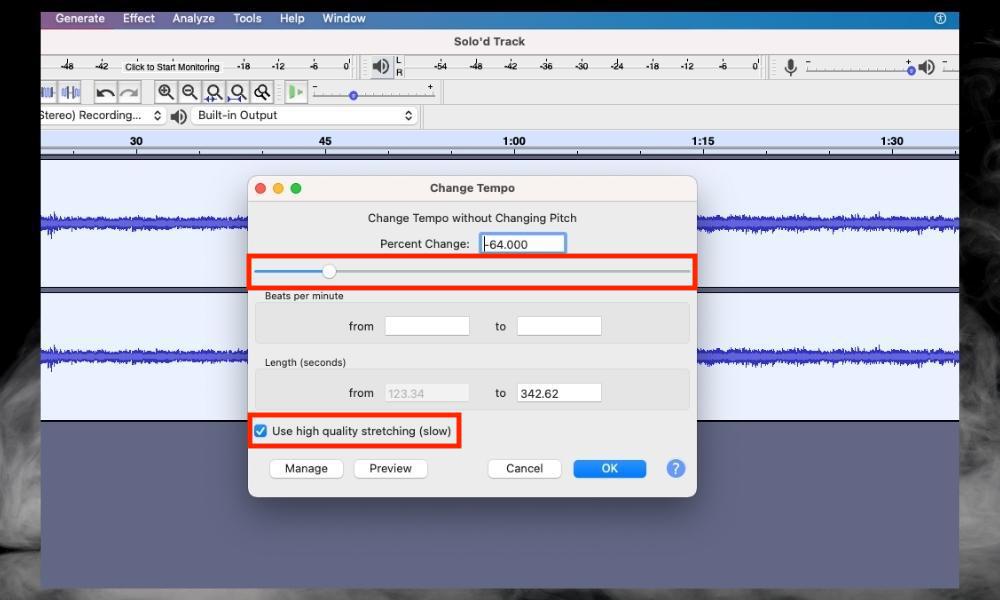
Drag the slider bar over to the right to increase the tempo of the track. Drag it to the left to decrease the tempo of the track.
6) Choose “High-Quality Stretching” > Select “Ok”
Once you’ve done that, you can choose “High-Quality stretching,” and while it does take a bit longer to process and export it, it’s ultimately much better to do it this way because it’ll sound a lot better.
Regarding the additional option, “Change Speed” instead of “Change Tempo,” the former does work for switching up the speed but the sound quality takes a hit for whatever reason.
Anyway, now that I’ve shown you a few ways of speeding up your audio with GarageBand and with Audacity, I’m going to show you the best way now which is with Celemony’s Melodyne.
Melodyne 5 seems to stretch or squeeze audio in a much better fashion, which makes sense, considering it does cost about as much as Logic Pro X does for the entire software and all of the instruments and plugins. Anyway, let’s get to it.
How to Use Melodyne 5 to Speed Up Your Audio
The first thing you need to do is get Melodyne 5 from Plugin Boutique, which is where I first got it from. I got it with installments, ie, the Basic version first, then the Assistant, and then the Editor version.
I haven’t gotten the Studio yet but I will someday soon. But I digress. Similar to GarageBand and Audacity, the first few steps involve soloing and exporting the track.

To speed up your audio with Melodyne 5
1) Solo the track
2) Export it to your desktop
3) Open the Stand-Alone version of Melodyne
4) Drag and drop the Audio file into Melodyne
5) Increase the Tempo with the Tempo Box number
6) Select “File” > “Export”
7) Drag the new file into GarageBand
Melodyne 5 is hands down the winner of editing audio compared to the software I’ve used thus far. Especially the stand-alone version although the plugin version is cool too. Unlike Audacity and GarageBand, I find you can change the audio in any way you want without it sounding choppy or weird.
How to Speed Up A Loop in GarageBand
Speeding up a loop isn’t terribly different than changing the tempo as a whole. To speed up a loop in GarageBand, first, solo the track. Then, check the “Enable Flex” box and adjust the BPM in the Tempo display. Export the song as an mp3, .wav, .aif, to your desktop, and then it’s ready for playback.
Important Things to Note About Speeding Up Audio in GarageBand
1) Logic Pro X and Other DAWs Have More Control Over Audio
As I said earlier, GarageBand is a nifty tool but a more advanced DAW such as Logic Pro X actually has the ability to manipulate the audio in a more advanced and specific fashion. In other words, if you find yourself regularly needing to manipulate the speed of your audio tracks, it may be time for you to upgrade.


 Written By :