To share GarageBand iOS and macOS project files
1) Open GarageBand
2) Move your project to your iCloud Drive
3) Long-press on the project > choose Share
4) Select “Project”
5) Select “Collaborate”
6) Press the Messages icon and send the project to the recipient’s iCloud address or phone number.
It doesn’t get a lot more complicated than that, however, it does get harder if neither party has iCloud. Older operating systems like iOS 14 and macOS Catalina were able to compress project files and then send them through iMessage (and possibly even SMS, although, I can’t say for certain). It appears Apple wants you to use iCloud because it’ll be far less simple if you don’t have it.
How to Share GarageBand Projects Using iMessage (iOS)
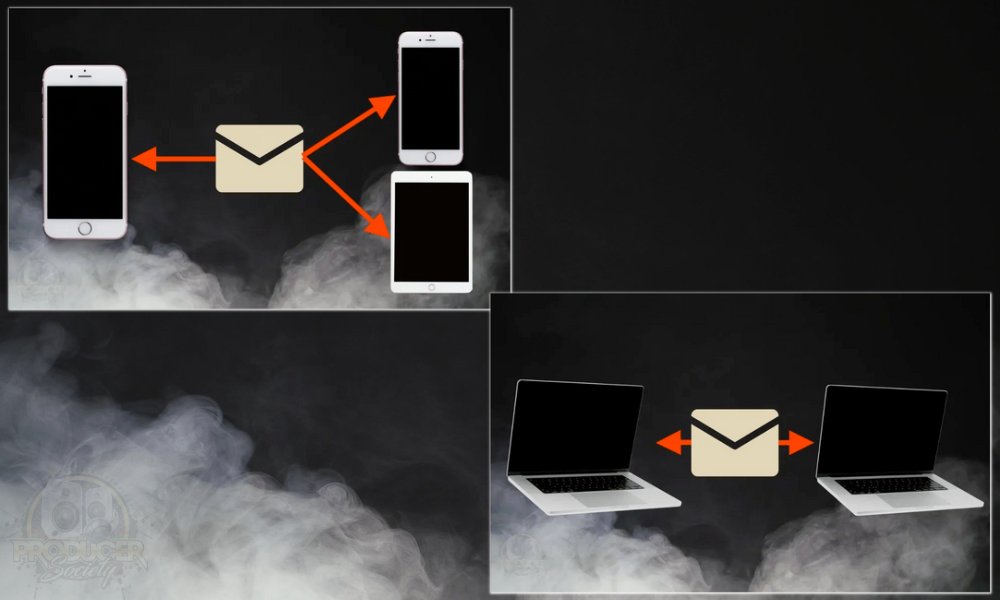
I started with this method first because I believe it’s the easiest to use. For me, it’s intuitive to have things set up in a way where you can share the file through messages. This is the main way I communicate with people in my life, so it makes sense for me to use iMessage.
First things first though, ensure both of you have iCloud. I talked about this at length in my guide on how to send GarageBand project files via iMessage.
It’ll also help if both of you have the latest version of GarageBand installed, or at least the exact same one. The images and steps that are laid out below are pretty much identical to my other article – check it out if you want to learn some of the other things I explained in that article that aren’t here. Anyway, let’s get into it.
1) Open GarageBand and Go To Your Recents Folder
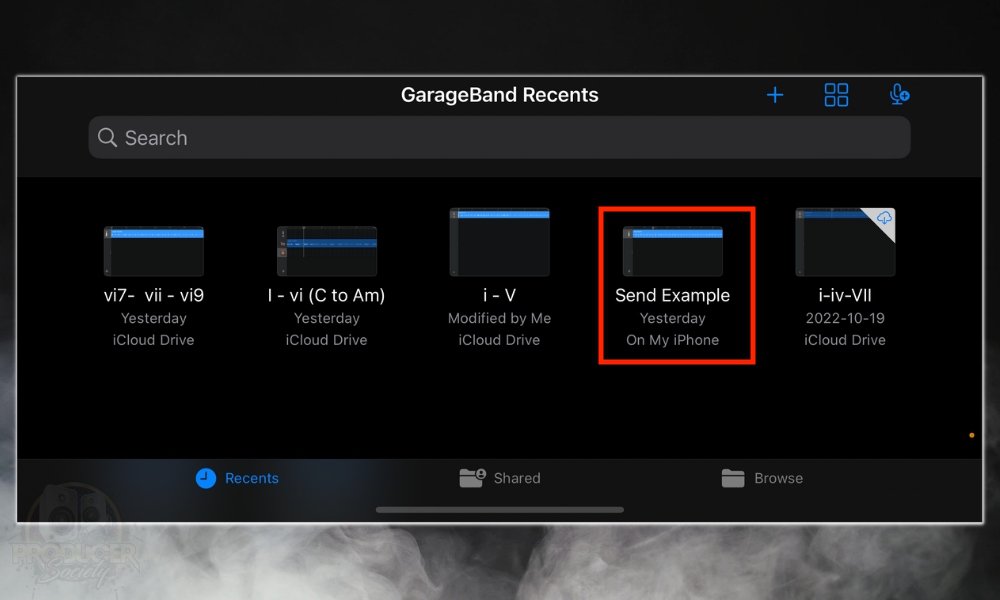
Whenever you open up GarageBand, it’ll usually take you straight to the interface where you can see all of your old projects. Assuming you don’t already have the file in your iCloud Drive, you will have to move it there for this to work. I’ll show you how to do that now.
2) Move The Project to iCloud Drive (Assuming It Isn’t Already There)
![2 - How to Send GarageBand Projects Through iMessage [iOS/macOS]](https://producersociety.com/wp-content/uploads/2022/11/2-How-to-Send-GarageBand-Projects-Through-iMessage-iOSmacOS.jpg)
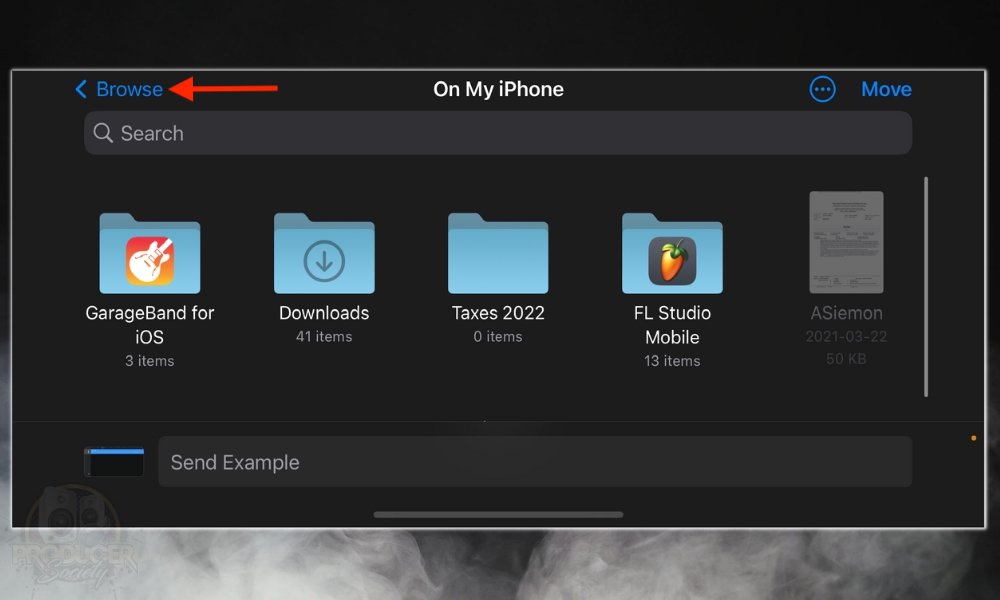
Alternatively, you could use the “GarageBand for iOS” folder to do the same thing, but I’ll show you how to do that later in this article.
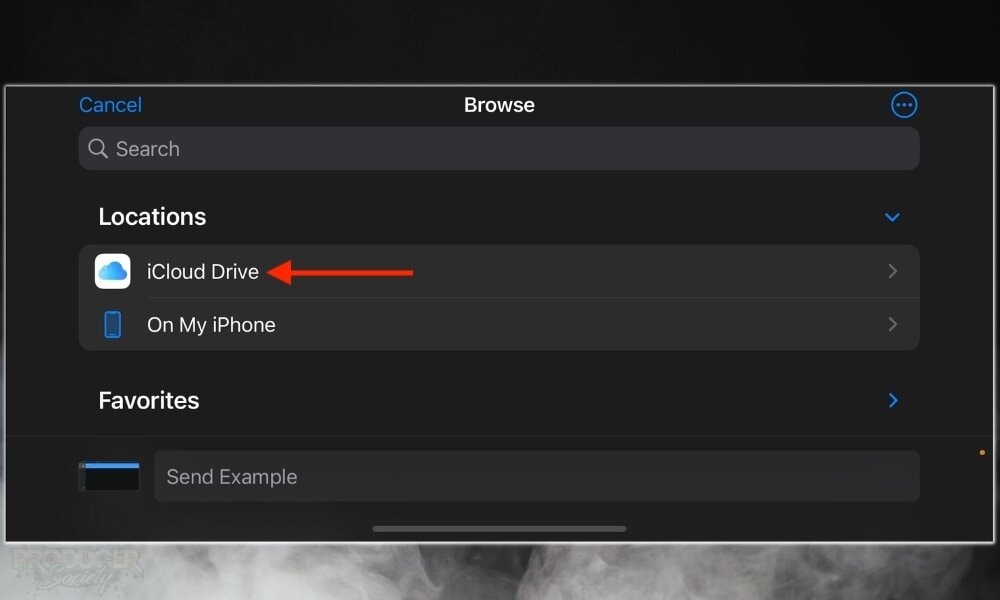
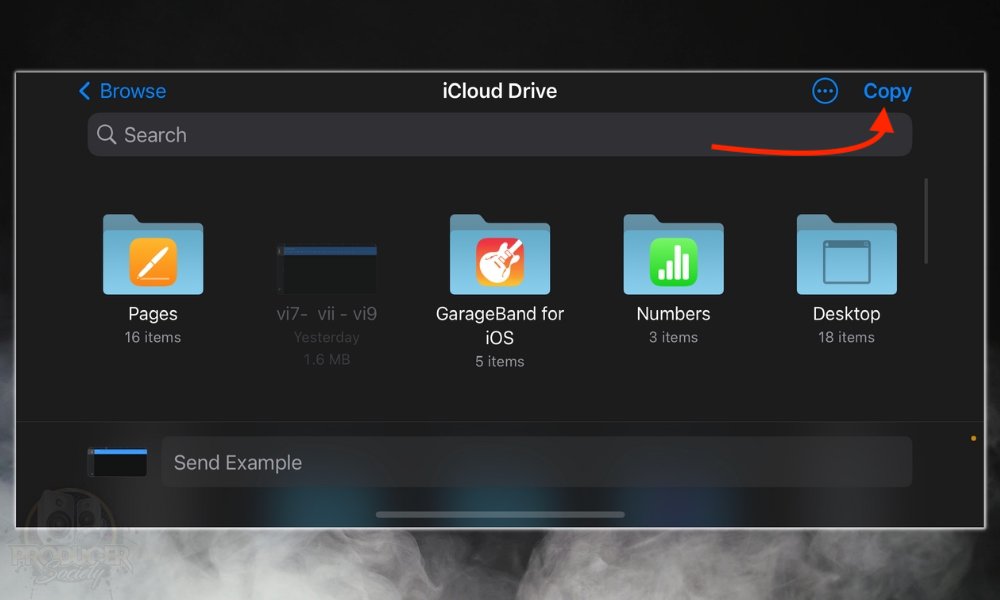
After you’ve put it there, you just have to long-press on it like what is shown down below.
3) While Inside the iCloud Drive > Long-Press the Project > Select “Share”
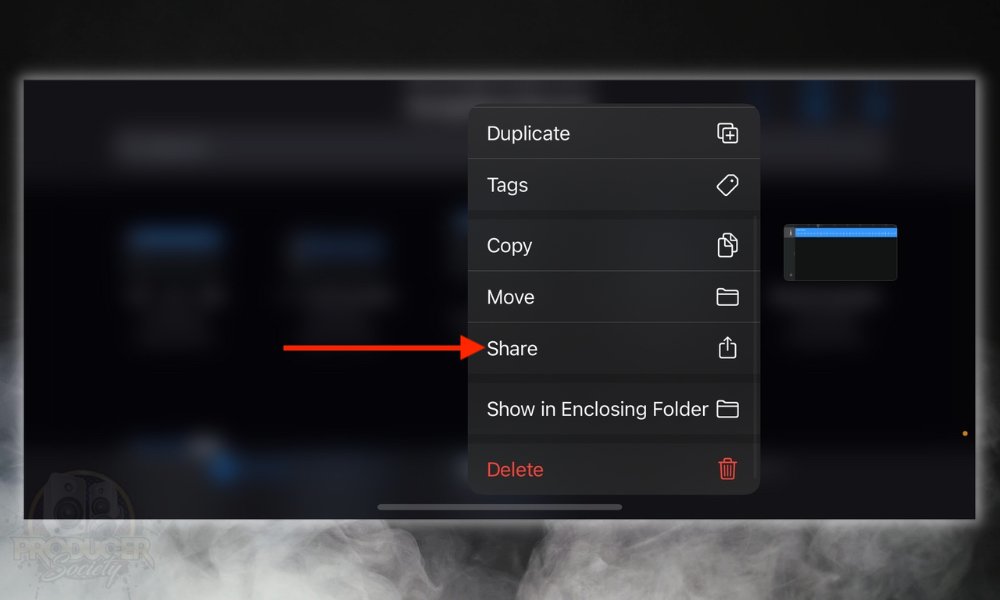
4) Press On “Project”
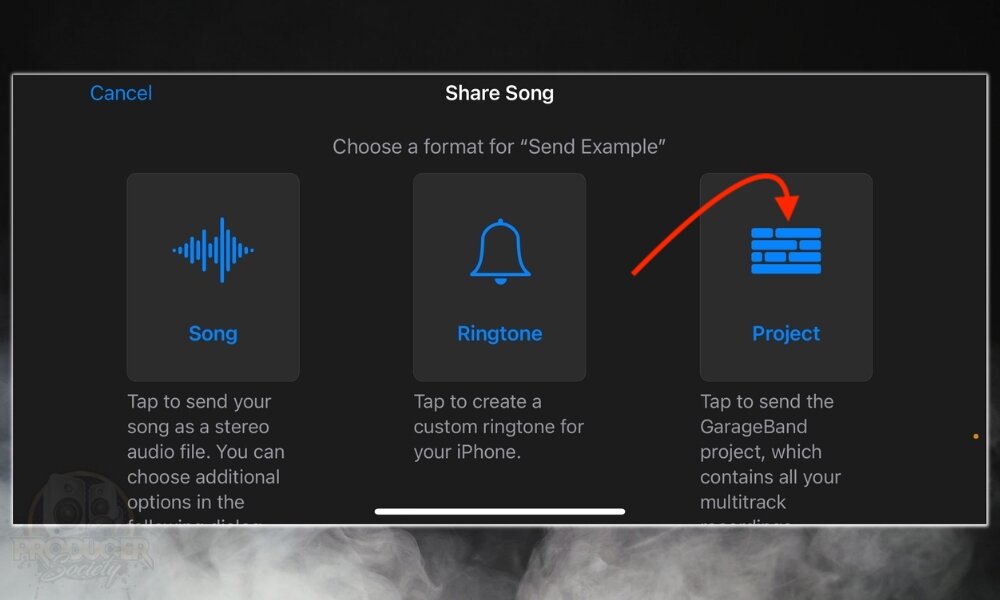
5) Choose “Collaborate” and Not “Send A Copy”
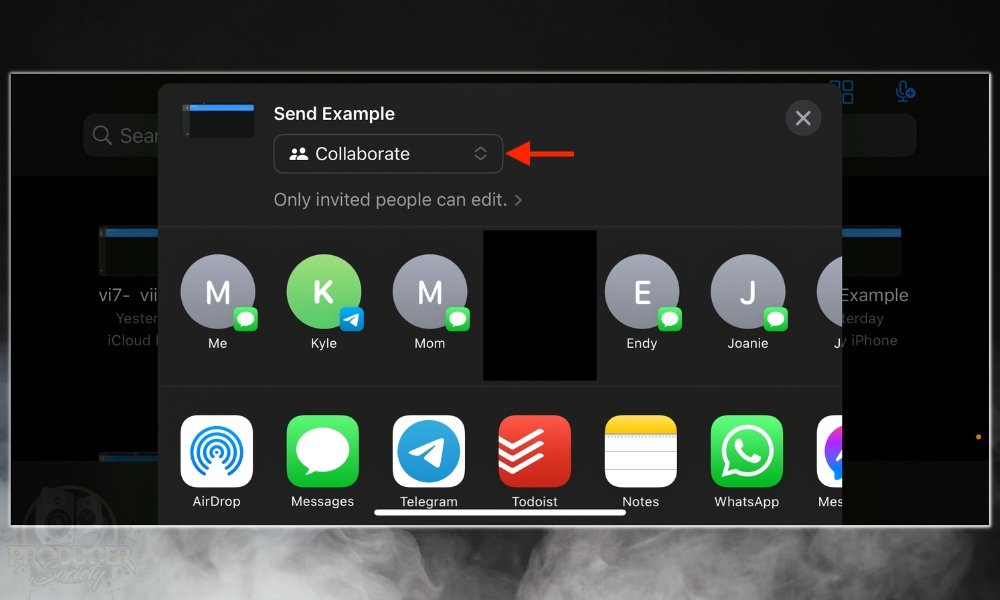
The reason why is that “Send A Copy” just doesn’t seem to work for me while using this tactic, however, it works fine for others which I’ll show you in a minute. I’m not sure why that’s the case, but it could be something I’m doing. Anyway, after you’ve chosen “Collaborate,” you want to select the Messages application.
6) Select the Messages Application
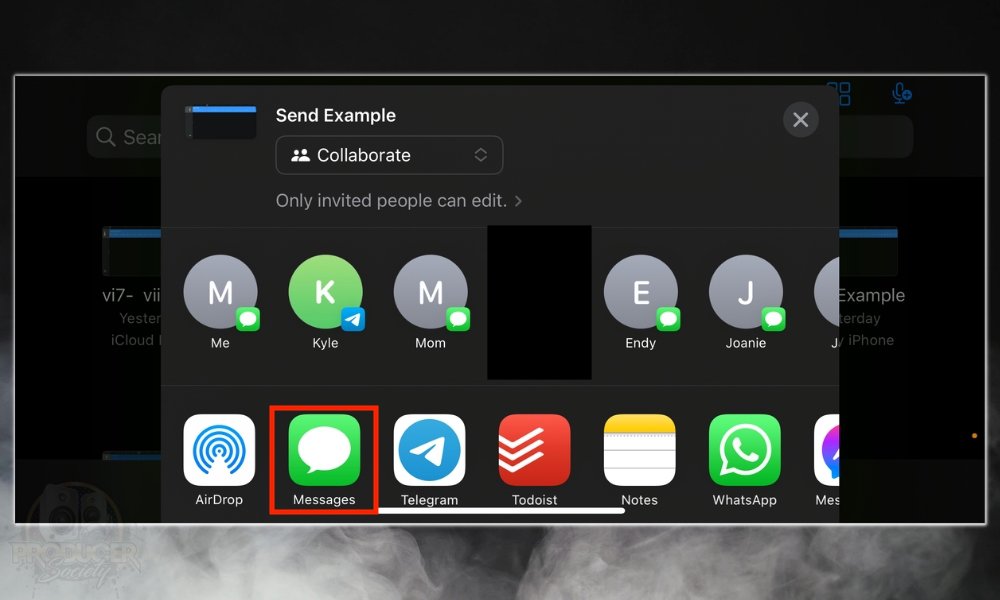
It’ll bring up your messages and then you’re almost done. Ask your buddy for their iCloud address because you’re going to need that or their number now. Having both on hand will help.
7) Type In The Recipient’s iCloud Address (or Phone Number) And Send the Project
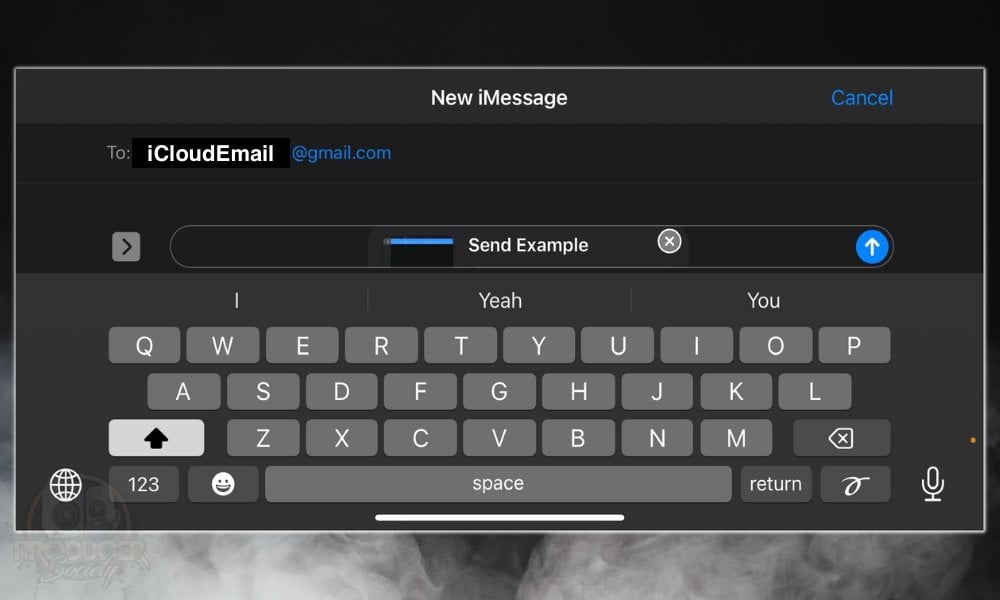
Type in the address and then click on the send button as you normally would send a message.
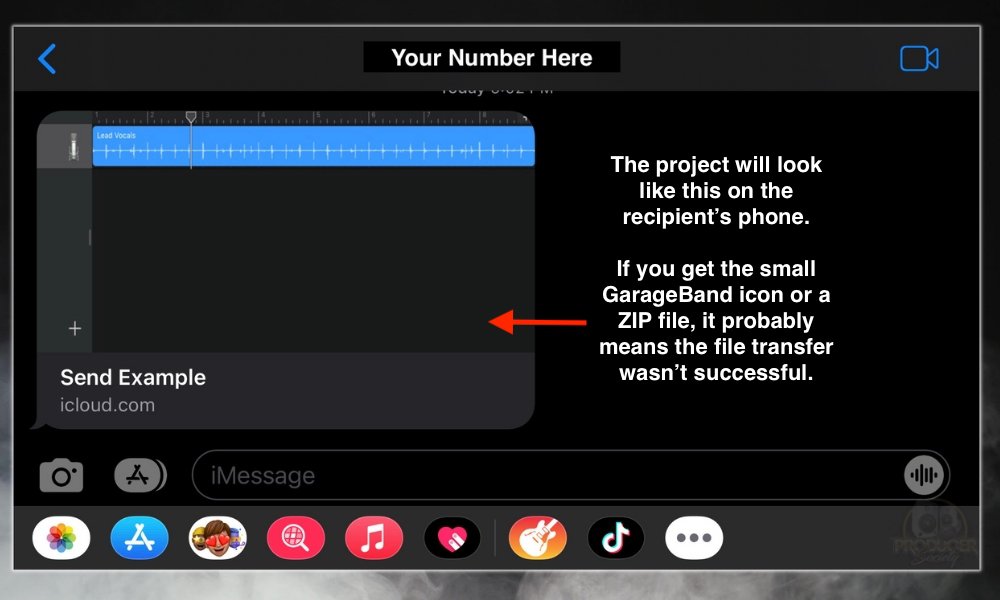
And that’s it for sending GarageBand projects through iMessage on an iPhone or iPad. While it may look just slightly different on an iPad, the principles are largely the same.
If you know how to do it for one, you know how to do it for the other. For macOS, it’s just a touch different. Let’s go through a tutorial on how to do that now.
How to Share GarageBand Projects Using iMessages (macOS)
![Messages Between macOS - How to Send GarageBand Projects Through iMessage [iOS/macOS]](https://producersociety.com/wp-content/uploads/2022/11/Messages-Between-macOS-How-to-Send-GarageBand-Projects-Through-iMessage-iOSmacOS.jpg)
I would say it’s easier to send and move files around with macOS compared to iOS. It could be because I use the macOS version as my primary DAW – and it’s how I also learned GarageBand – but either way, I still think it’s better (here’s my article comparing iOS and macOS GarageBand by the way). Let’s get into it then.
1) Select File > Save As > Desktop
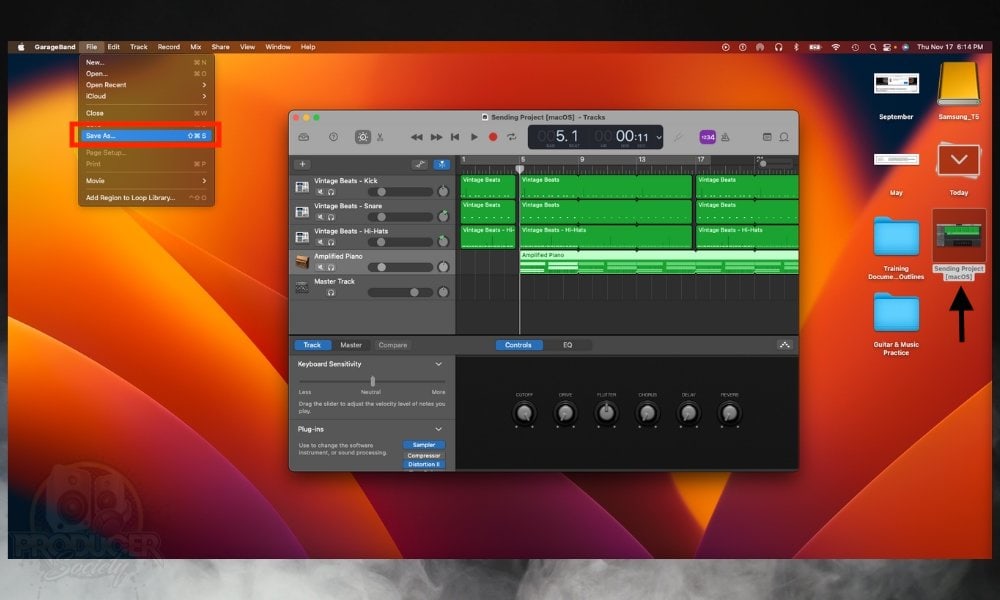
So the first thing you want to do is save your project to your desktop as shown in the image above. Click on “File,” then choose “Save As,” and save the project to “Desktop” or somewhere else easy to find. I always choose my desktop. Give it an easily recognizable name as well.
2) Close GarageBand then Right-Click the Project to Compress It
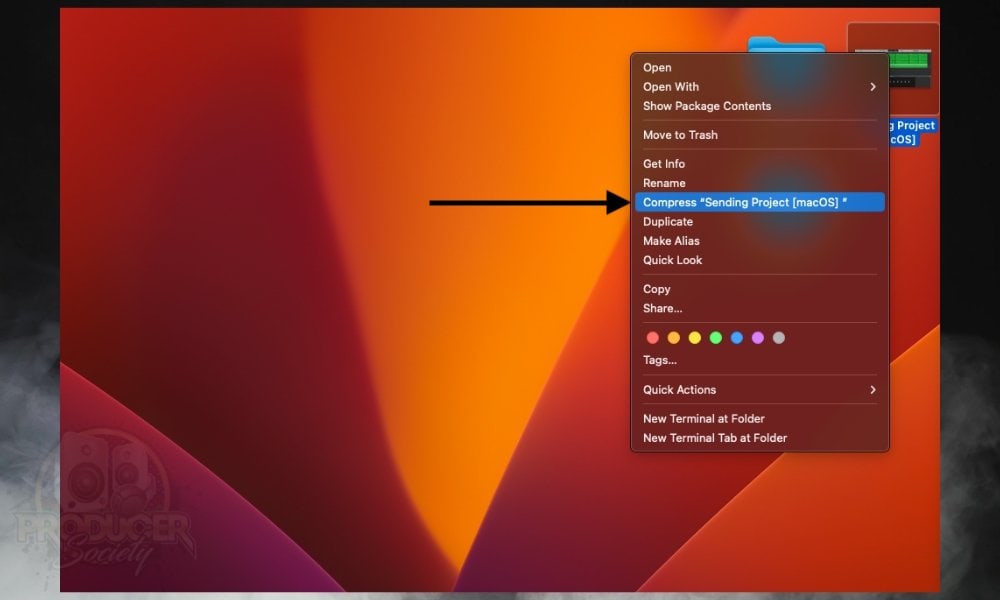
It’s important that you close GarageBand first, otherwise, you won’t be able to compress it as is shown here. Seriously, close GarageBand otherwise it won’t work.
3) Open Your Messaging App Then Type In Recipient’s iCloud Address [or Phone Number]
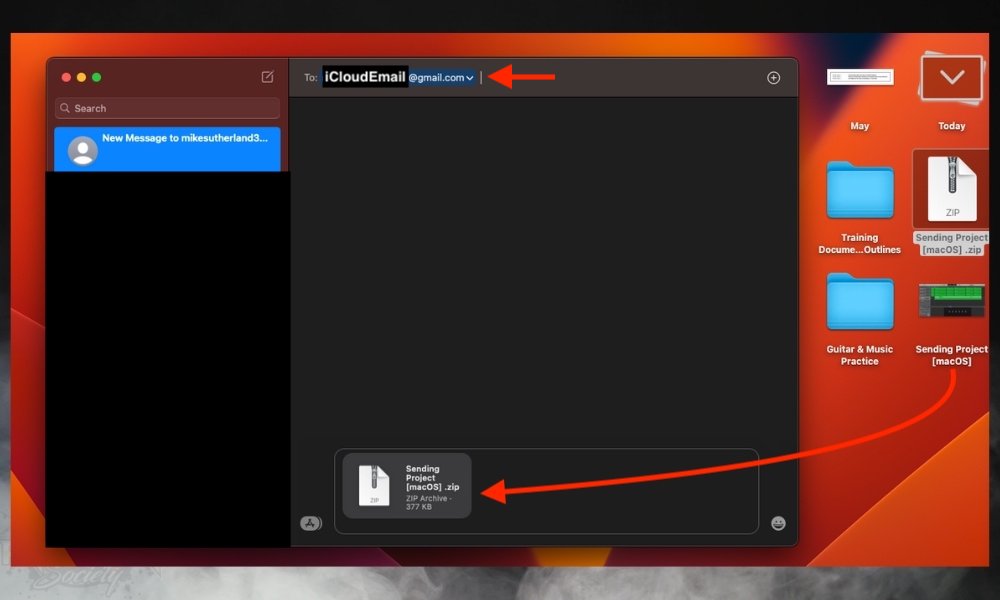
Open up your messages and type in the iCloud email address or phone number.
4) Drag the Compressed Project File Into The Message and Then Send It
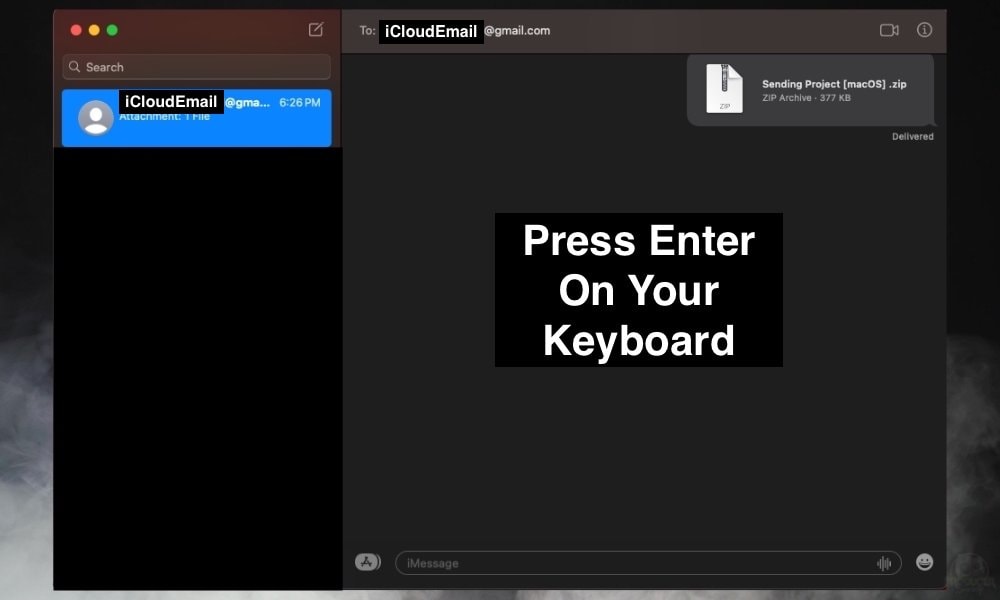
The project will send just fine. This works great for macOS users and I find it the easiest among all of the tactics, at least for macOS. Also, for whatever reason, I find sometimes the “Send” button on the SMS application will be invisible.
In these cases, use “Enter” on your keyboard. The next way to share projects is just by using an email/cloud service like Google Drive, DropBox, or OneDrive.
How to Email GarageBand Project Files (macOS/iOS)
Despite having already gone through how to do this in my guide on how to email GarageBand projects, I think it’s worth our time to do it once more here. If you need more detail on how to do it, go to the article or watch the YouTube video above.
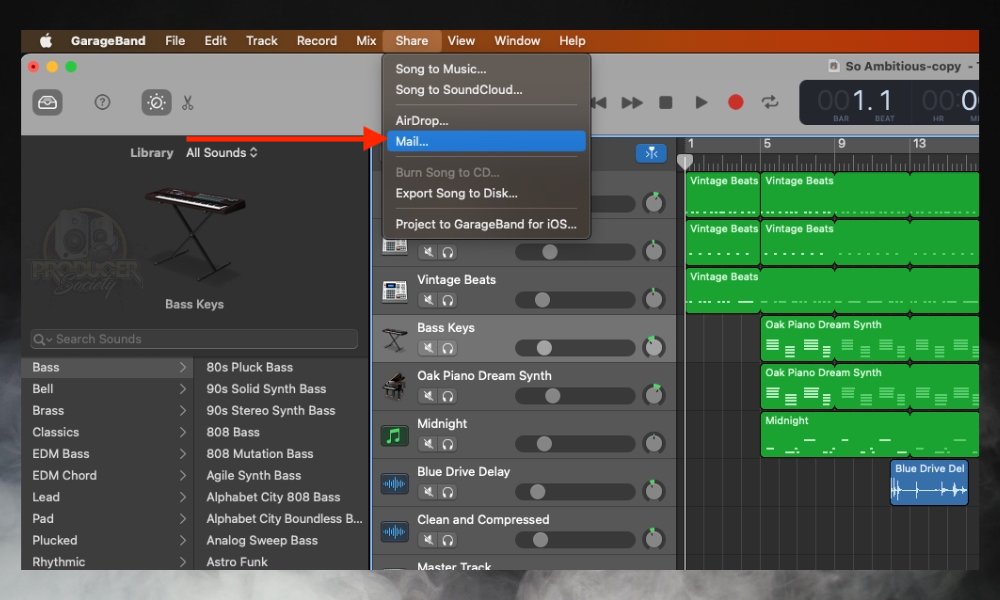
macOS
1) Open GarageBand > Press File > Then Save As
2) Choose Your Desktop
3) Close GarageBand
4) Right Click on the GarageBand Project and Compress It
5) Open Your Email and Drag The File Into the Email
6) Click Send
iOS
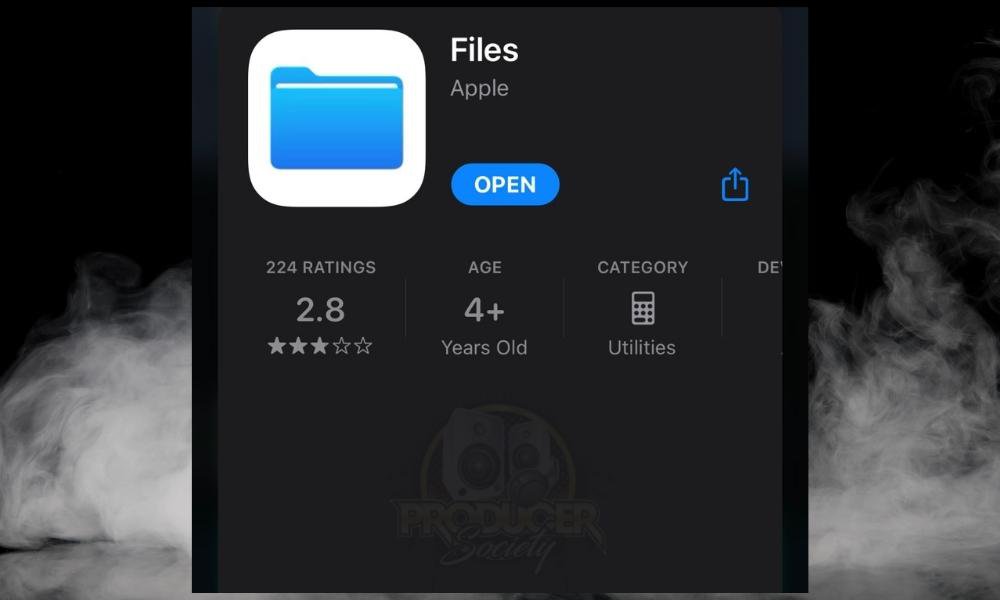
What makes sharing projects through email a bit more time-consuming on iOS is the fact you have to compress the file. To be more accurate, you don’t have to compress the file, but it will reduce the size and ultimately make sending and downloading the file a bit faster.
Nevertheless, to compress the file, you have to locate it in Files rather than in GarageBand Recents, because if you open it in GarageBand Recents, you won’t be able to compress it.
That’s why it’s not a terrible idea to use Files App when you first go hunting for the project. It’s because you can compress it and share it right there, effectively saving yourself about a minute or two.
Additionally, you can’t email project files when they’re stored in iCloud Drive but not on your phone’s local drive. That’s why you may have to either download the file from iCloud or move it to your Files Application and then locate it there.
Either way, you’ll have to go to your Files app anyway because you need compression. This tutorial pre-supposes that you don’t already have the project in your Files app.
1) Open GarageBand to Your Recents Folder
2) Long-Press the Project and Select “Share” from the Menu
3) Select “Save To Files”
4) Choose “Downloads” (Or Another Folder If You Want)
5) Go to the Files Folder and Open “Downloads”
6) Long-Press the Project to Compress It
7) Long-Press It Again And Click “Share”
8) Choose the Mail Icon and Then Send It to An Email Address
How to Share GarageBand Projects to Apple Music & SoundCloud (macOS)

Despite the fact GarageBand makes it so easy to send right from the interface, I prefer to actually do so manually for a couple of reasons.
One is that I like to listen to the file before I upload it, and the second is that I like to find artwork while I’m listening to the track. Either way, I don’t think this needs a dedicated tutorial because it’s mad easy. If you chose SoundCloud, you obviously need a SoundCloud first.
For Music, it’s just going to use your Music application on your computer – it won’t upload it to Apple Music which has to be done through a service like TuneCore or Distrokid (I use the latter).
1) With GarageBand Open, Click “Share” In the Top Toolbar
2) Choose “Song to Music” or “Song to SoundCloud”
3) Choose Your Song Title and Type In The Artist, Composer, Etc
How to Share to SoundCloud (iOS)

If you’ve read or used any of the methods I’ve shown thus far, some of this stuff will start to look familiar. If you’re trying to upload songs to SoundCloud from GarageBand iOS, you’re in luck, because the iOS operating system has made it fairly slick.
You don’t even need to download the song from your iCloud Drive before uploading it. interestingly, SoundCloud (or maybe it’s GarageBand) will also upload the file at a relatively competitive volume.
One thing you need to know first though is your username and password because GarageBand needs SoundCloud’s permission to upload. Additionally, you’ll have to upload an image afterward because GarageBand automatically uploads an image of its icon as the song’s display picture.
1) Open GarageBand and Locate Your Project
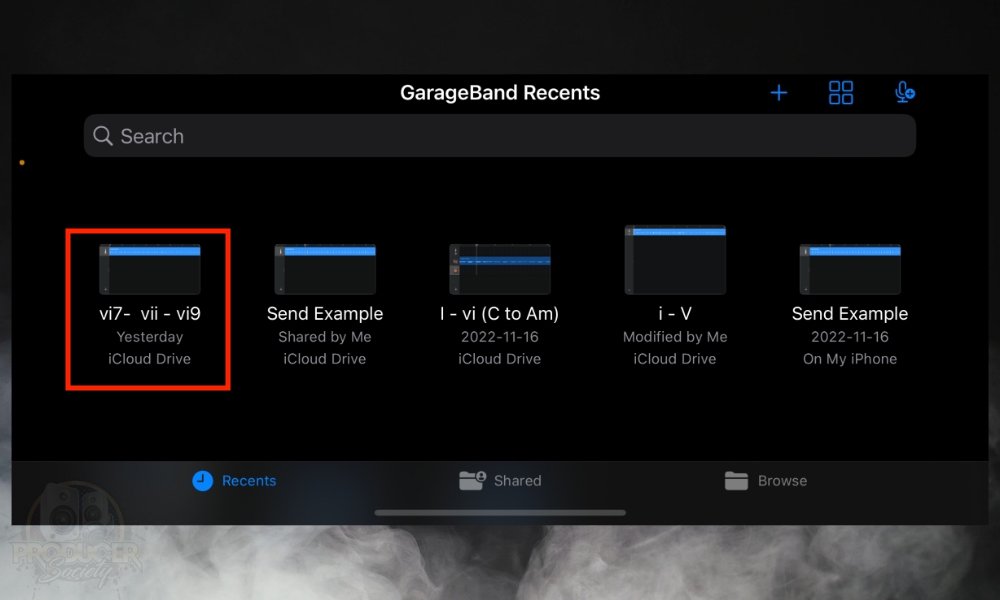
2) Long-Press the Project File and Select Share (iCloud Drive or In Your Local Drive)

3) Choose Song and Then “Uncompressed (WAV)”

You could actually choose any number of file formats for uploading to SoundCloud, but I prefer WAV because, to me, it always seems the most reliable and versatile while working with other platforms and operating systems. Additionally, SoundCloud says right on its site that they like WAV, AIFF, and a few others.

4) Navigate to the SoundCloud Logo and Press On It
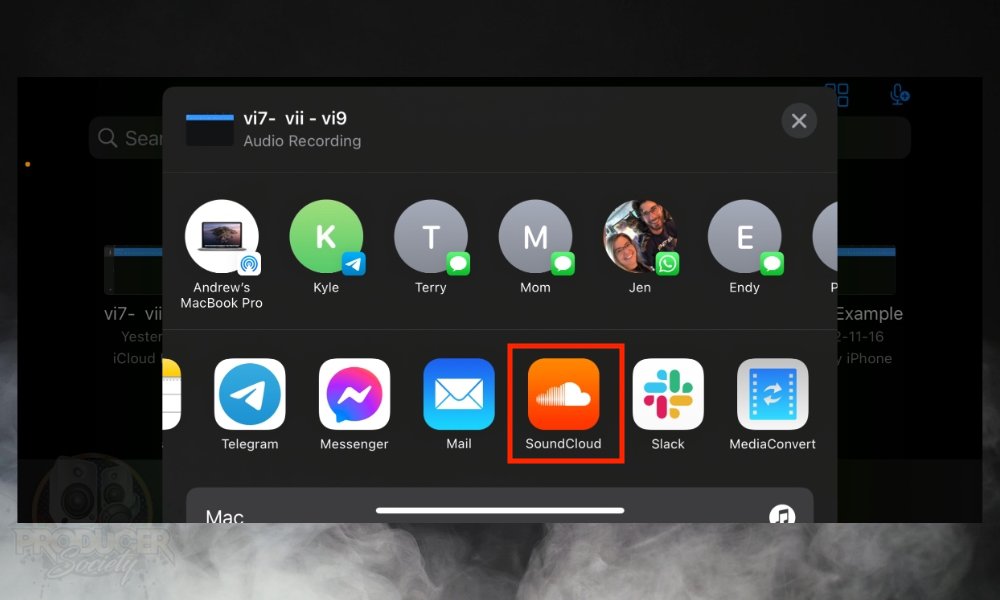
Interestingly, you don’t actually have to have SoundCloud downloaded on your phone in order to use it as an option.
5) Type In Your SoundCloud Username and Password
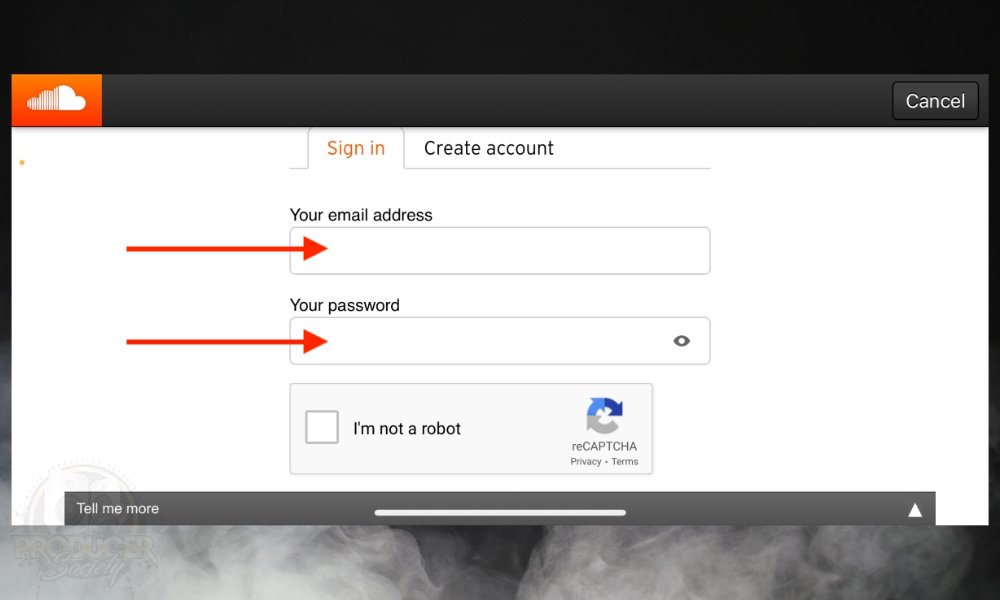
Use the captcha to prove to the robot that you’re not a robot and then you’re almost done.
6) Choose Continue And Then “Allow Downloads” and “Allow Streaming” [If You Want]

7) Click “Share” > Wait For It To Export
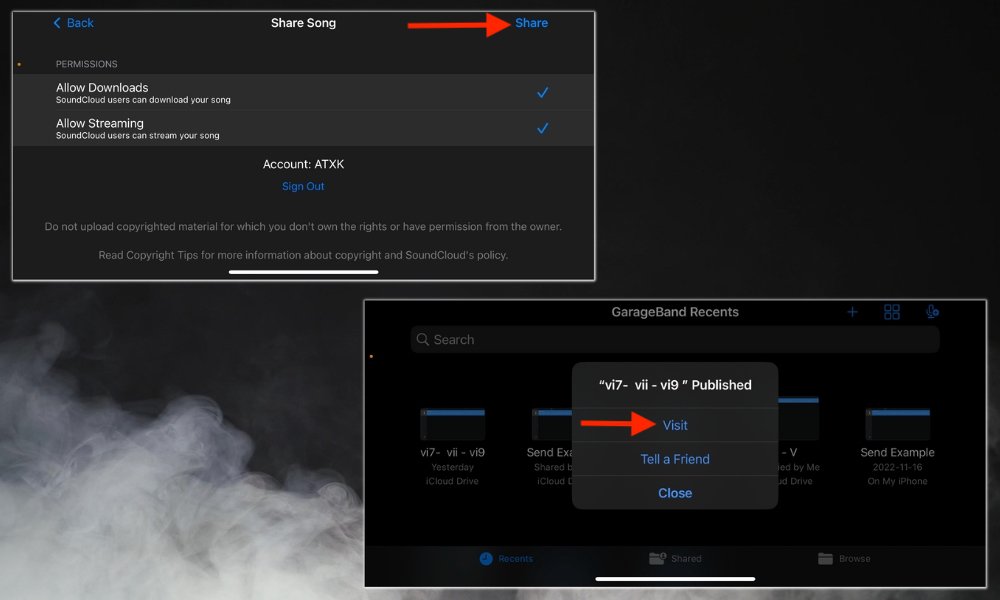
In some cases, it won’t work for reasons I can’t explain. If that does happen to you, just do it again and it’ll work just fine. Click “Visit” if you want to be able to change the display picture for the song.
Note:
You’ll need to download the application on your phone if you want to change the picture from the GarageBand logo to whatever you want.
How to AirDrop GarageBand Project Files (macOS)
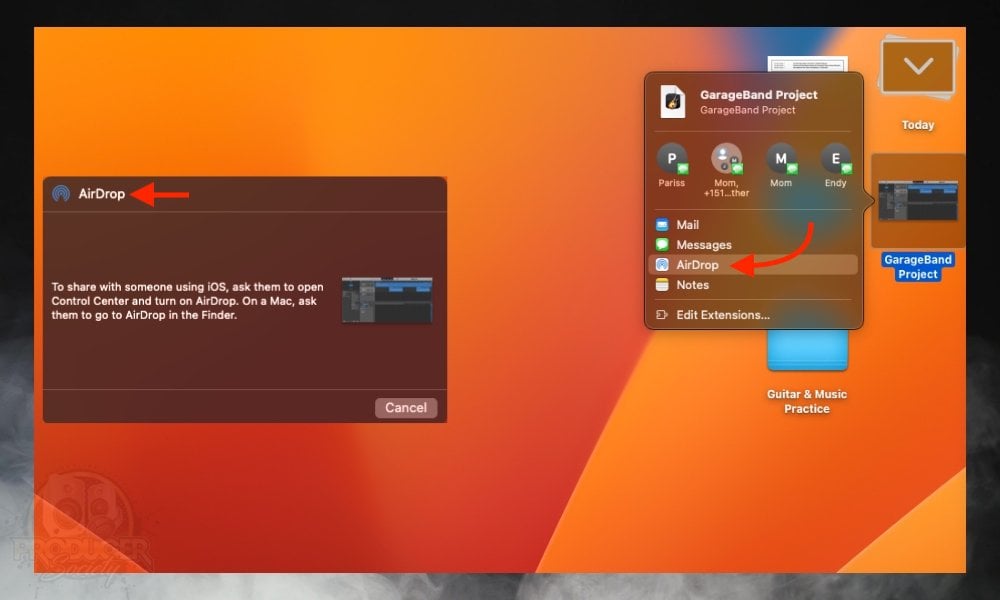
Every Apple user loves AirDrop, including myself, although, I would be lying if I didn’t notice its unreliability at times. For transferring projects to other GarageBand users who are close to you, AirDorp is unparalleled in its efficiency and convenience. Keep in mind that they must be close to you if you want to use AirDrop.
1) Save Your Project to Your Desktop And Then Close GarageBand

Remember, you have to close GarageBand right after if you want to compress it unless you want to wait there forever and have nothing happen.
2) Right-Click the Project File and Select “Compress”
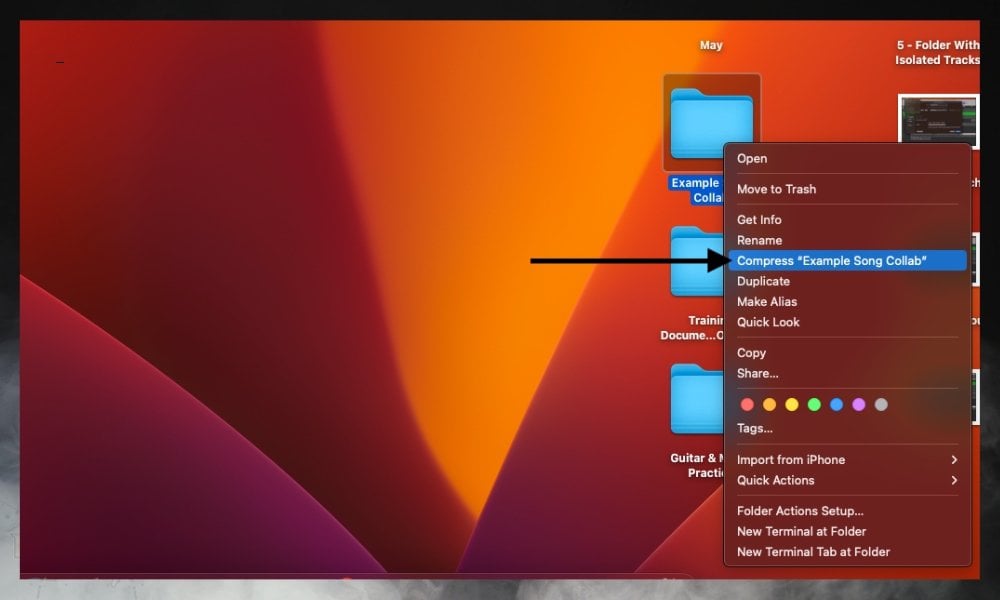
This is always going to be a good idea whenever you have to send things across the internet.
3) Right-Click the Project File Then Choose “Share” > “AirDrop”
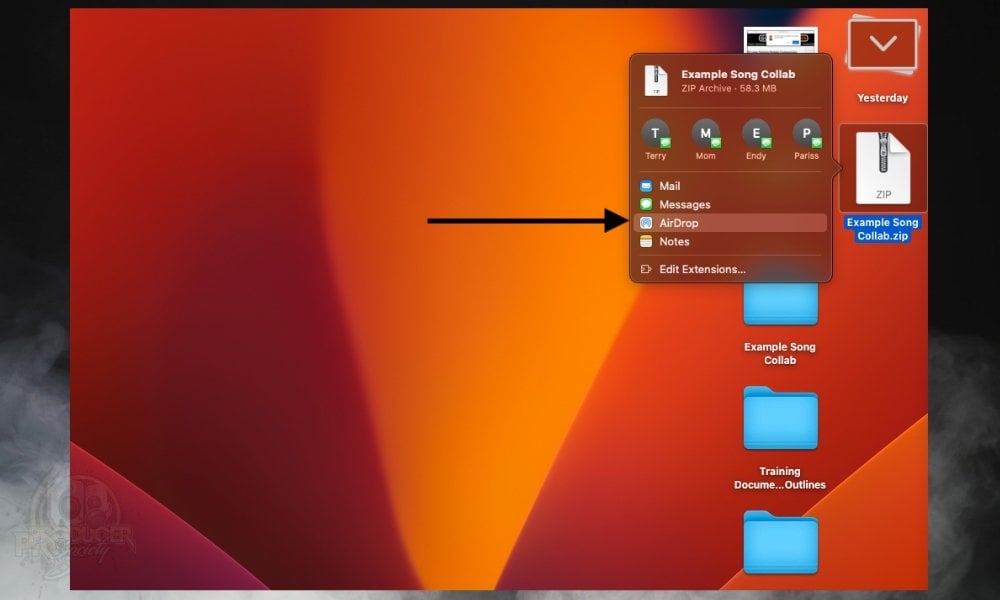
4) Choose the Nearby macOS Device in the AirDrop Menu
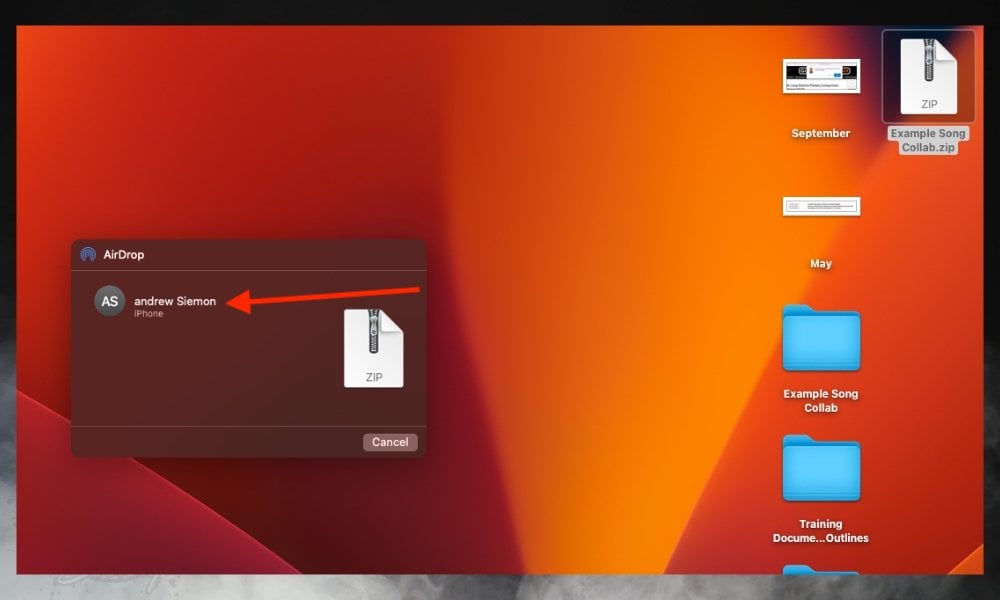
Note:
While you technically can AirDrop a GarageBand macOS project with an iOS device, you won’t be able to open it once it has been transferred. You have to use GarageBand Project to iOS in the share menu instead of GarageBand, which I’ll show you how to do in a minute – it’s dead simple.
But first, let’s dive into how to AirDrop GarageBand iOS files. It’s a little different from macOS but still mad easy.
How to AirDrop GarageBand Project Files (iOS)
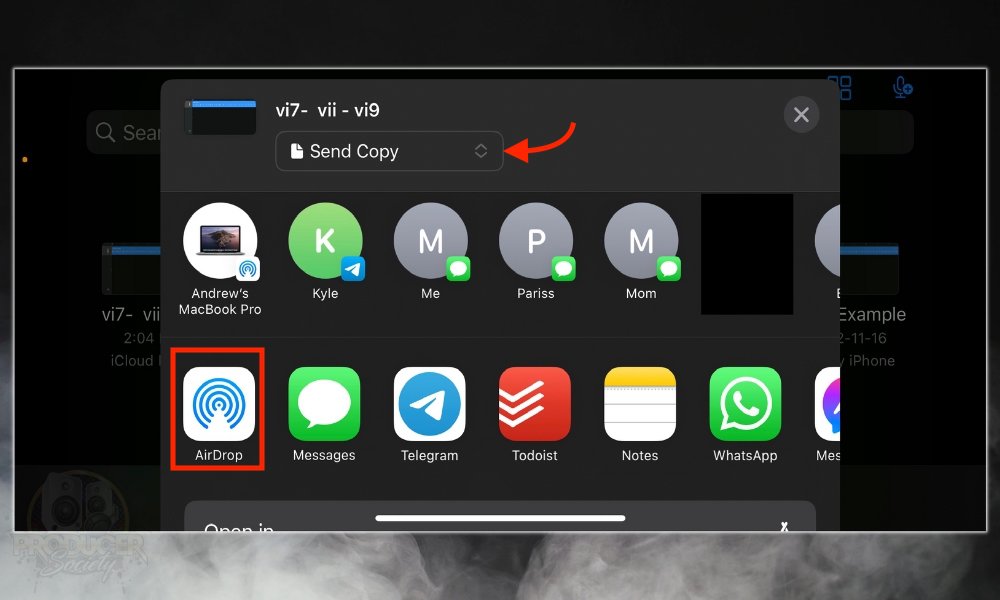
It’s easy to AirDrop files either from macOS to iOS or iOS to macOS, however, you won’t be able to open the macOS GarageBand project with iOS GarageBand.
It’s worth noting that if you AirDrop a file that’s not sitting in the iCloud Drive and is sitting in the phone’s local drive instead, you won’t have to choose “Send A Copy” or “Collaborate.”
1) Open GarageBand and Find Your Project File
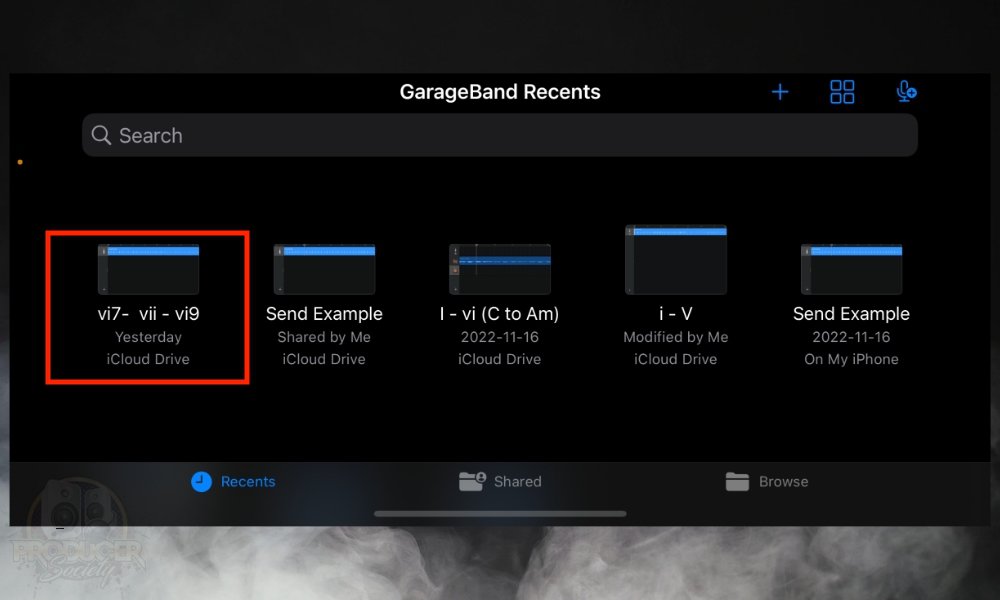
2) Long-Press On It and Select “Share”

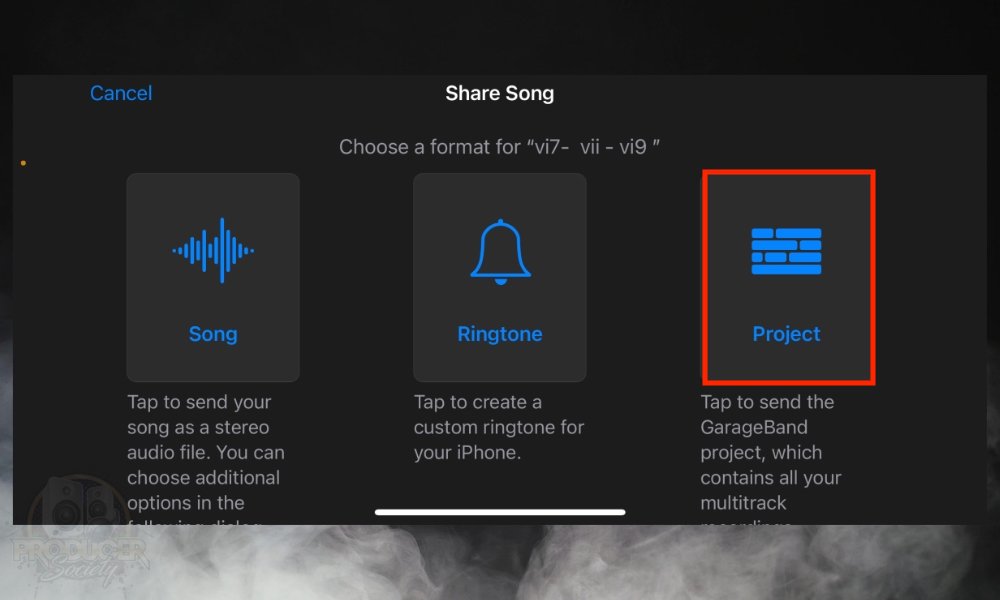
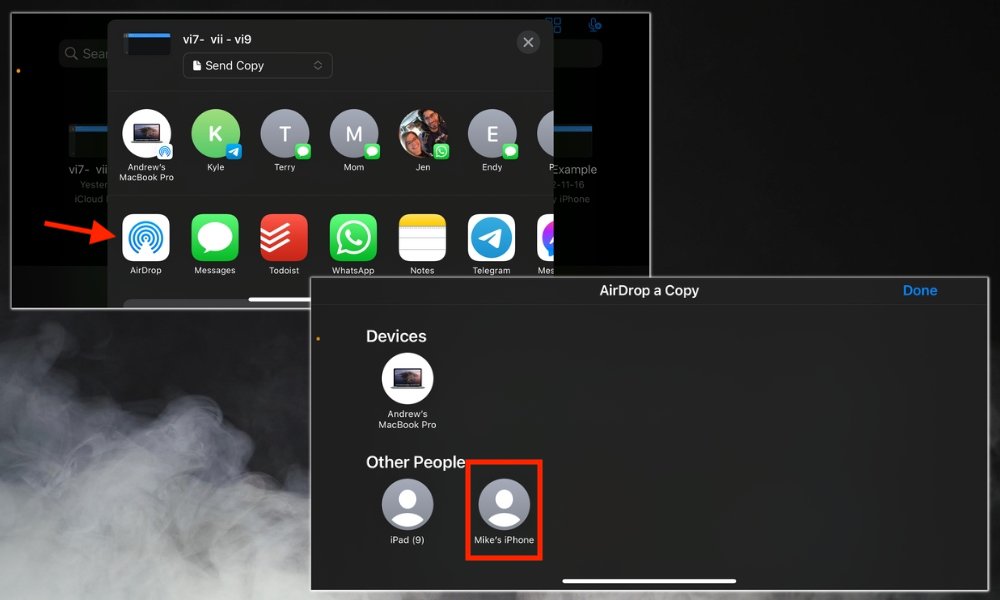
3) Choose “Project” And Then Select AirDrop
4) Select “Send A Copy” or “Collaborate” – Both Will Work
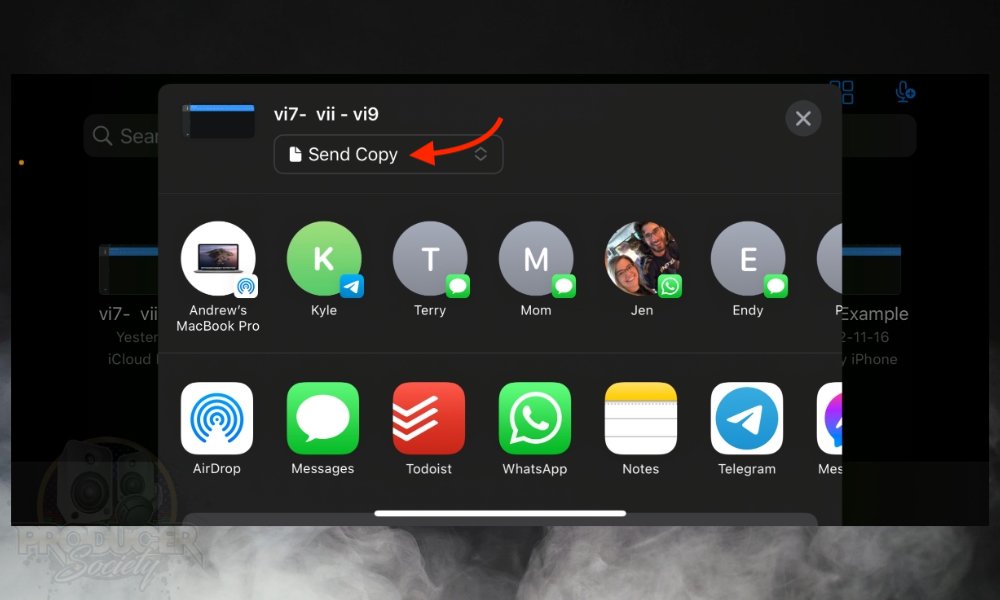
If you recall what I said earlier, I claimed that “Collaborate” was often a better choice over “Send A Copy,” and I stand by that. However, there are some cases – like now, for instance – where “Send A Copy” will work just fine.
5) Choose AirDrop Again And Then Select the Device
How to Share Project Files From One Device to Another (macOS ↔ iOS)

Using “Share” > “Project to GarageBand for iOS” is how you bridge the gap between GarageBand macOS and iOS. This is the way I know how to convert GarageBand macOS projects to GarageBand for iOS. It may actually be the only way. as a matter of fact.
1) With Your GarageBand Project Open > Click Share Then “Project to GarageBand for iOS”

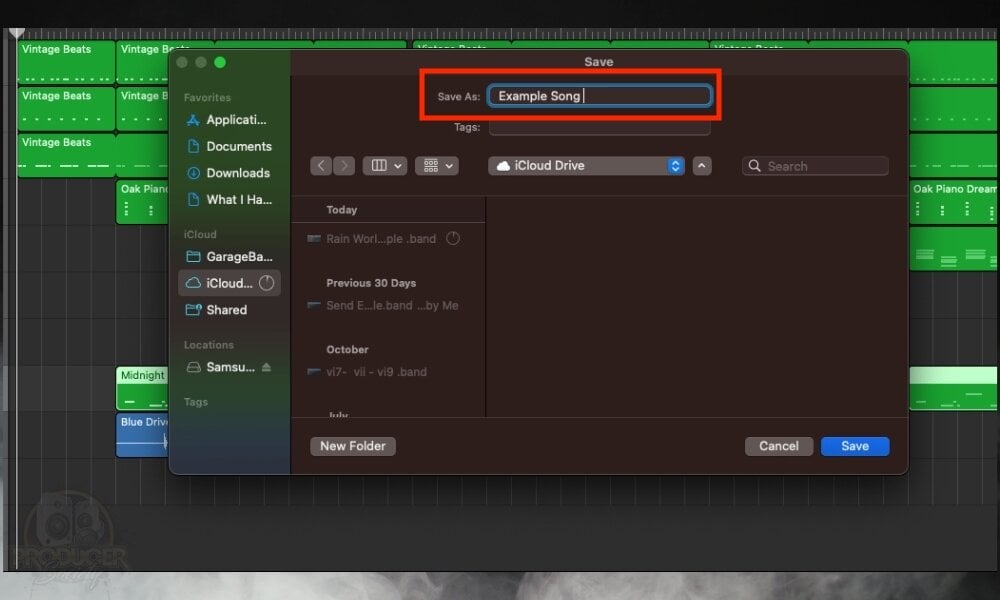
2) Name the File
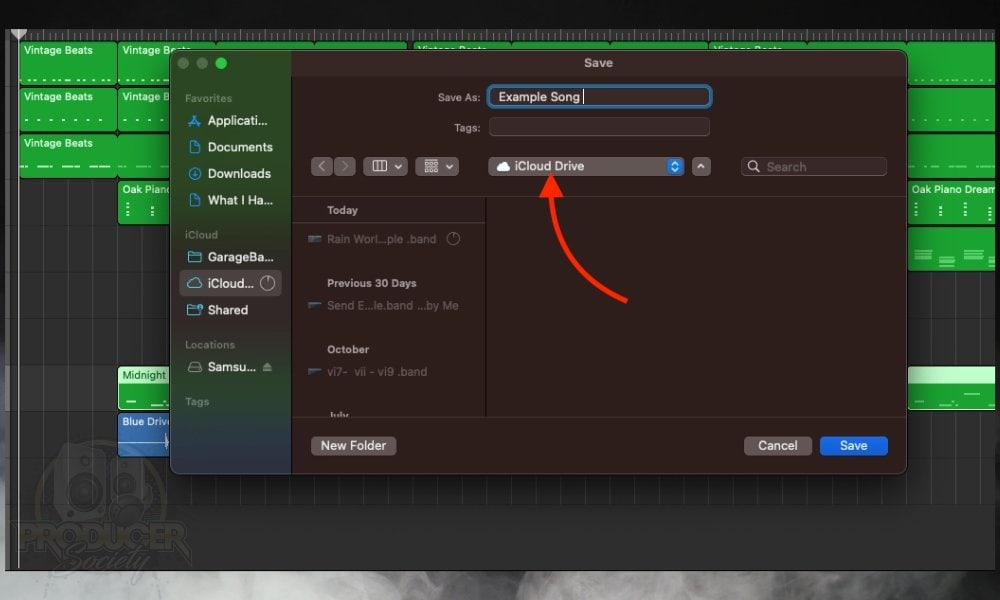
3) Select the iCloud Drive You Want To Save To
Note:
This doesn’t work for sharing GarageBand projects with other users. It only works with yourself. However, what you can do after you’ve shared the file to your iOS device, is you can then use any of the aforementioned methods to transfer the now-iOS project to another user. After you’ve turned the project into an iOS file, it can be sent to any iPad or iPhone.
How to Share GarageBand (iOS/macOS) Projects With Non-Apple Users?
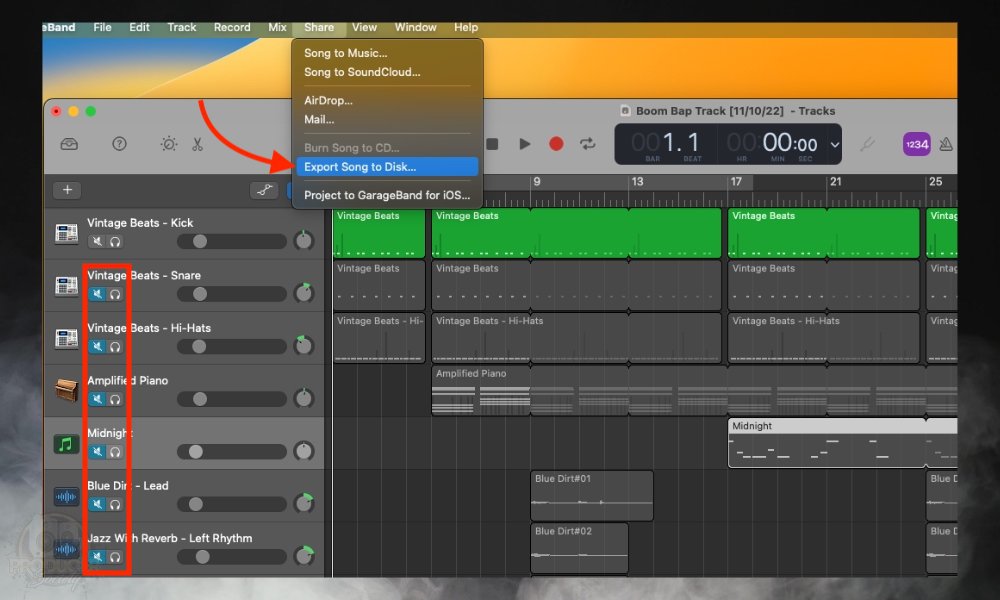
And while the article itself is old, you can share your project file with other users in the exact same way. It’s worth stating that it is a bit time-consuming, although, not terribly so.
This is because you’ll have to turn each track region into an mp3, label everything properly, and then put everything into a well-organized folder. It works great though, and if your computer is decent, it shouldn’t take that long to do it. Anyway, I’ll show you how to do it now.
1) Open Your GarageBand Project, Label Every Track Very Well, And Then Save It
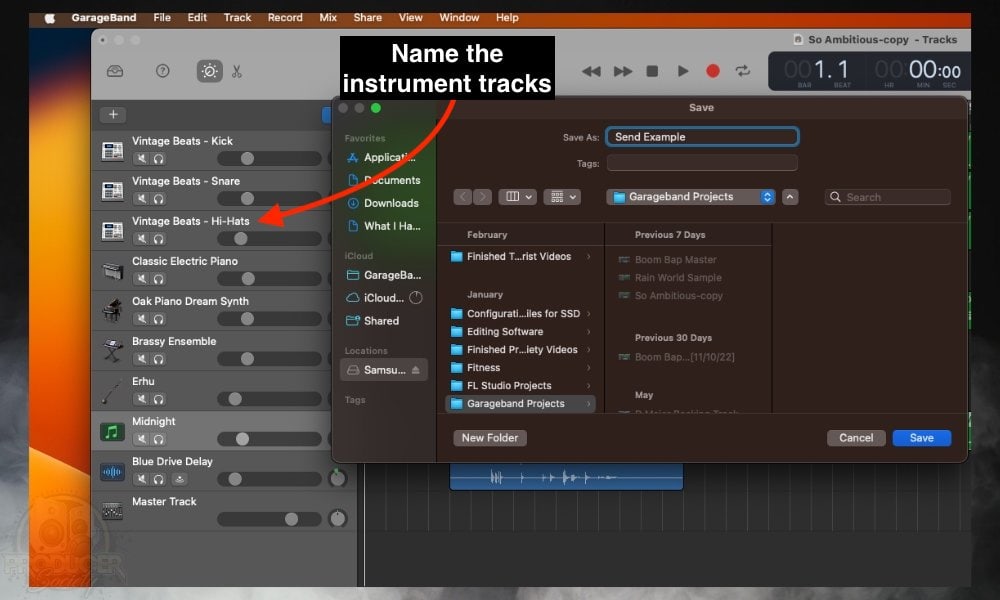
This will ensure the recipient and your collaborator will actually know what you’re talking about. Trust me, it’s a nightmare when you receive a bunch of files and you have no idea what any of them are.
2) Isolate the First Instrument

You could probably mute all of the other tracks instead but the isolation tool is a better option.
3) Click Share > Export Song to Disk > Uncompressed (WAV) > Save It To Your Desktop

4) Go Through Each Track One by One and Export Them While Isolated

5) Create A Folder With All Of The Isolate Tracks

6) Right Click the File to Compress It

7) Screenshot the Way You’ve Panned the Instruments and Include It In the File Folder
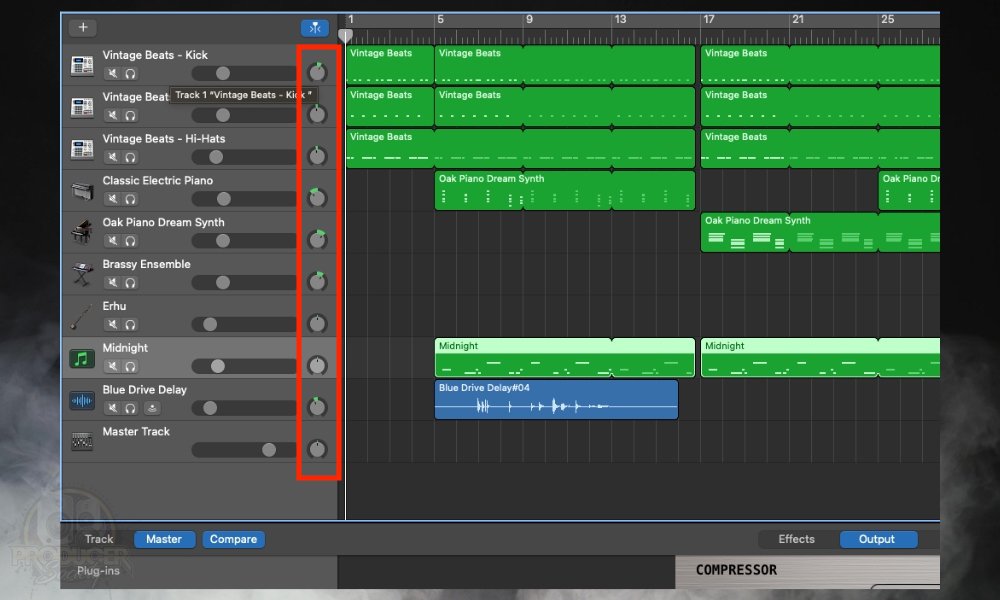
8) Send The Compressed Folder With An Email Service Producer – GoogleDrive, OneDrive, or WeTransfer

Typically, you’ll have to wait for it to upload because the file will be large for most services. But what if you do if your project is massive and Google Drive, OneDrive, etc, are not working?
I would recommend using WeTransfer because it’s incredibly easy to use and the free plan allows you to send 2GB projects. I’ll show you how to use it now.
How to Use WeTransfer To Share Large Files

You can use Google Drive and other email services too, but I find they can be quite slow and unreliable at times. In those cases, use WeTransfer and you won’t have a problem.
Just follow the instructions that I’ve outlined below after you’ve made an account. You probably won’t even need instructions because it’s fairly intuitive.
1) Save the Project On Your Desktop and Close GarageBand

2) Right-Click on the Project to Compress It

3) Go to WeTransfer and Make A Free Account
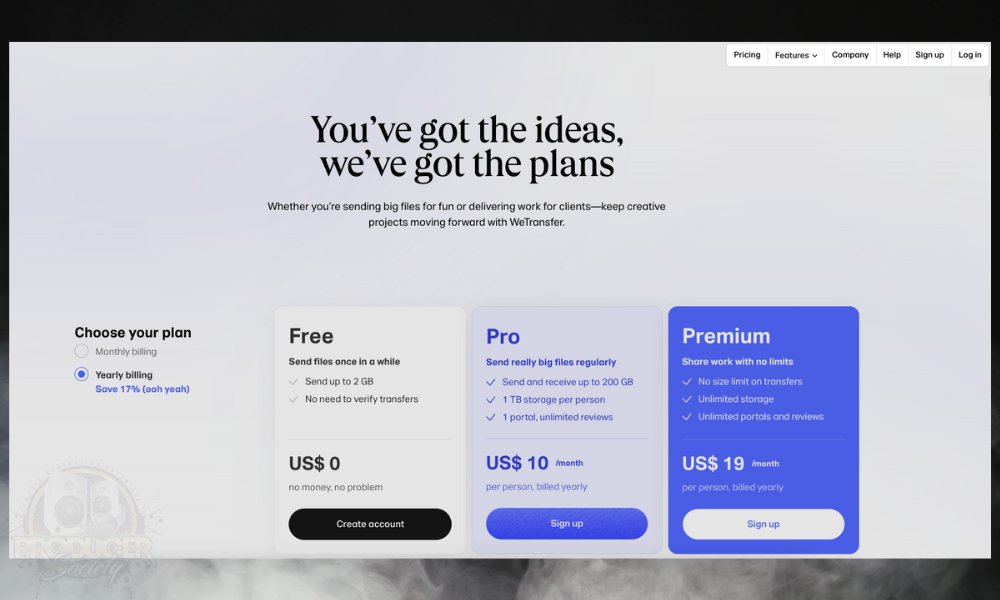
With a Pro Plan, you can send huge projects of 200GB or even have 1TB of storage. WeTransfer is great and I couldn’t recommend them enough.
4) Type In The Email And Then Upload The File

5) Click Transfer And Wait For It To Send

Other Articles You May Be Interested In
- How to Upload Music To SoundCloud, YouTube, and Music
- How to Import Audio Into GarageBand (iOS/macOS) [SIMPLE]
- How to Update GarageBand (iPadOS, iOS, and macOS)
- How To Get YouTube Music into GarageBand [iOS/macOS]
- How To Download Garageband On Your Macbook

Important Things to Note About Sharing GarageBand Project Files
1) You Can Share GarageBand iOS Projects to macOS In Many Ways, But Not The Other Way Around
You can share GarageBand iOS projects to macOS with many email service providers, AirDrop, iCloud, and through iMessage (which is also kind of done through iCloud), but when it comes to sharing macOS projects to iOS, you have fewer options.
2) Whether Your File Is In The iCloud Drive or the Local Drive Makes A Difference In How Files Are Shared
Using iCloud Drive between users is by far the easiest way to share projects, but I understand not everyone wants to use it. I was also hesitant about iCloud Drive when Apple first came out with it and began creating its apps in such a way that it seemed impossible not to have it.
If you don’t want to use it, compressing the files first and sending them through email is your best bet, or you could use WeTransfer which also works great.
3) iMovie And GarageBand Also Can Work Together As Sharing Devices [YouTube/Facebook]
It’s worth noting that you can also use iMovie and GarageBand together and I have an article describing how to use them for background music. The article will also show you how to share things with various services.
4) You Can Also Add More Sharing Extensions
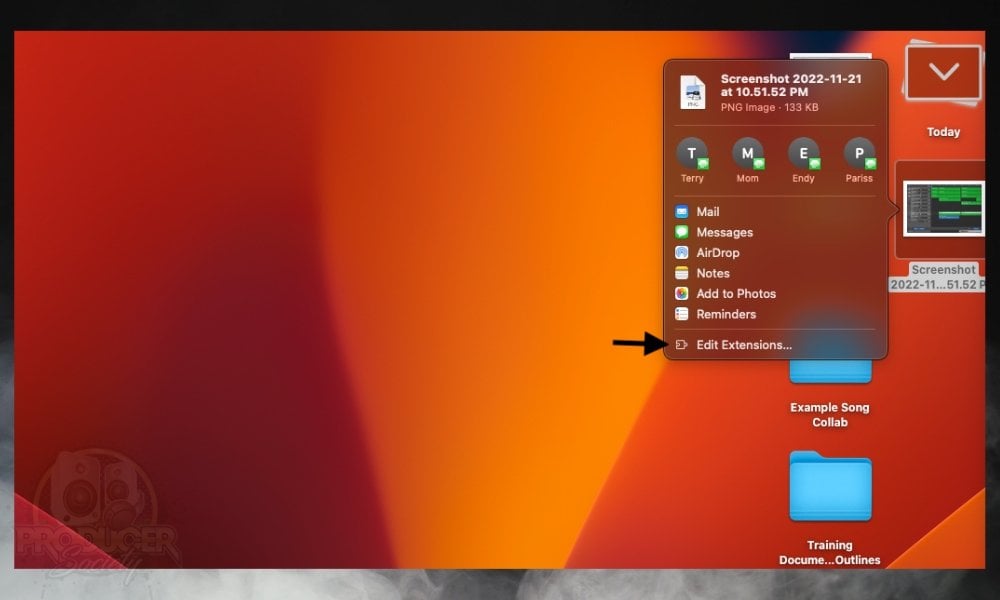
Whenever you share things with your laptop or whatever you’re using, it’s actually possible to add more sharing extensions, ie, SoundCloud or some kind of email service. You do that by right-clicking on the file, pressing Share and choosing the option “Edit Extensions.” There’s more information on Apple’s website.

 Written By :