Some of Apple’s recent changes have brought necessary workarounds, but thankfully, there not difficult to execute. One is how you would get a YouTube song into your GarageBand project, whether the iOS or macOS version.
To get YouTube music into your GarageBand project
1) Copy and paste the YouTube link into a YouTube to MP3 Converter
2) Download the file, then change the file extension to .wav if you’re using macOS.
3) If you’re using iOS, you’ll need to convert the MP3 to a .wav using the Media Converter app.
How to Import YouTube Music into GarageBand macOS
1) Copy the Link from YouTube

So obviously the first thing you want to do is navigate to your YouTube video and then click the URL to copy it. Make sure you grab the whole thing. Cutting will work fine as well.
2) Paste It Into A YouTube MP3 Converter (ytmp3)
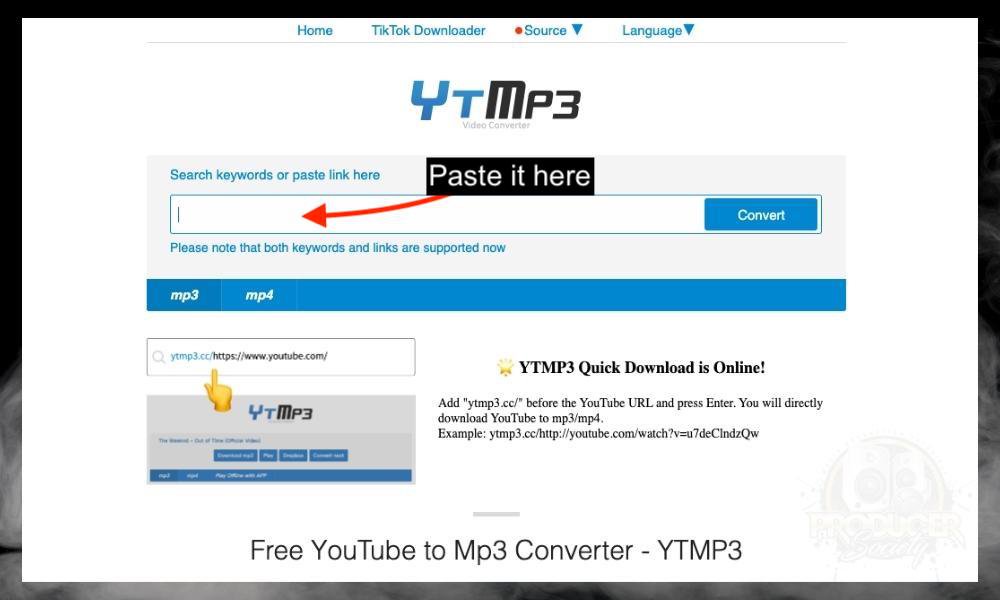
Once you’ve copied the link, navigate to this website and then paste the link right into the “Convert” bar. The moment you paste the link into it, it’ll start converting right away.
3) Download the File To Your Desktop

Click the “Download MP3” option once it has finished converting, and then it’ll send the download to the bottom of your browser, or wherever your downloads go on your browser. I’m using Google Chrome, so it goes to the bottom.
For whatever reason, I find it’s quite slow to download these days, however, it’s very possible that it’s just my internet. I’m not sure.
4) Right-Click on the File and Rename the File Extension to “.wav”

After your file has finished downloading and you’ve dragged it to your desktop, right-click on the file and change the file extension name from “(track name).mp3” to “(track name).wav” instead. I showed you how to do this in my guide on why you can’t import mp3s.
This will change how GarageBand and your computer’s operating system will handle the file. One thing that’s important to add is that this won’t actually change the file type.
It’ll just change, as I said, how your computer (including GarageBand) handles the audio file. This same trick won’t work, for example, on GarageBand iOS.
I’ve tried just changing the file extension and sending the file to GarageBand iOS and it won’t accept it. I explained this in detail in my article on why your audio files are “greyed-out” in GarageBand iOS.
5) Open Your GarageBand Project and Drag It Into the Workspace

If you’ve tried to do this before without converting the file from .mp3 to .wav, you’ll know that the workspace looks different when importing. If the import isn’t going to work, GarageBand won’t turn the audio track blue.
It’ll just stay a dark-grey color, despite the fact the green “+” sign still shows. I’m still not 100% positive why files must be changed like this for GarageBand and other Apple software to accept them.
I argued in the other article I linked above that it had to do with the style of codec, but If that were the case, I think that simply changing the file extension wouldn’t work. Anyway, after you’ve reached #5, all is said and done and you’ve got a project with YouTube audio in it.
I’m going to mention a few other methods for getting YouTube music into your GarageBand project as well, including the three alternatives mentioned below.
Other Ways Of Importing YouTube Music into GarageBand (macOS)
1) Loopback Audio
Loopback Audio, which I first talked about in my reference track and Spotify-to-iPhone-ringtone tutorial, is a tool that reroutes audio from one source to another.
In effect, you can send the audio that’s coming from an application on Google Chrome or whatever browser you’re using, and then send it to different software. In our case, it would be GarageBand. But you can send it anywhere including other DAWs, video and audio editors, Audacity, etc.
2) Sample Chrome Extension
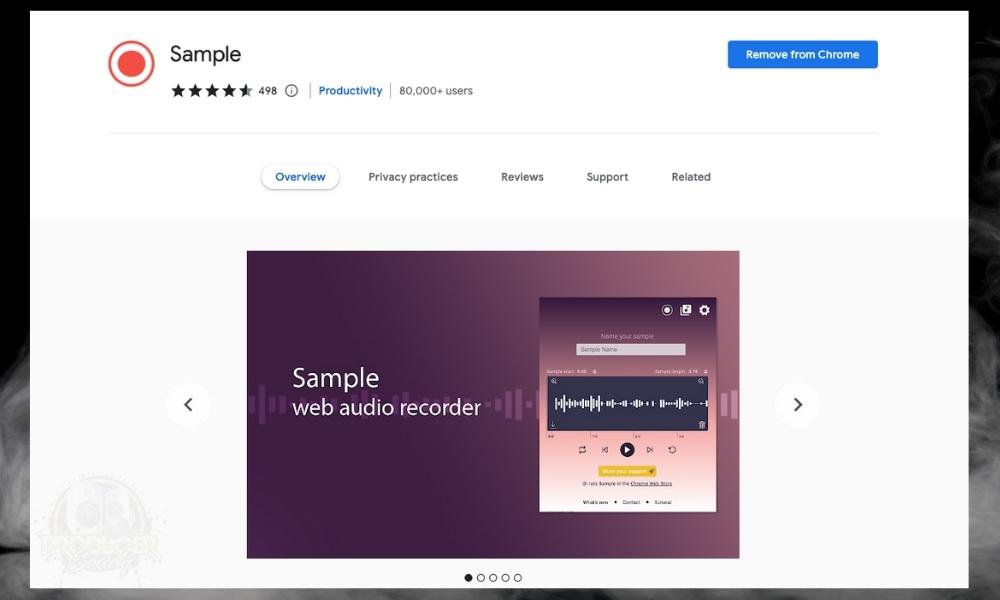
Another awesome way to get your hands on audio from YouTube and other browsers is the Chrome Extension “Sample,” which does as it says.
Essentially, this is a Chrome Extension used by music producers and audio engineers to get audio sounds quickly and efficiently.
As the name suggests, this is an incredibly useful tool for producers and musicians who love to sample. You don’t need to use YTMP3 or screen record if you just use this, moreover, you can crop the exact section you want right in the Chrome Extension.
3) Screen Recording
![Screenflow Editor - How To Get YouTube Music into GarageBand [iOSmacOS]](https://producersociety.com/wp-content/uploads/2022/05/Screenflow-Editor-How-To-Get-YouTube-Music-into-GarageBand-iOSmacOS.jpg)
Telestream’s Screenflow Editor is another awesome tool that I use all of the time for making videos. You can use this to record your screen, or whatever it is that you’re watching. It could be a university lecture, a video online, a TED Talk; whatever you want. These days, I use Screenflow Editor as my primary video editor.
Now that I’ve shown you how to get YouTube music into your GarageBand project for macOS, I’m going to show you how you would do it in GarageBand macOS instead. If you’d rather watch a YouTube video, I’ve included one right before the written tutorial.
How to Import YouTube Music into GarageBand iOS
What You Need to Import YouTube Music Into GarageBand iOS
1) Media Converter
I’ve talked about this handy application a few times in my articles. This is just a tool that allows you to convert video and other files to other file formats. You’re going to need this to take the song you’ve downloaded from the YTMP3 converter and turn it into a file format that GarageBand iOS can always use.
2) Files App
As I’ve said this before and I’ll say it again, this is an app I should’ve downloaded ages ago. It’s very possible that it comes on the iOS device by default and I just deleted it, but either way, it’s essential for having an easy place to send files.

It’ll especially come in handy when you’re moving files around on your iOS device, or when you need a place to send the MP3 to after you’ve downloaded it from YTMP3. So before we get into the tutorial, please do me a favor and download both of these applications.
1) Copy the Link from YouTube

You can either long-press the YouTube link to copy it like this, or you can highlight and then copy it manually.
2) Paste It Into The YouTube to MP3 Converter (ytmp3)
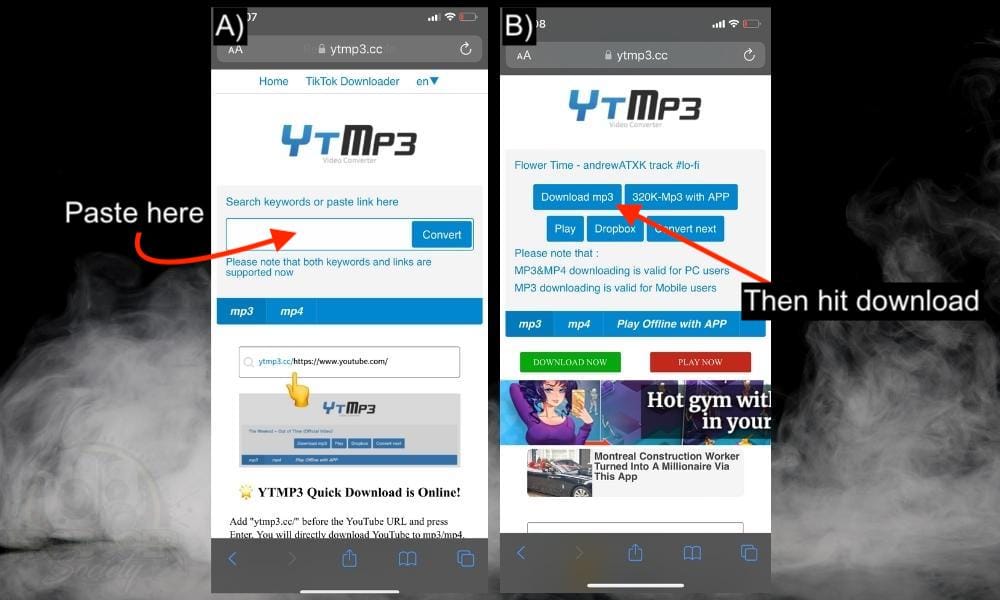
Go to the YouTube to MP3 Converter website and then paste the URL into the conversion box. Press Convert, and then you have to press the “Download mp3” button. It’ll bring up an annoying advertisement, but that’s ok, you just have to switch out of it and then come back to the website.
3) Click Away From the Advertisement Then Hit Download
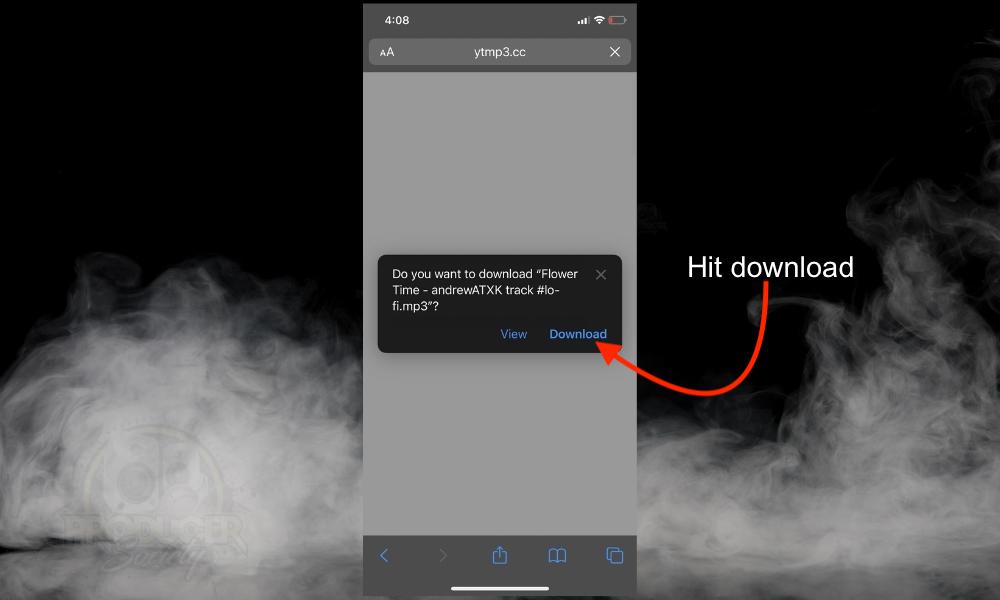
After you’ve clicked away from the advertisement having converted the mp3 file, go back to the website, and you may have to press the “download mp3” button again.
Oftentimes, the converter, however, will just bring up the prompt that you can see in the above image. Once you’ve downloaded the mp3 to your Files (which will be sitting neatly in the Files app if you need to retrieve it manually), you can go to your Media Converter.
4) Open Media Converter and Import the MP3 File

A) Hit the “+” Symbol
B) Choose “Files/iCloud Drive”
C) Long-Press the MP3 In Your Files
Import your mp3 file as is shown in the image above. Notice how the application developers misspelled “iCloud” as “icound.” That’s a pretty big mistake, but who cares, the app works great. For this next section, we’re going to convert the mp3 into a .wav file, and then we’re going to send it to GarageBand iOS.
5) Convert It To A WAVE File And Send It To “GarageBand iOS File Transfer”
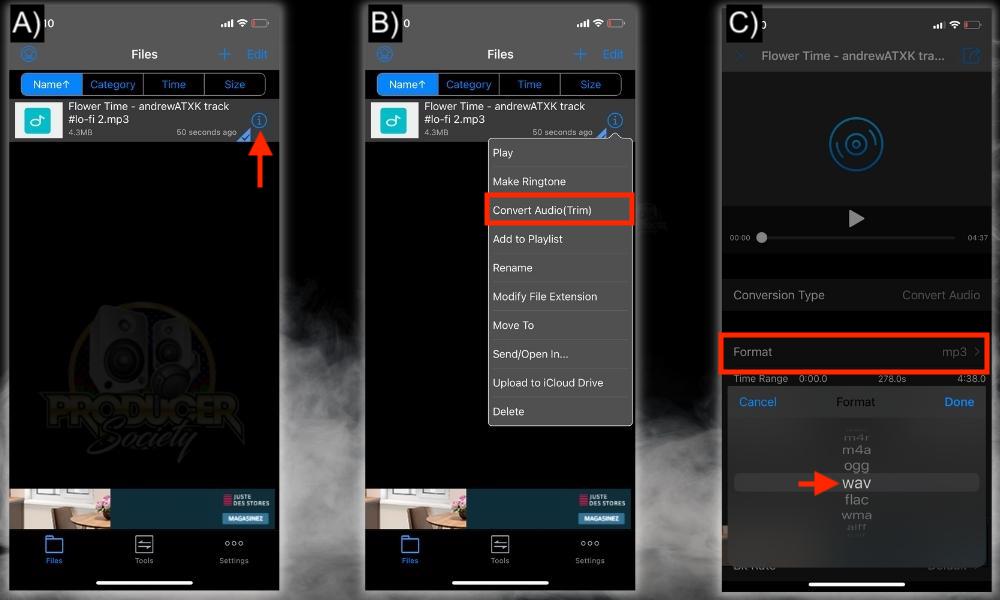
A) Press the Info Button
B) Choose “Convert Audio (Trim)”
C) Change the Format to “wav”

D) Click the “Share/Export” Button
E) Select “Send/Open In”
F) Choose “Save to Files”
G) Choose GarageBand for iOS > GarageBand File Transfer > Save
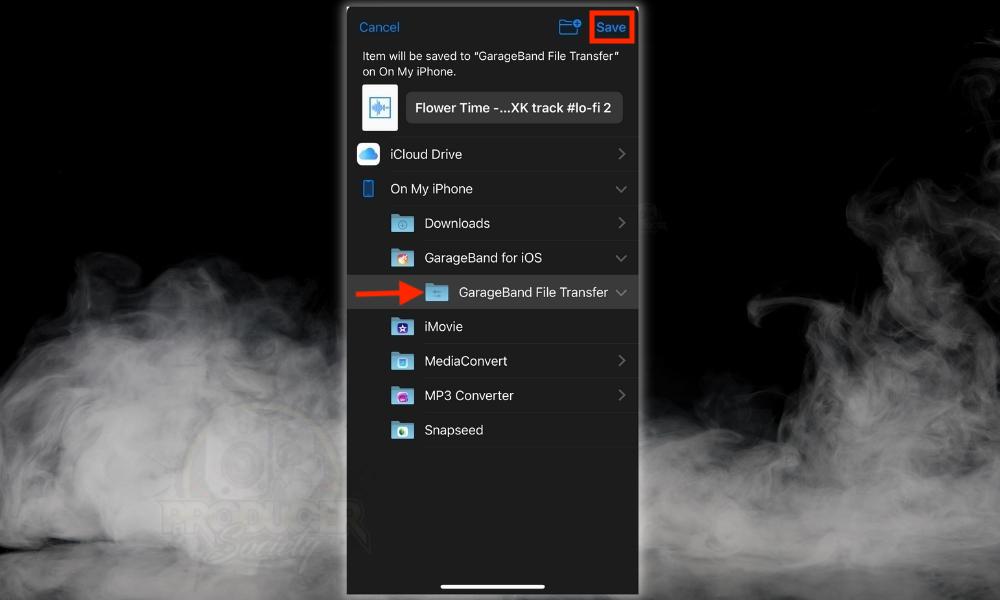
6) Open GarageBand > Click the Loop Icon > Select Files

7) Drag and Drop the WAVE File Into Your Workspace

And voila! you’re done. If you’re wondering why we had to convert the mp3 into a .wav file, it’s because GarageBand iOS doesn’t always accept mp3 files which I explained a bit earlier in the article.
Some mp3s appear to have a codec that GarageBand doesn’t like, so you have to convert it to a more friendly file format. In the case of GarageBand macOS, you can just change the file extension as I showed you earlier to .wav, but this won’t work in GarageBand iOS. It has to be a .wav file.
Other Articles You May Be Interested In
- How to Import Audio Into GarageBand (iOS/macOS) [SIMPLE]
- Why Can’t I Import An Mp3 Into Garageband? [ANSWERED]
- How to Send GarageBand Projects Through iMessage [iOS/macOS]
- How to Import/Export Audio To & From FL Studio (MP3s & More)
- How to Import A Song Into FL Studio Mobile [Dead Simple]
Important Things to Note About Importing YouTube Music to GarageBand
1) There Are Other File Converters Available for GarageBand iOS
You can also use a file converter called MP3 Converter, which is an MP3 Converter I recommended in other articles. The thing about it though is that it has a 3-day free trial.
Had I known there were other converters that you could use, I would’ve just used that one. Another one that’s just like Media Converter is the File Converter. It has a little green icon and you can also find it, like the other ones, in the App Store.
2) You Can Use Screen Record Easily in GarageBand iOS
I’m not aware of a super-easy way to get your hands on Screen Recording on a macOS device, however, it comes by default on the iPhone. If you wanted to screen record your video instead and then put it through the converter, that would work just fine.
Gear Mentioned
1) Screenflow Editor (on my Product Page)


 Written By :

