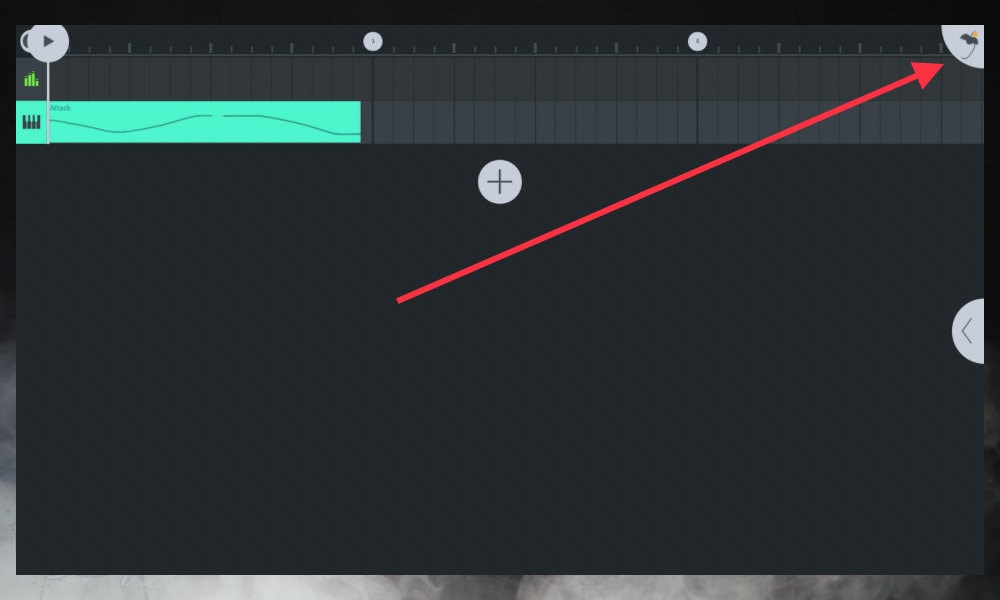
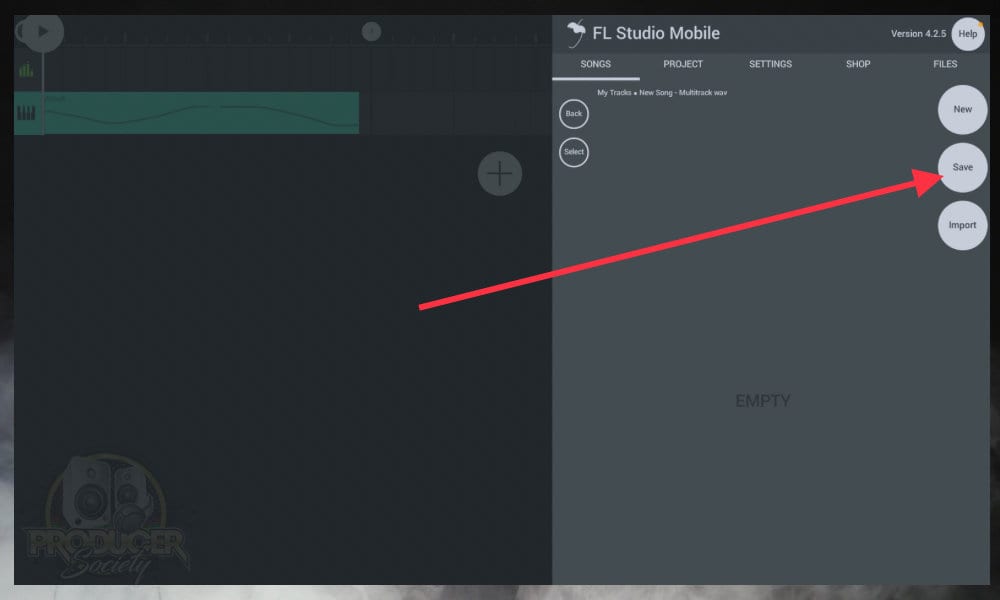
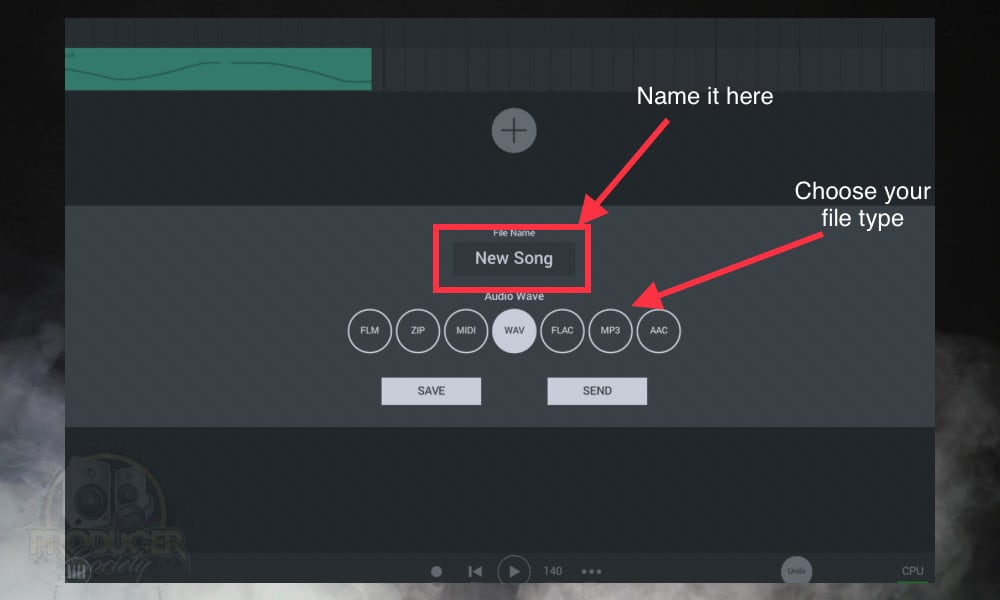
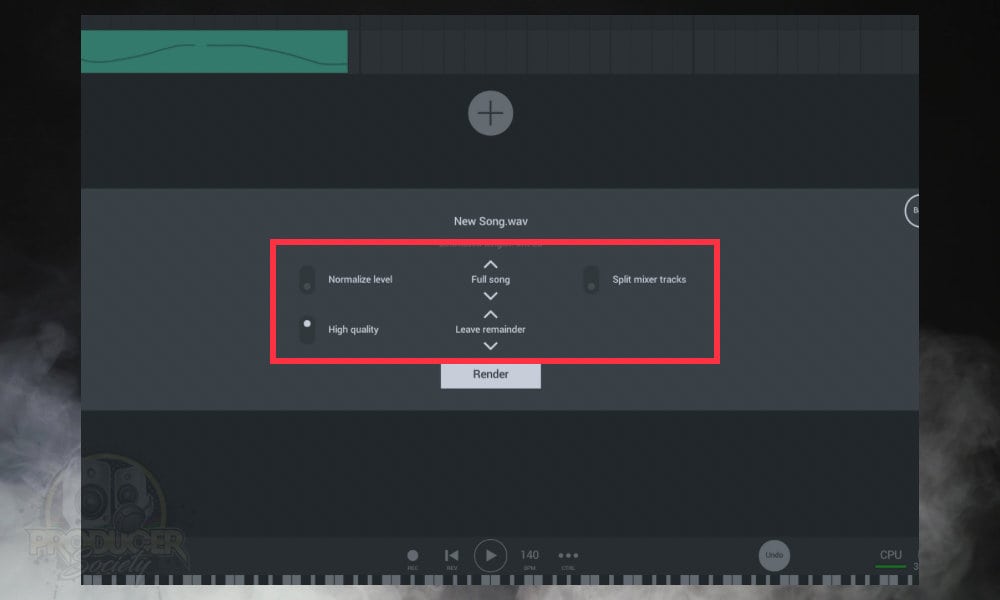
To export audio files from FL Studio Mobile, click on the FL Studio Mobile icon on the top right-hand side of the Playlist. Click “Save.” Give your project an easily identifiable name, then choose the file type ie, WAVE, select “Send,” and then select your rendering options before hitting “Render.”
There are a few different options you can choose from, but I almost always use “High Quality;” I have normalized audio unselected, split mixer tracks turned off, and then I also have the “Trim Silence” option turned on so the project doesn’t include a silent section at the end.
The way FL Studio Mobile exports audio on iOS isn’t my favourite. I find that when I choose “Save” or “Send,” it isn’t always clear where the app has sent the audio. Sometimes it gives you the option to choose where it goes, while on other occasions, it does not.
5 Steps to Exporting Any File Type From FL Studio Mobile

With your project open, you’ll notice the miniature FL icon on the right side of what the Image-Line website calls the “playlist.” It’s a little different from the regular FL Studio icon you’ve likely seen around on the internet.
1) Click the FL Studio Mobile Icon On The Top-Right Of The Playlist

Try not to confuse this icon with the tab/arrow underneath it which is how you open up the rack effects.
2) Select the Option “Save”

I feel as though it would’ve been a better option to just create a separate option for “Export,” and “Save,” but what do I know? Once you’ve clicked on it, you can name it and choose the file type.
3) Choose Your File Type and Type In A Project Name As Well

This applies to practically every DAW or operating system out there, but it’s important to know either way. I digress.
4) Select All Of Your Rendering Options And Then Choose “Render”

Remember that when you choose “Split Mixer Tracks,” you’ll have the option to enable or disable your Master Rack effects. I talked about this a little more in my guide on what Split Mixer Tracks does. Surprisingly, a lot of people ask about Split Mixer Tracks online despite its fairly self-explanatory name.
5) Choose Where You Want To Send Your Exported Audio

Don’t get me wrong, I love my iPad, but I find it so weird how you essentially have to download a Files app in order to have a place where you can access all of your documents and files. It’s not my favourite part of iOS, that’s for sure. I’ve talked about this at length before in my guide on importing/exporting GarageBand files.
6) Select The FL Studio Mobile Or Wherever It Makes Sense To You

You can obviously choose wherever you want to send your files. One thing that you should probably do always though is export your projects not to your iCloud but to your local drive.
This just seems to be a good practice, in my opinion. There’s nothing worse than trying to open up a project on an airplane or somewhere else where you don’t have Wi-Fi and then you can’t get to your project because you’re not connected to the internet.
Sometimes, I even find iCloud Drive doesn’t work while other internet services do. iCloud doesn’t seem to like less-than-perfect internet connections, but I can only guess what’s causing the issue. If you’re interested in learning more, have a look at some of the articles shown below. Image-Line’s manual is pretty good too.
Other Articles You May Be Interested In
- How to Export The Best Quality from FL Studio Mobile [EASY]
- What Does Split Mixer Tracks Do in FL Studio Mobile? [EASY]
- How to Cut Audio Clips & MIDI Notes in FL Studio Mobile
- How to Install Plugins in FL Studio Mobile [EASY]
- How to Import A Song Into FL Studio Mobile [Dead Simple]
Important Things to Note About Exporting Audio from FL Studio Mobile
1) FL Studio Mobile Has Plenty Of Options for Exporting Audio
Image-Line has given us more options to export files, similar to how they’ve done so with the desktop version. If you compare GarageBand (macOS) and FL Studio (macOS), for example, FL has way more options for exporting audio. And the same rules apply to the mobile versions as well.
One such option which can be confusing to some people is the “Split Mixer Tracks” option. As I explained earlier, in simple terms, this separates all of your audio files into separate tracks so you can send them to other people as individual files.
And you can also choose whether to export the master rack effects on your project after you’ve selected the “Split Mixer Tracks” switch. But if you intend on turning off all the processing on each individual track, you’ll have to do that on a track-by-track basis.
While I don’t really like how they’ve worded the “Save” option as well as how challenging it can be to find the exported files, FL Studio Mobile still excels at being more producer-friendly so to speak. And by that, I mean you can actually separate your tracks during an export which neither GarageBand iOS/macOS can do.
2) What Options You’ve Chosen Previously Will Sometimes Affect What You Can Do
Now that I’ve written a few FL Studio Mobile tutorials, I know that the “Save/Send” option will change what you can do. In other words, originally, I thought it was best to choose “Save.”
But after messing around with it a bit more, I find that using “Send” will usually give you the ability to choose where in your Files App the FL Studio Mobile project or audio file will go. But it ultimately depends on what options you chose beforehand.
For instance, if you’ve created a new project, rather than opening up something you’ve worked on a bunch of times, it seems that the options change a bit. I’m not sure why this is the case.

 Written By :