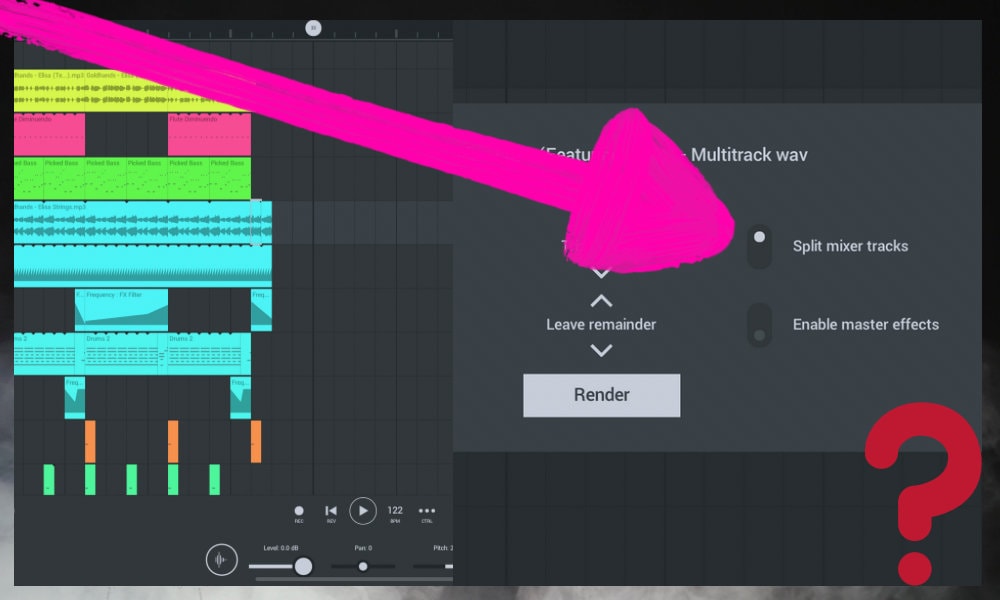
Simply put, splitting mixer tracks in FL Studio Mobile renders each track in your Playlist as separate audio files. Commonly referred to as “stems,” they can be saved with master track effects enabled or disabled. This feature is great for sharing projects with other artists, regardless of DAW.
This is something I talked about in one of my articles which I’ll link to later, but splitting your tracks into separate audio files is incredibly useful if you intend on collaborating with another artist.
You can render each audio file as an MP3 or WAV if you’d like, which means practically anyone can use them. This also means that you don’t have to isolate each project and export them as you would have to do in GarageBand macOS/iOS.
How to Use Split Mixer Tracks in FL Studio Mobile

Now that you know what it is, let me show you how to do it, including a few extra tips for actually finding them once you’ve saved them. This is honestly the tricky part, in my opinion.
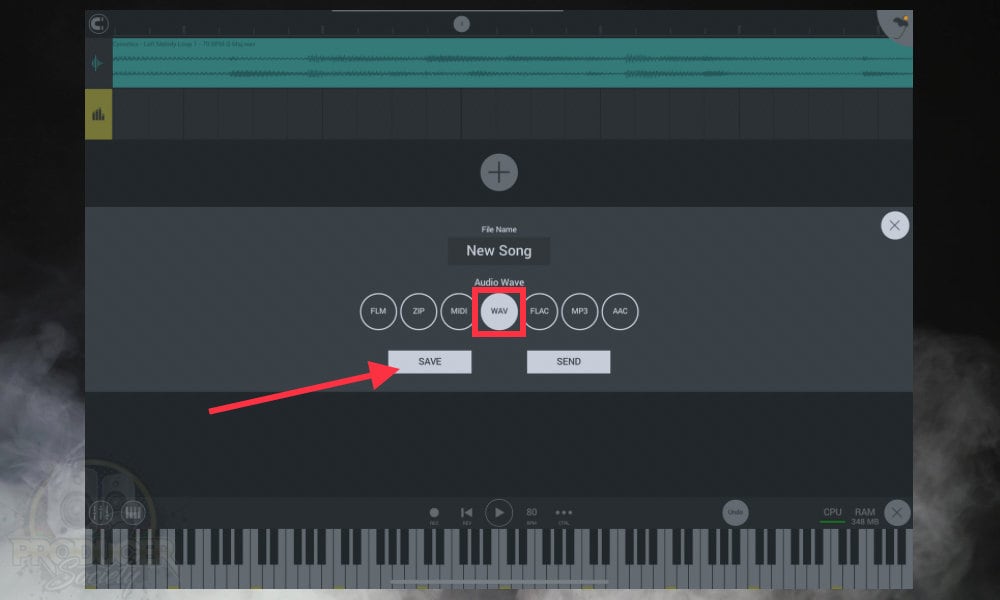
1) Press The FL Studio Icon On The Top Right Of Your Playlist

If you ever want to save or export a project, you always have to start by clicking on the FLM icon on the top-right.
2) Select “Save”

3) Choose Your Audio File Format – “WAV” and Then Hit “Save”

At this point, it’s also a great idea to give your tracks a solid name that differentiates them from other files in your directory. It can be a challenge to find where programs send files in your directory on iOS – at least it is for me, anyway.

To be honest, I still don’t even know where FLM sends the files to when you use the “Send” option. I tried for a hot minute and couldn’t find it. Anyway, after you’ve chosen “Save,” instead of “Send,” you have to choose how you’d like to export your tracks.
4) Select “High-Quality,” and “Split Mixer Tracks”

As I said in my other guide, I’m not sure why anyone would choose anything other than “High-Quality,” but that’s neither here nor there.
5) Choose Whether to “Enable” or “Disable” Master Track Effects

You’ll have to turn off your effects on each individual track manually if you want to make this change.
6) Find Your Files After Export

You could also go into your Files Application if you’re using iOS and find where they’re sitting.
Other Articles You May Be Interested In
- How to Export The Best Quality from FL Studio Mobile [EASY]
- How to Cut Audio Clips & MIDI Notes in FL Studio Mobile
- How to Import A Song Into FL Studio Mobile [Dead Simple]
- How to Install Plugins in FL Studio Mobile [EASY]
- How to Sample in FL Studio Mobile [Chop, Slice, & Reverse]
Important Things To Note About Splitting Mixer Tracks in FL Studio Mobile
1) Pay Special Attention To Your Master Rack and Effects
I’ve read on other forums that people often struggle with using this feature because they forget to disable or enable the master track and other effects. The reason this is an option is because it allows you to export the dry audio file (without processing), to your mixer or engineer.
However, keep in mind that it only does so on the MASTER Rack, and on not on the individual playlist tracks. As the manual says directly on Image-Line’s website, if you wanted to disable the effects on each track individually, you would have to go through one-by-one and do it manually.
2) Name Your Files Appropriately and Use “Save” Instead of “Send”
As far as I know, this can’t really be blamed on Image-Line because I believe it’s an issue with iOS in general, but I find that it’s hard to find where files go if I use “Send” instead of “Save.” I spent about 10 minutes trying to find where FLM sent my files when I used “Send” but I couldn’t find them.
But if you use “Save,” you can easily find where your files go. With that in mind, it’s a good idea to always name your tracks with an easily identifiable name.
Because then when you’re trying to find them, it’s easy to differentiate between your recent and older files. In the end, it’s a fairly simple process once you figure it all out.

 Written By :