FL Studio has a few different ways to pitch shift in real-time without changing the timing/tempo of the vocals. The easiest one is the Pitch knob in the Channel Settings window of an audio clip. Here’s how to do that:
To pitch vocals in FL Studio
1) Open the Channel Settings by double-clicking the audio sample in the Playlist
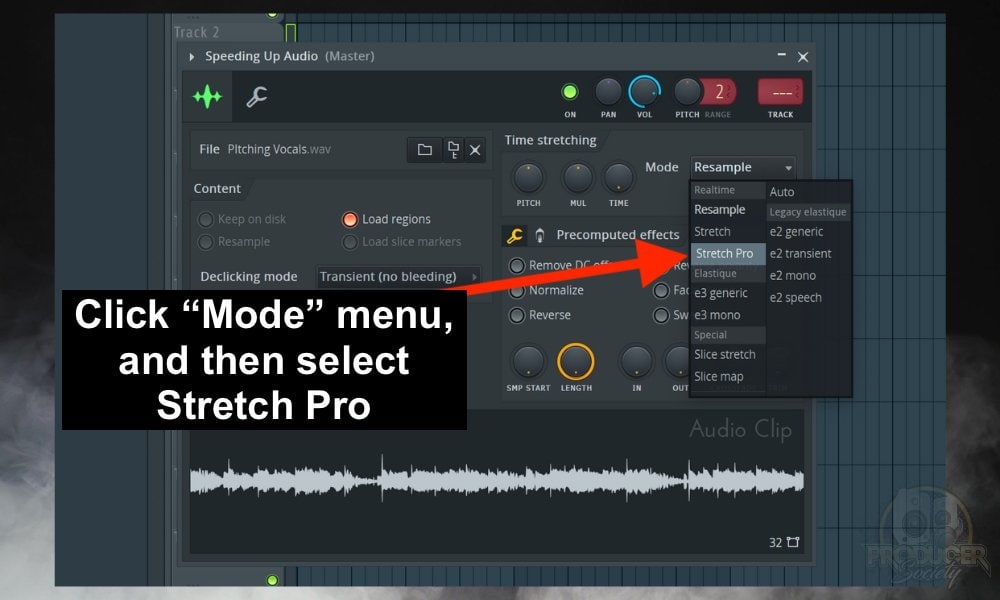
2) Change “Mode” to Stretch Pro
3) Turn the “Pitch” knob under “Time stretching” (left to lower the pitch)
4) Use the “Formant” slider to change the timbre of the vocal recording
4 Ways to Pitch Vocals in FL Studio
The method described using the Channel Settings window is effective and produces good sound quality.
For most, this method is sufficient. It certainly works for me. That said, there are even better ways of doing the same thing, some more time-consuming than others.
The “Time Stretch” option in Edison offers better control of many pitch-shifting parameters. Newer versions of FL Studio also come with an effects plugin called Pitch Shifter.
It’s a more simple and powerful variation of Edison’s time stretch with other features that altogether make it a solid plugin. Another great way of adjusting the pitch while retaining the human quality is Melodyne. If you’ve been around long enough, you know I’ve talked about it extensively in the past.
1) Using “Stretch Pro” in the Channel Settings Window
As I was saying a moment ago, the FL Studio Channel Settings has a lot of great functions. It essentially serves as an accessible audio editor, well-suited for pitch shifting.
There are 2 pitch buttons in the window. One is the channel pitch itself, while the other one is under the time stretching section (as stated earlier, pitch shifting works by time stretching).
Changing the pitch using the channel pitch knob will change the pitch, but will affect the timing. The higher the pitch, the shorter your vocals become; the lower the pitch, the longer your vocals.
A) Using the Time Stretching Pitch Shift
Pitch shifting in the time stretching section involves three knobs. The way the pitch is changed is determined by the modes under the mode options.
The mode relevant to pitch change is the Stretch mode or Stretch Pro mode. Other modes have their significance, and you can find out more about them from the FL Studio reference manual.
i) Open the Channel Settings Window

To open the Channel Settings, on the playlist, double-click the audio clip you want to pitch. Another way is from the channel rack, simply click the channel where the vocal audio is on, and this takes you there.
ii) Locate The Time Stretching Tab

It is the first section to the right. Notice the “Pitch”, “Mul”(stands for time stretch multiplicator) and “Time” knobs. Mul and Time are more typically related to time stretch than pitch shifting.
iii) Change Mode To Stretch Pro

Now, if you made a large change to the pitch, let’s say about 1200 cents (12 semitones), you’ll notice that your audio sounds a bit weird (specifically for vocals).
If you raise the pitch, you’ll hear a chipmunk kind of sound, and if you reduce the pitch, you hear a dark kind of sound. This is called formant shifting.
Formants are harmonic frequencies present in our voices. They are the frequencies that make up much of the sonic character of our vocals.
Changing the formants does not affect the pitch or length of your vocals, they just alter the way we perceive the voices. Like making a woman’s voice sound deep like a man’s for example.
iv) Adjust The Pitch
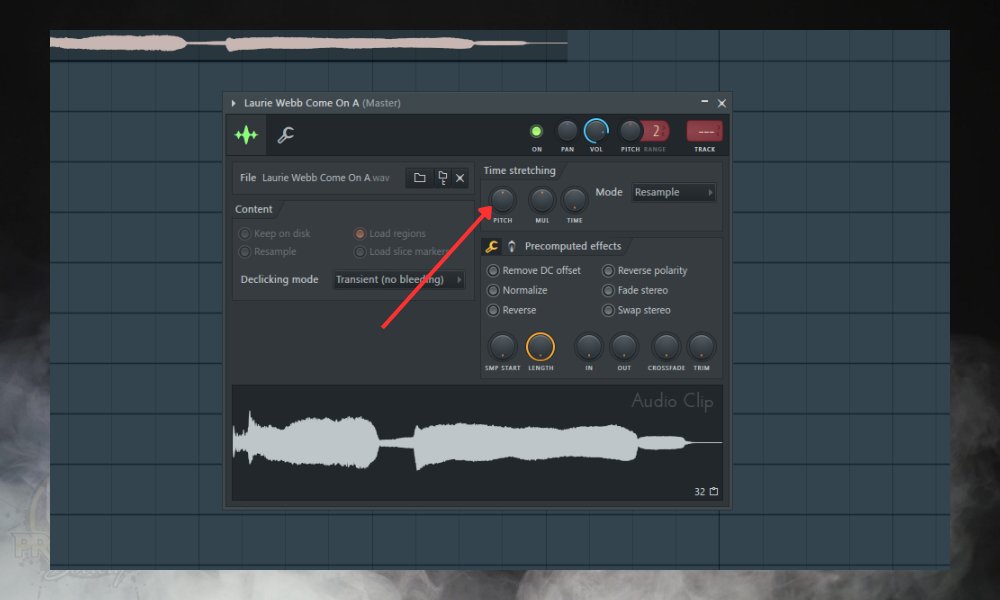
Next, use the pitch knob to adjust the pitch of your vocals to your desired point. This knob measures pitch in cents: 100 cents is equivalent to 1 semitone (a half step on a piano). The limit is 1200 cents (12 semitones) which is equal to one octave.
Pay attention to how when you move this knob, FL Studio will need to re-stretch your audio to effect the pitch change. Depending on the length of the vocal, this could take a little while or maybe no time at all.
v) Fine Tune the Formant Slider

The Formant slider adjusts the characteristics of the sound that are closely associated with the human voice. It changes how deep (nasally) or high-pitched (chipmunk) a voice sounds without altering the actual musical pitch or note.
For example, if you raise the pitch, you’ll need to reduce the formants (move the slider to the left), if you reduce the pitch, you’ll need to increase the formant (move the slider to the right).
B) Using The Channel Pitch
As stated earlier, using the Channel pitch messes with the timing of the vocals. If this is what you want, then don’t bother with the time-stretching pitch.
There are two things you need to take note of here: the pitch knob and the range. The range determines how much pitch change you can have. It’s measured in semitones (half-steps on a piano), and each number represents a semitone.
An octave is 12 semitones. The widest range you can get from the sampler is 48 semitones – equivalent to 4 octaves.
If you decide to use the channel pitch, but you don’t want to mess with the timing of the vocals, then you have to change the time stretching mode to Stretch/Stretch Pro
i) Change the Mode To Stretch Pro

ii) Define the Pitch Range

The range is measured in semitones and the limit is 48 semitones (4 octaves). I do not recommend large alterations in vocal pitch, except if you want to use it as an effect.
iii) Pitch Your Vocals

Let’s move on to Edison, which is another great way of doing the same thing.
2) Using Edison’s Time Stretch
Edison provides a more detailed yet straightforward approach to pitching vocals.
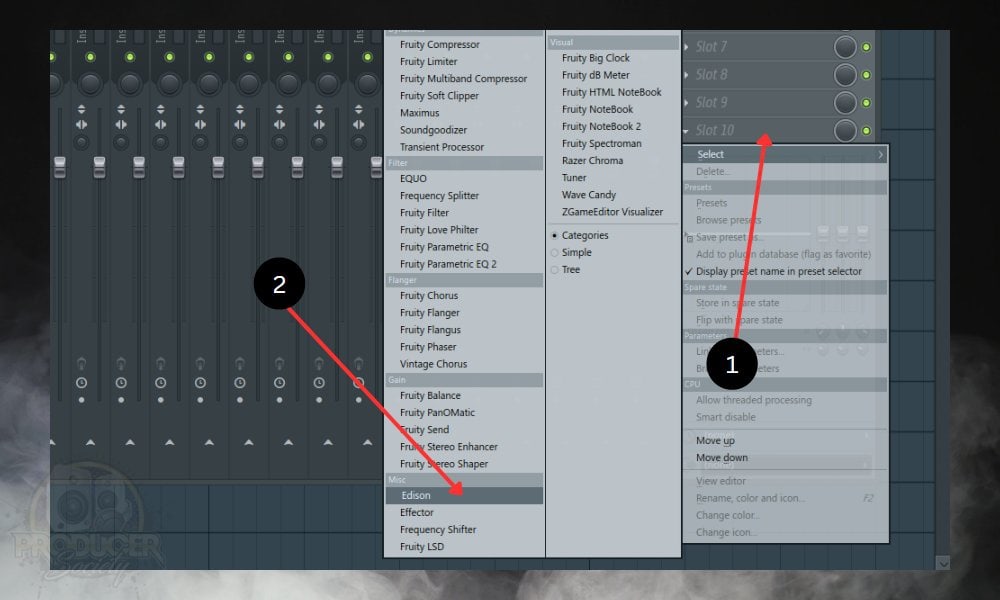
A) Insert Edison On a Mixer Track
B) Load Your Vocals Into Edison
To begin editing your vocals with Edison, you need to have loaded the audio into Edison. There are a few ways you can load any audio sample into Edison.
i) From The Audio Clip On The Playlist

Open the clip options by clicking the top left icon on the audio clip. From the drop-down, select “Edit sample”, This will open the vocal in Edison.
ii) From The Channel Settings
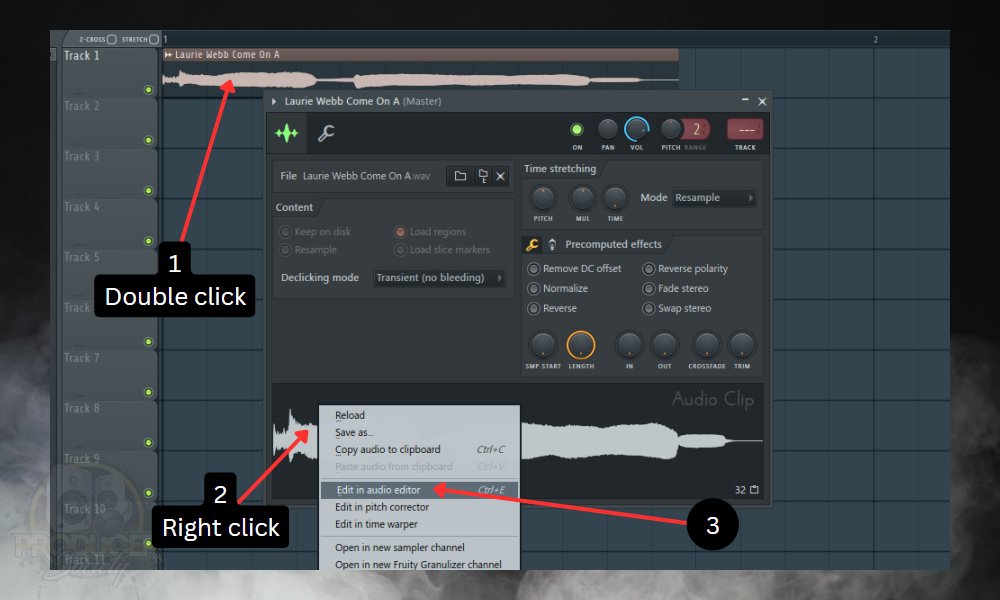
From the sampler window, right-click the waveform of your vocal and select “Edit in audio editor”, Or simply press Ctrl/Cmd + E.
C) Find The “Time Stretch” button

D) Open Time Stretch
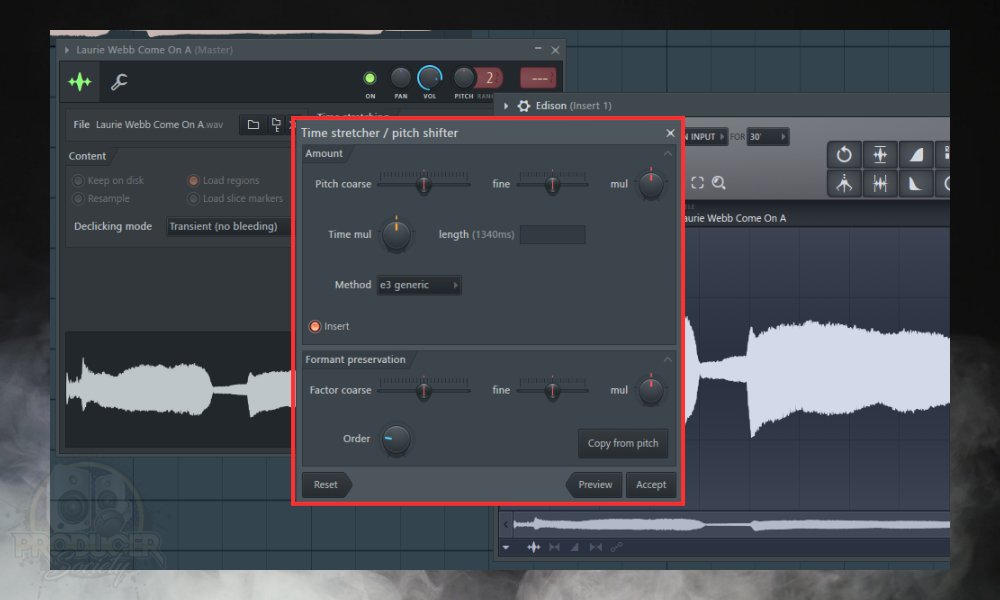
The amount section features 2 pitch sliders: Pitch coarse and fine. The “coarse” changes pitch in semitones with a 12 semitone (1 octave) limit. The “fine” changes pitch in cents with a 100 cents (100 cents = 1 semitone) limit.
The “mul” button to the right of the sliders is the pitch multiplier. From the name, it multiplies the effect of the pitch sliders. You can use it to increase or decrease the range of pitch modification.
The “time mul” (time multiplier) decides how long/short the audio will be. Leaving it in default (in the middle) keeps the time unchanged while moving it to the left or right shortens or lengthens it respectively.
Under the formant preservation section, use the “Factor coarse” slider to adjust the formants. Moving it to the right “decreases” the formants, while moving it to the right increases the formants.
The “copy from pitch” button automatically detects the formants of the original vocals and uses that information to adjust the formant slider. This will give the best naturally sounding result. Adjust these settings to your preferences and click “Accept” when you’re done.
E) Send Your Vocals To The Playlist

Don’t forget that the edit you’ve done is in Edison alone. You need to transfer the pitch-shifted vocals to the playlist. You can do this by clicking the “Send to playlist” button.
Which is found at the bottom right in the tool section. That’s it for this method. But we’re not done yet. Let’s use the Pitch Shifter plugin as well.
3) Using The Pitch Shifter Effect
If your version of FL Studio doesn’t have it, you should consider updating your software to a more recent version.
It offers more options than Edison in a more dedicated and sophisticated way. This video by Image-Line (FL Studio’s manufacturer) gives a detailed explanation of the pitch shifter and all its other functions. Let’s begin.
A) Route Your Audio to The Mixer

Route your audio to the mixer by:
- Double-clicking the audio clip of your vocals on the playlist
- Then, drag the track select button up/down. Or simply press Ctrl/Cmd + L
B) Insert Pitch Shifter on a Mixer Track

C) Adjust the Pitch Shifter Settings

Pitch Shifter has 2 modes: Vocal Mode and Music Mode. Vocal mode is best for audio with clearly defined pitches, while Music mode is more suited for audio with varying instruments and vocals of different pitches.
Use the pitch slider to adjust the pitch as desired. Then adjust the formants accordingly using the formant slider.
The formant correction knob is used for the automatic correction of the formants whenever you shift the pitch.
It balances out the pitch with formants. The higher the pitch, the lower the formants and the lower the pitch, the higher the formats.
4) Using Melodyne in FL Studio to Pitch Shift

A) Insert Melodyne as a Mixer Plugin
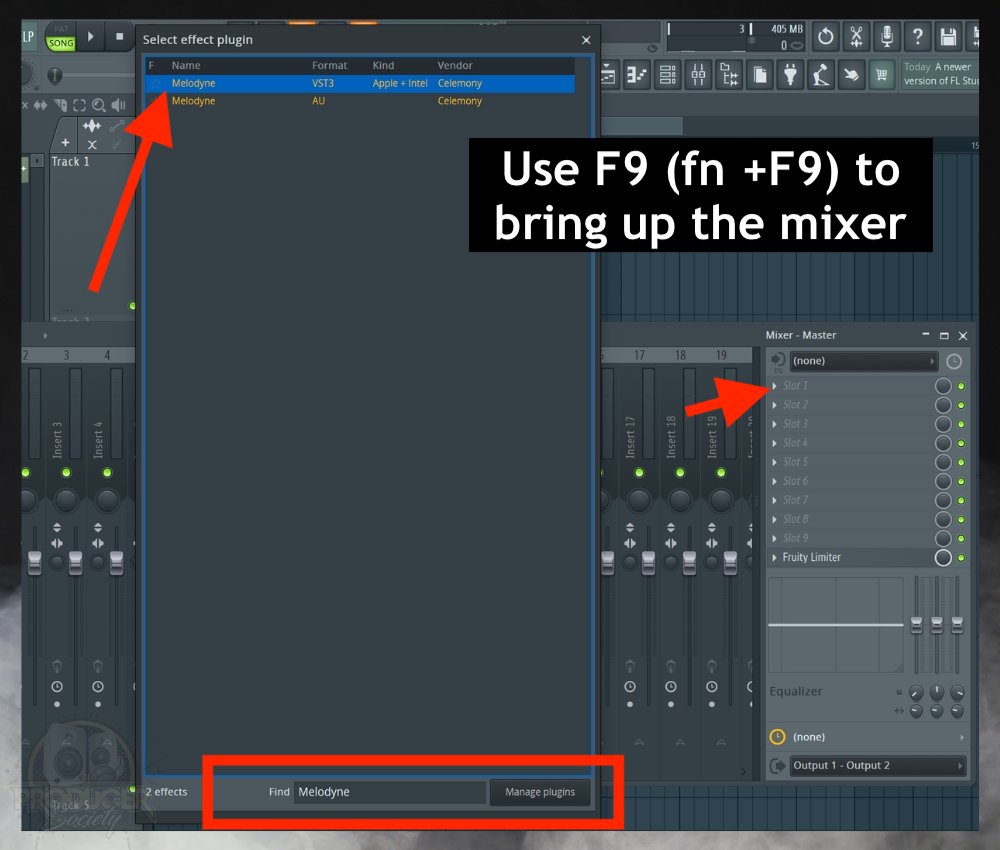
i) Use F9 or fn + F9 to Bring Up the Mixer
ii) Click one of the Slots and Choose “More Plugins”
iii) Find Melodyne in the List and then Select It
B) Use the Transfer Button to Record the Audio into Melodyne

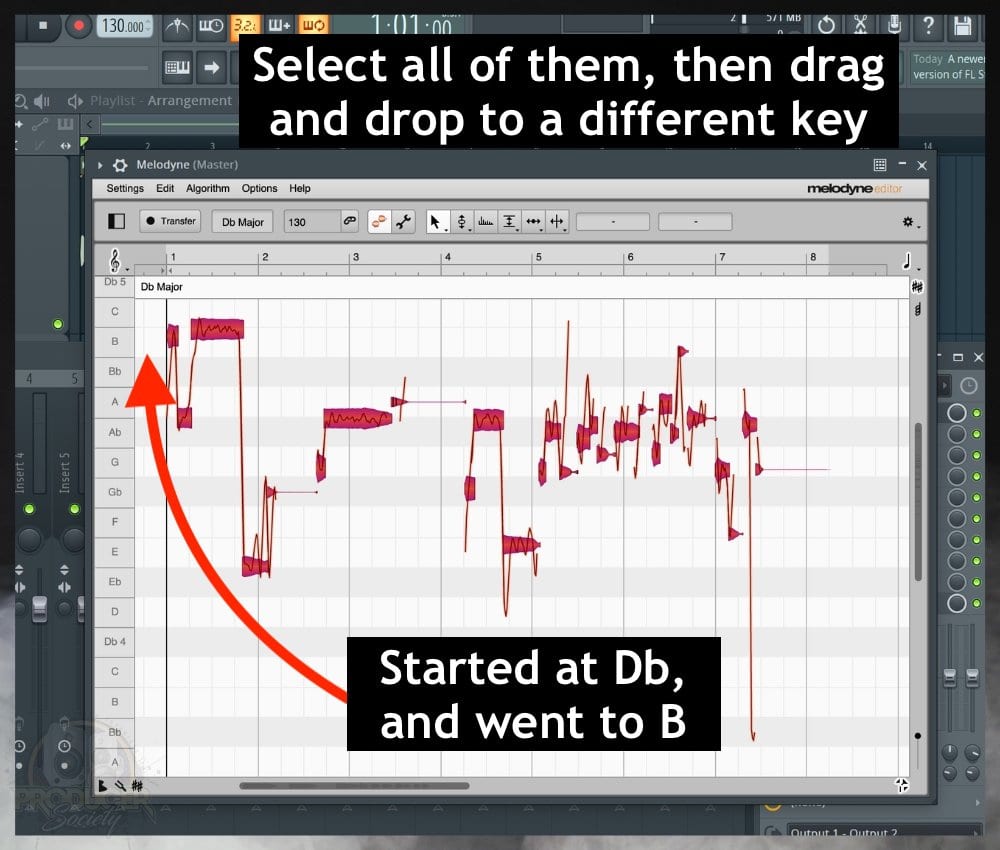
C) Drag and Drop the Blobs in Melodyne to the Desired Pitch
D) Fine-tune the Modulation, Timing, Formants, and Amplitude
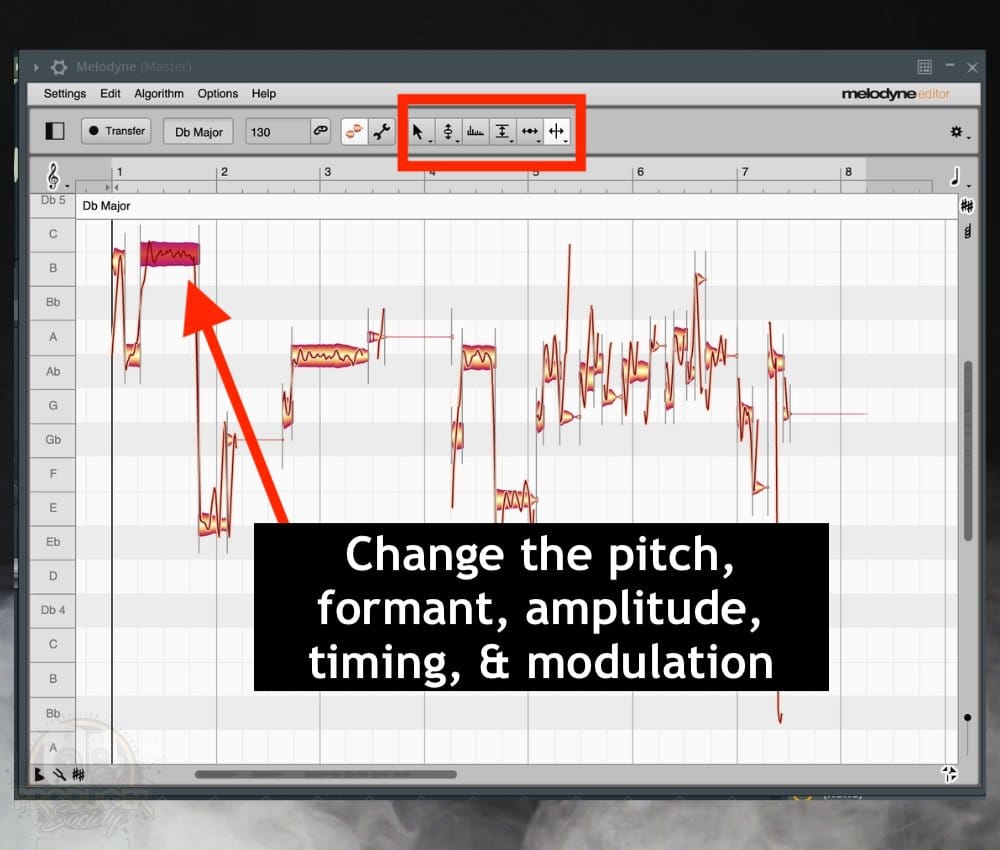
The 6 buttons I’ve highlighted in the image above are the Main Tool, Pitch Tool, Formant Tool, Amplitude, Timing, and Note Separation Tools, respectively.
With each of these, you can get surgical in terms of how you change the pitch, timing, etc. By default, Melodyne stores the edited audio in its own system. Personally, I prefer to bounce/render the file and then bring it back in. I’ll show you how to do that.
E) Render or Bounce the Vocal Track to A New File
i) Use File > Export > Wave

You’ll also want to mute the rest of your tracks or solo the insert track with Melodyne on it.
ii) Choose Your Desktop as Export Location then Select Your Rendering Settings
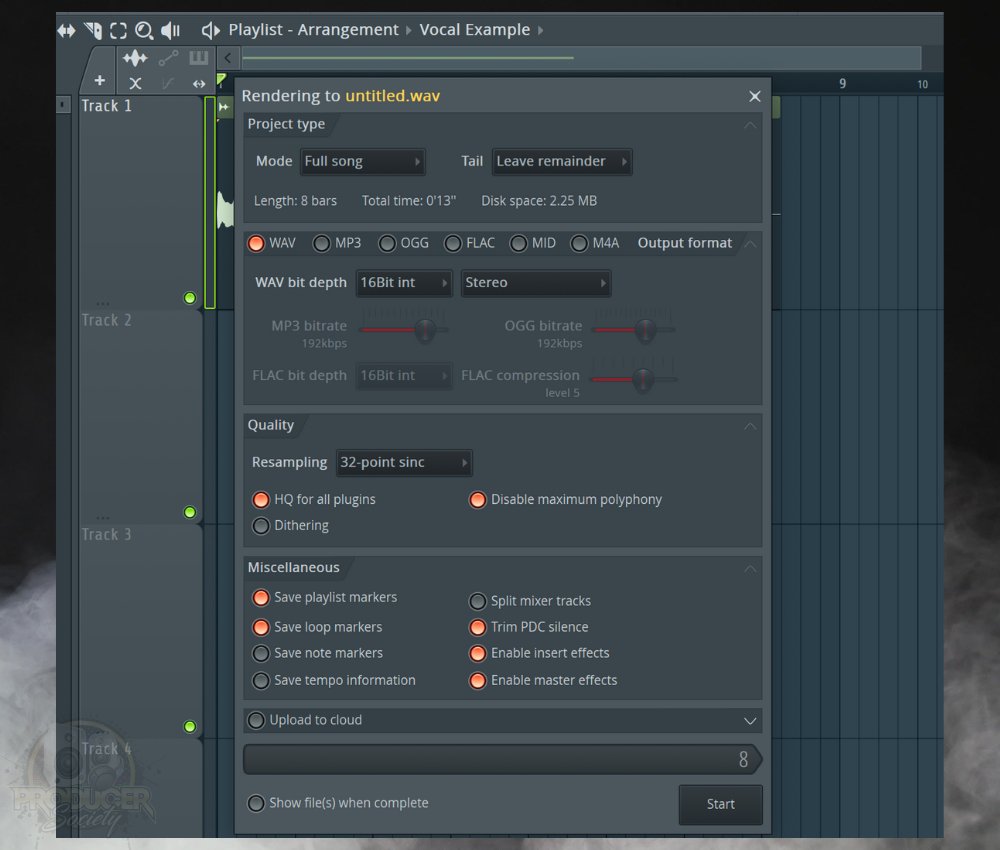
iii) Drag and Drop the Corrected Vocal Track Back into Your Project
Once you’re done, simply drag and drop the vocal recording into your Playlist. Voila, you now have a newly corrected track. Obviously, you want to do this once you’re sure you won’t be editing the vocal again.
Other Articles You May Be Interested In
- How to Reset An Audio Clip in FL Studio (Pitch, Time, Mul)
- Speeding Up Audio in FL Studio Is Very Easy + (4 Tips)
- How to Find Melodyne Files (Where They’re Stored)
- Can Melodyne Fix Bad Vocals? [ANSWERED]
Important Things to Note About Pitching Vocals in FL Studio
1) There Are Probably Even More Ways
I’ve just scratched the surface of pitch correction. There are probably tons of other tools and plugins you can use to do the same thing. I think I’ve covered the best ways of doing it though.


 Written By :