To find where Melodyne files are stored
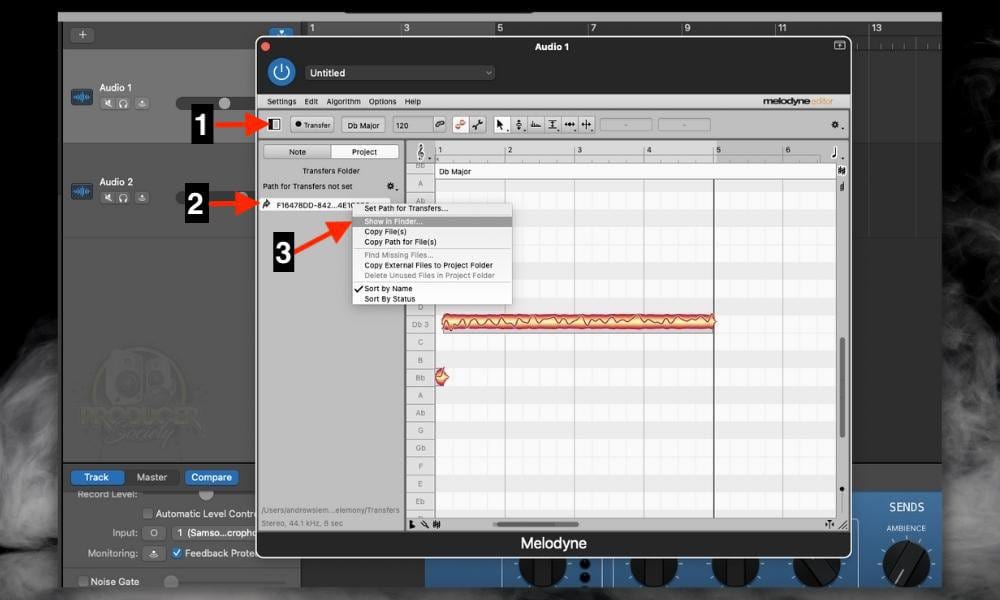
1) Open the Melodyne plugin in a pre-existing project
2) Click on the rectangle next to the Transfer button
3) Right-click on the file underneath the heading, “Path for Transfers Not Set”
4) Select “Show in Finder” to go where Melodyne files are stored
One tip that’s really helpful for finding where files and folders are located, is to use the shortcut Option + Command + P. This will enable the “Show Path Bar,” which means when you select a file/folder, it’ll give you the exact path right at the bottom of the Finder window.
How to Find Your Melodyne Files

The image above is the meat and potatoes, so to speak, of finding where all your Melodyne files are, however, as I was saying to you a moment ago, there is another way of doing it. Also, before you do any of this, I think it’s a good idea to have “Show Path Bar” enabled.

To enable the “Show Path Bar” shortcut, use (Option + Command + P) with your finder open so the operating system will clearly display the pathway at the bottom of the Finder.
This will enable you to find your files in a step-by-step fashion, that way you know where you are when Melodyne takes you to where the files are stored.
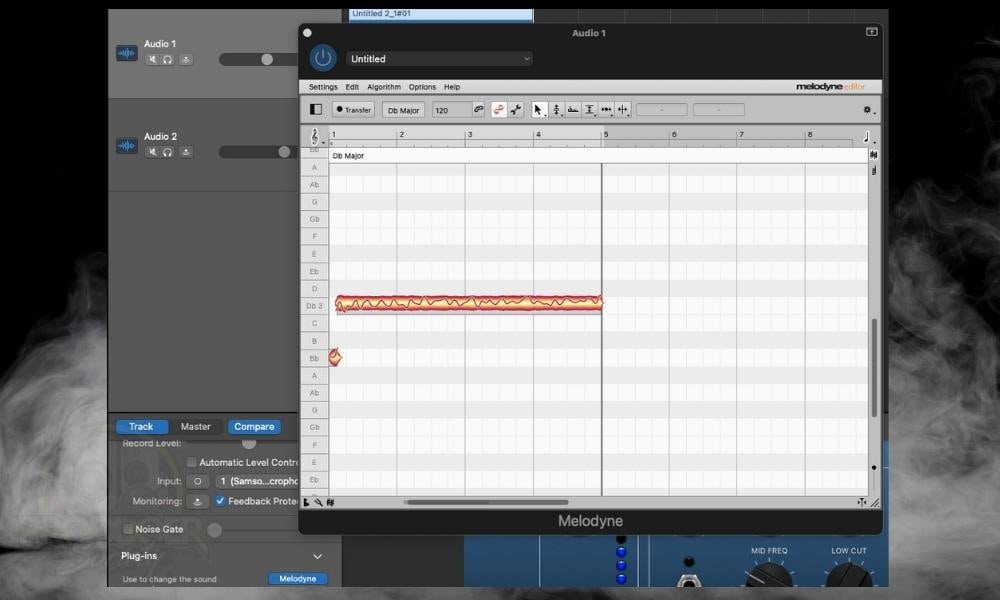
1) Open The Melodyne Plugin In Your Project

For this step, it’s important that you’ve either opened up a pre-existing project with a Melodyne file already printed or transferred, or you can simply make a new one by recording a 2-3 second file and transferring it into Melodyne.
It’s important because if you don’t, you won’t be able to right-click any file to “Show in Finder.” It simply won’t give you that option.
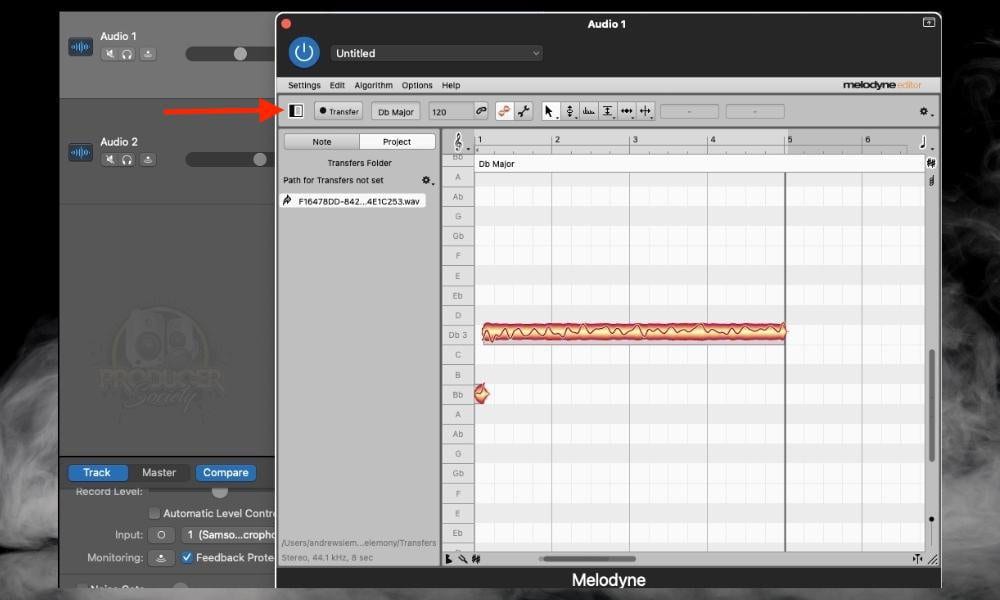
2) Click on the Partially Shaded Rectangle to Open The Transfers

Once you’ve selected the rectangle like what’s shown in the image, Melodyne will take you to an interface where you can see some of the transfer projects right in Melodyne.
However, don’t be fooled, because the transfer files aren’t really stored here. They’re stored elsewhere on your hard drive, which you may already know if you’ve read my review of Melodyne.
3) Right Click on the Melodyne File and Select “Show In Finder”

And this is where the money is. Once you’ve selected the “Show in Finder” option, you’ll be taken to exactly where everything is stored. However, it’s important that you’ve enabled “Show File Path,” that way you can actually see where those newly discovered files are located.
4) Navigate to Where Your Transfers Are Stored

If you’ve read my guide on finding GarageBand files, you know that it can be a challenge to properly navigate the macOS directory to find your files.
5) Look at the Bottom to Find the Exact Pathway for the Melodyne Transfers

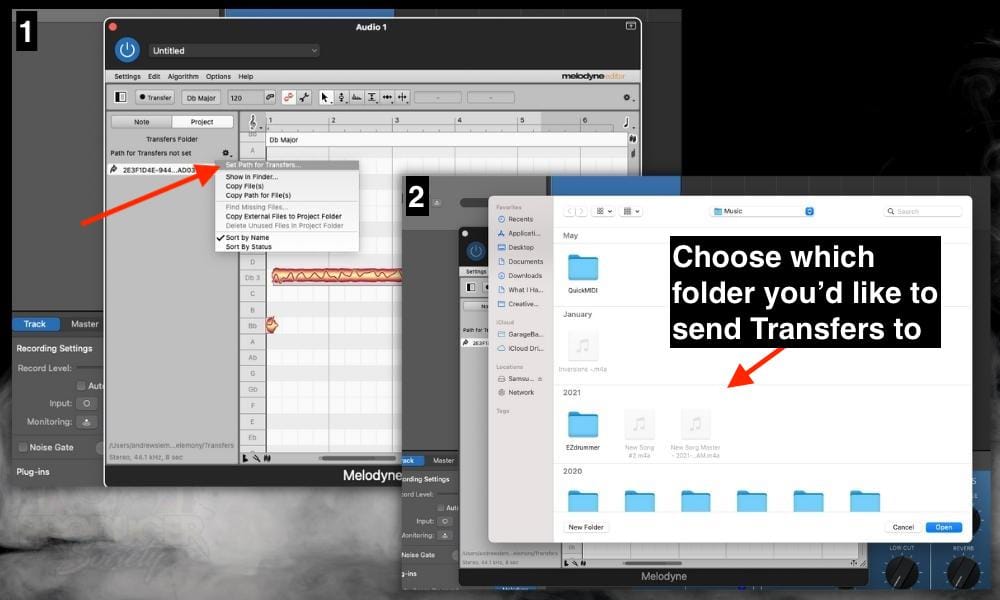
And voila, you now know exactly where your Melodyne files are located, which is great. It’s worth mentioning that you can actually configure where Melodyne transfers are sent to, but I just choose the default folder that it uses. Here’s how to do it.
How to Set the Path for Melodyne Transfers

Originally, I had another one set up but the files weren’t going there for some reason. Anyway, there’s actually another way to find your Melodyne files and it involves a few similar steps, but the last two are different.
How to Use the Copy Path Function to Find Melodyne Files
The first thing you want to do is navigate to the Transfer window of the Melodyne plugin just like I showed you before. You do that by opening the Melodyne plugin, clicking on the partially shaded rectangle, and then selecting Copy Path for Files.
1) Click Copy Path for Files

2) Open A Text Editor and Paste the Pathway Into It

With this pathway, you can go into the folders one by one until you find where everything is stored. I prefer the first method, but I figured I would say something about this.
I imagine there is a way to paste this into the terminal or something like that and it’ll take you to where the file is, but personally, I don’t know how to do it.
It’s worth mentioning that the Terminal and other tools can be used to find the pathway of a file if you already have located it, but this isn’t super relevant to our needs in this particular issue.
Where Are Melodyne Files Stored?
Generally speaking, you can find Melodyne files by following the file path: Macintosh HD > Users > “your username” > Music > Celemony > Transfers. However, with a Melodyne project open, you can also set the Transfer Path by clicking on the half-shaded rectangle next to the Transfer button.
Other Melodyne and Relevant Articles
- How to Add Vibrato in Melodyne
- How to Pitch Your Vocals in GarageBand
- ALL The Best Plugins for GarageBand (Free and Premium)
Important Things to Note About Finding Melodyne Files
1) There May Be Other Ways to Find Melodyne File Transfers
How your computer stores Melodyne Transfers may depend on what operating system you’re using. It may be slightly different if you’re using Windows, for instance, or if you’re using the older version of Melodyne, Melodyne 4, or a different version like Essential vs Editor.
The version of your operating system might change the process as well. That all said, I believe the method I showed you though should be enough to work across various versions and operating systems.

 Written By :