Making drums and other sounds louder in Garageband is a lot easier than you think. The AUPeakLimiter, the limiter, or the compressor all work but there’s another way too.
To make the drums louder in Garageband
1) Use the Gain plugin for volume boosts
2) Set up a compressor and increase the “Gain” setting
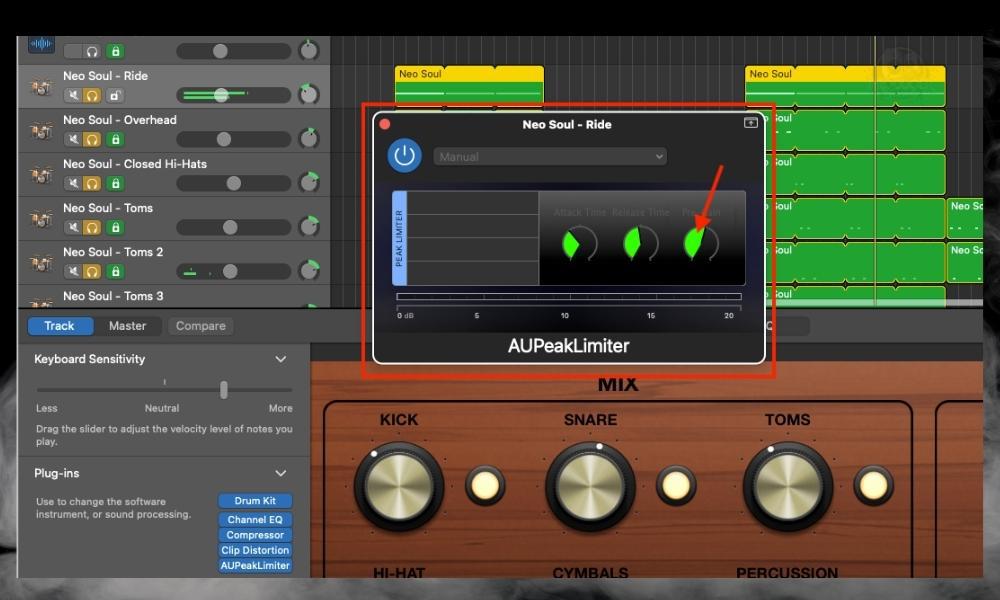
3) Use the AUPeakLimiter in the Smart Controls and increase the Pre-Gain parameter
4) Increase the VU Meter volume
5) Boost the Gain on your Channel EQ plugin
6 Different Ways to Make Drums Louder in Garageband
1) Use the Gain Plugin To Increase the Volume

The easiest way to increase the volume of any sound is to add the Gain plugin to the plugins section of the Smart Controls. There is only one parameter so it’s very hard to make a mistake.
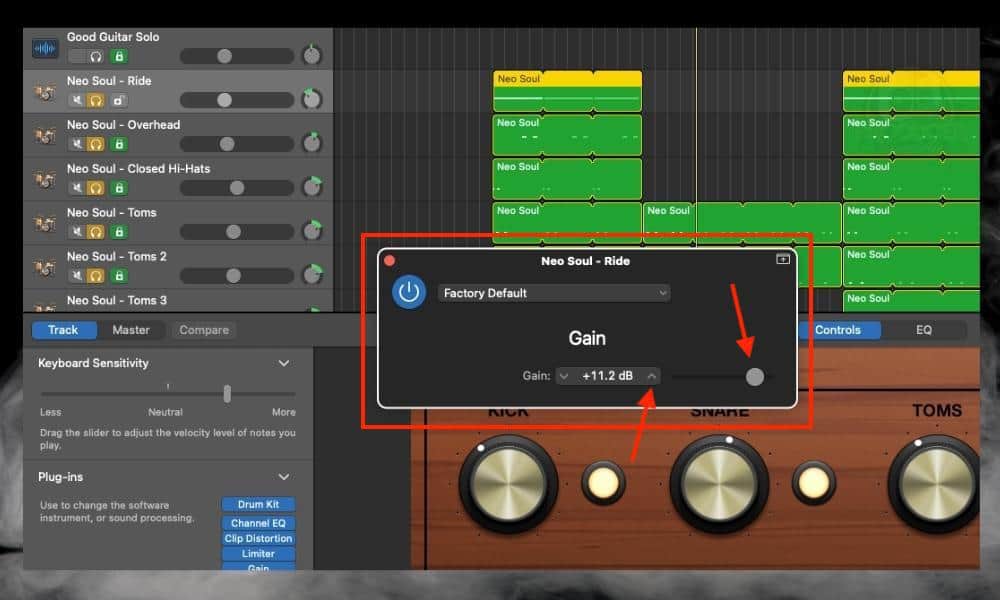
Go down into the Smart Controls after having pressing (B) on your keyboard to bring the plugins up (I have more keyboard shortcuts in my guide by the way). Click on an empty plugin slot > choose Utility > then Gain.
Once Garageband brings up the Gain plugin, increase the parameter by sliding the slider over to the right, or by clicking on the upward directional arrow. It’s as simple as this. You’ll notice immediately that the volume of the instrument will increase.

To make this method work, you have to add the Gain plugin to every single part of the drum kit, of course. Unless you only wanted to increase the volume to one specific part of the drum kit.
Nevertheless, this is the newest strategy for me to increase the volume of my instruments. Needless to say that I’m not 100% sure of its reliability, particularly when mastering.
Increasing the volume with the Gain plugin is different from using a limiter, compressor, and the AUPeakLimiter in one fundamental way. It doesn’t compress or limit the audio signal at all as the other three do.
As you may already know if you’ve read my limiter guide, a limiter is just a compressor with the ratio cranked to the maximum. But the Gain plugin increases the volume of the audio recording with no other added processing.
In effect, the limiter and the AUPeakLimiter create a ceiling for the sound and volume but the gain does not. That means you don’t know if there will be distortion or clipping on the final product once you’ve tried to master it.
One way of making sure you haven’t increased the volume far too much is with the MLoudnessAnalyzer from Melda Productions. My reference track tutorial shows how to use the loudness analyzer. The other way could be looking at the VU meters, as usual, to ensure they’re not going into the red at any point in the project.
2) Set Up a Compressor and Increase the “Gain”

Similar to using the Gain plugin, go down into the Smart Controls and then choose Dynamics and then Compressor. Compress the drum piece as you normally would, but then use the Gain control to get the volume exactly where you need it.

A good rule of thumb is to press the On and Off button while adjusting the gain. Adjust the gain this way so you can match the volume of the uncompressed sound with the compressed sound. Or you could use the gain so it’s much louder than the original signal.
Previously, I used the compressor as a total volume control all of the time, despite what people told me not to do. The thing about compression is that it does tend to make things sound louder which always seems better to my ears.
According to Bobby Owsinski in his book, The Mixing Engineer’s Handbook (which you can get on Amazon), this isn’t an uncommon sentiment either.
The problem with using this method is that it means you’ll have to set up a compressor on every single part of the kit. Then, you’ll have to make sure the ratio is set and the threshold is set to something where it won’t destroy the music.
You’ll notice the ratio on my compressor, for example, is 1:1. That means there is no compression at all but the gain is turned up to +5.0dB. As long as you don’t go crazy with this, I think you should be ok.
There’s nothing wrong with using the compressor’s gain to make up for the changes as a result of the compression. As a matter of fact, that’s what the “makeup gain” is for. It makes up for the loss in volume (more on compression in my guide).
3) Increase the Gain of your Channel EQ Plugin

Using the Channel EQ plugin is one method that not a lot of people will think of. It’s an easy way to increase the volume because every part of the kit usually needs equalization.
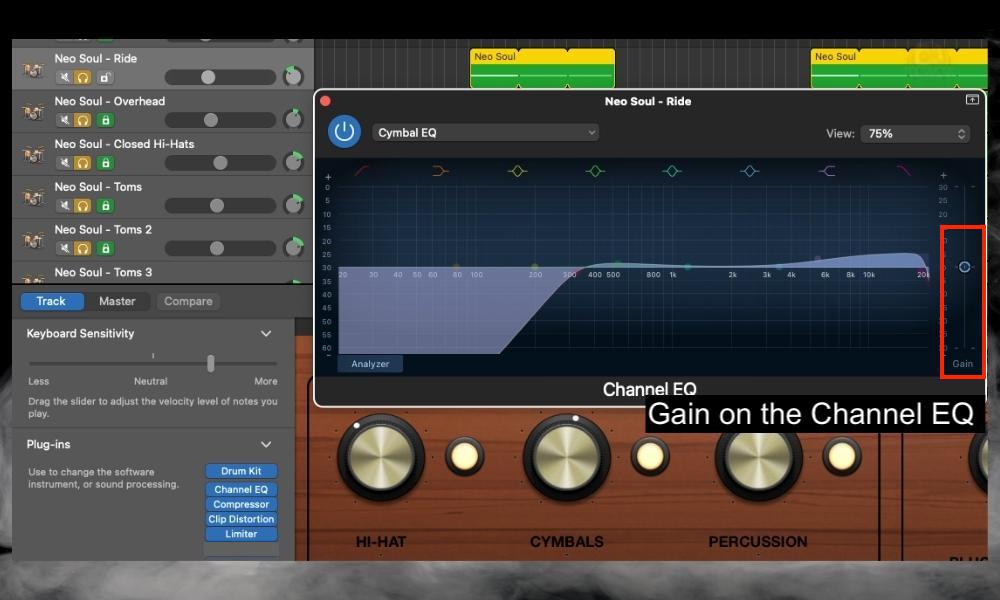
That means every part will also have a Channel EQ running on it and turned on. Use the Gain parameter on the right-hand side of the Channel EQ plugin to increase the volume.
This might be one of the more underrated ways to increase the volume of any sound. It’s nice to use for incremental volume changes because, as I said, there’s usually a Channel EQ on every sound. Try boosting the volume by +1-2dB on every track. That should be enough.
4) Increase the Pre-Gain Parameter on the AUPeakLimiter

Using the AUPeakLimiter is the most impractical way of increasing the volume of drums, but it still works. The great cost of using it though is that you’re essentially putting a limiter on every single track.
That means you could squash the sound big time. And then when you put a compressor on the mix buss or master track, you’ll get distortion, clipping, or over-compression.
Either way, the AUPeakLimiter is one way to increase the volume of your project. I almost exclusively use it on the master track as I’ve explained in my guide on why Garageband songs are quiet. By the way, the article I just mentioned has more information on why things are too quiet sometimes, so make sure to check that out.
5) Increase the VU Meter Volume

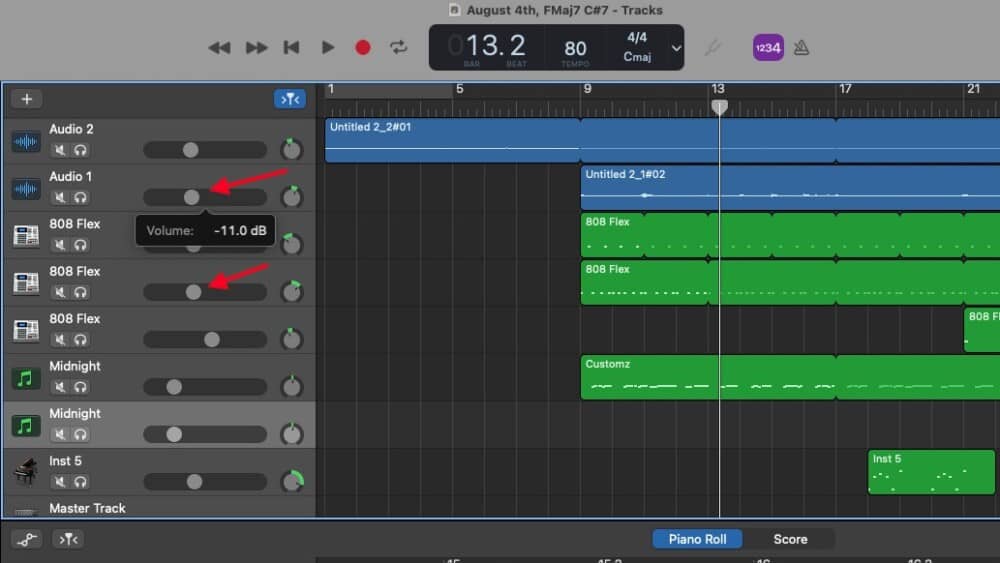
And finally, the last way to increase the volume is the easiest and most obvious. I try not to assume anything, so I made sure to include it here. The VU Meters are the primary way to adjust the volume in Garageband, regardless of whether it’s an audio, instrument, or drummer region.
And you can also increase the volume of your project by using the Master VU meter which is on the top-right hand side of the Garageband interface.

6) Increase the Mix of Each Part of the Kit in the Drummer Track’s Smart Controls

The final way to increase the volume of your Garageband drums depends on whether you’ve used the Drummer Track or not. Assuming you haven’t separated the drums for mixing (which I showed you how to do in my drum editing guide), you have the option of adjusting the mix of each part of the kit.
Turn the knobs to the right to increase the mix of each part as the image above shows. This method presupposes you won’t separate the drums into their own track region though. I listed this method last for this exact reason: it’s useless once you start separating the drums for mixing.
Why Can’t I Hear The Drums in Garageband?
1) The Mute Button is On
This is an annoying tip, but it needs to be said. If you haven’t already separated your drums for mixing using the article I linked earlier, your drums may be loaded on one track.
If you use the Drummer Track, every part of the kit exists on just one track. In this case, leaving the Mute button on by accident is probably the biggest culprit.
Toggle the Mute button off if you switched it on by accident. Related to this, accidentally soloing other parts of the project could also be the reason you can’t hear your drums.
2) The VU Meters Are Far Too Low
Garageband drums are relatively quiet by default. You may have to increase the VU meter by +5dB to +10dB, perhaps more, to hear them. If they’re still too quiet, use one of the tips that I mentioned earlier. The Gain plugin is always a good choice.
3) You Need to Re-Start Your Project
One of my favorite drum plugins to use is the Drum Pro audio unit from Studio Linked (my guide to plugins here). I use it on almost every single song and I love it. However, with recent updates, I find it’s not as reliable as it once was.
Every once in a while, the plugin crashes and I have to restart the project to hear it once again. If you’re using a third-party plugin, you may also have run into the same issue.
Important Things to Note About Increasing Drum Volume
1) Don’t Increase The Volume of Anything Beyond +0.0dB
Don’t increase your VU meters above 0.0dB, however, because anything above 0dB in the digital world is above the point of distortion.
Whenever you take your VU meters above that point, you’ll find things just don’t sound as good as they should. I notice this effect big time when I record guitars – one reason why I, and many others, argue for the importance of leaving plenty of headroom on your tracks.

 Written By :