TikTok is probably one of the biggest opportunities in music because it’s a fairly new social media platform. Thankfully, it’s not that different from using YouTube and Instagram, so how do you use it for guitar videos?
To make guitar videos on TikTok
1) Connect a guitar to the computer via an audio interface
2) Put a light source behind the camera
3) Turn it on and record your guitar part in a DAW
4) Match the audio/video in iMovie
5) Export it as a vertical video
6) Upload the video to TikTok with your phone
What You Need to Make a Guitar Video on TikTok
Before we continue, let’s talk about what gear you actually need first. There are a number of ways you can go about filming yourself playing the guitar and then uploading the footage to a popular social media sharing platform.
For example, I already made a tutorial here on how I would do it for Instagram and YouTube, but for TikTok, it’s slightly different.
Additionally, I’ve also changed the way that I record myself playing although the key principles and concepts are still the same. These days, for making guitar videos I use a few different pieces of gear that I didn’t use before although I still use the handy SIOTI camera mount on Amazon on a regular basis and for all kinds of things.
Before I show you every piece of gear that I’m using these days to make video content for the web, I’m going to talk a little bit about the easiest way to make content for TikTok and other platforms. And by easiest, I mean the most simple and the one involving the least amount of gear.
The Simplest Way to Record TikTok Videos
1) Use an iPhone/Smart Phone

2) Get a Ring Light
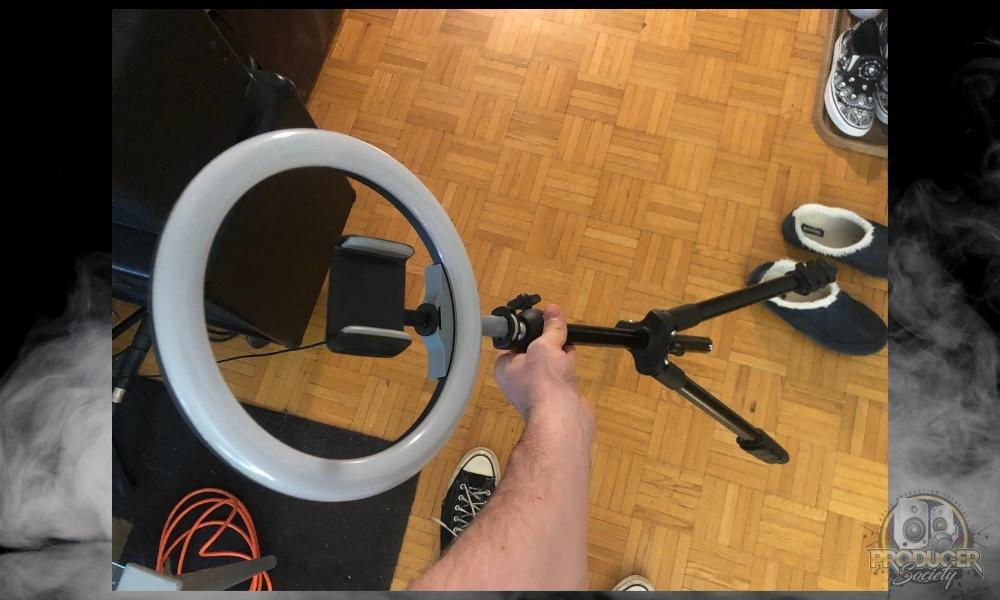
Using an iPhone and a ring light would be the easiest way to make content, however, if you want to make content with good video AND audio quality, rather than just good lighting, a ring light and camera phone probably won’t cut it.
To use your phone and a ring light, you just set your smartphone in the middle of the ring light’s holder and then hit record whenever you’re ready.
This is a great way to create quick content, but it’s not the best if you want high-quality sound. You could argue that this raw and bare-bones style is better due to simplicity, however.
What You Need to Make a High Quality Guitar Video on TikTok
1) Smart Phone – iPhone
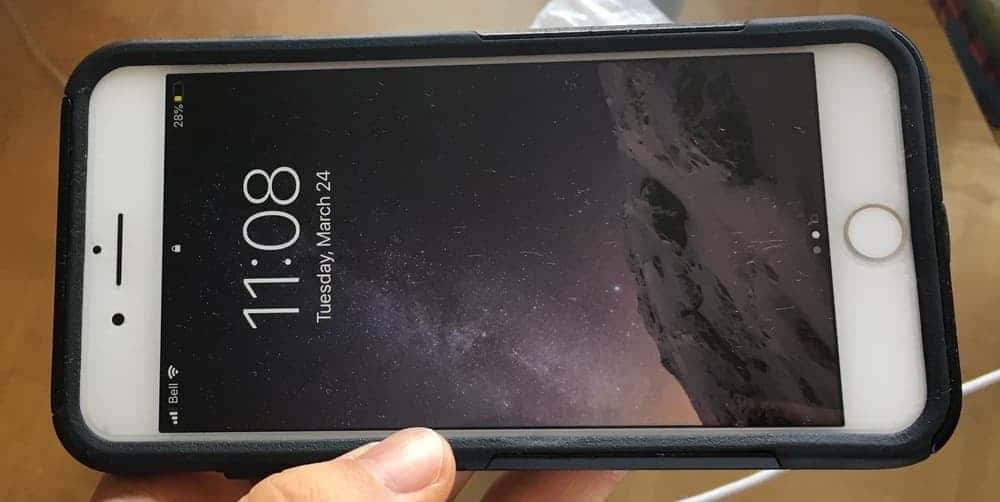
I currently own an Apple iPhone 7+ as well as an iPhone 6s. Without question, the 7+ has a superior camera and microphone built-in, however, I actually use my iPhone 6s for the camera simply because I have so much storage space on my old iPhone.
Switching to a phone without much storage space wasn’t a good idea, and it’s one reason why I recommend this maxed-out iPhone. If you want to get really serious about recording and making music, then storage space is something that you absolutely need, plain and simple.
I’ve explained before in my guide on the best laptop for Garageband that cheaping out on computers, phones, and other devices through foregoing optimized storage space was a big mistake, and it’s something I won’t do again.
2) Computer – MacBook Pro
If you’re reading this article, you probably already have a computer or laptop of some kind. You need a computer and/or laptop in order to edit the footage and match up the audio later in iMovie or Screenflow.
You could do these things with the mobile application as well, but I would much rather do it on desktop because the interface is way bigger and the user experience is easier to work with.
As I’ll explain in a minute, after I’ve recorded the footage on my iPhone and I’ve stopped recording in Garageband, I’ll AirDrop the footage right onto my computer.
This is a great way to speed up this process. Not having to connect everything via USB is very convenient, however, as I said above, if you plan on making lots of videos, storage space is crucial.
Either get an an external solid state drive like this one or buy a MacBook Pro with optimized specs like this one. You don’t necessarily need this stuff to make TikTok videos, but if you want to get serious about it in the future, it would be wise to own better equipment.
3) Audio Interface – Focusrite Scarlett 2i2

If you want to connect your guitar to your computer in a way that sounds great, grab a Focusrite Scarlett 2i2 which will be one of the better purchases that you make. Every computer has a sound card or an audio interface built right into it.
It’s the device inside the computer that turns the analog sound (the guitar string vibrations) into a language the computer can understand (more on this in my audio interface guide).
There are way better audio interfaces on the market than this one including the SSL 12 but the Scarlett 2i2 is going to work just fine for your first few years of video making and music production.
Another thing to get for your audio interface is a 10-foot USB to Thunderbolt cable like this red one. A wise man at the music store once told me it’s better to be too long than to be too short.
4) Camera and Phone Stand – Magic Fun Boom Arm
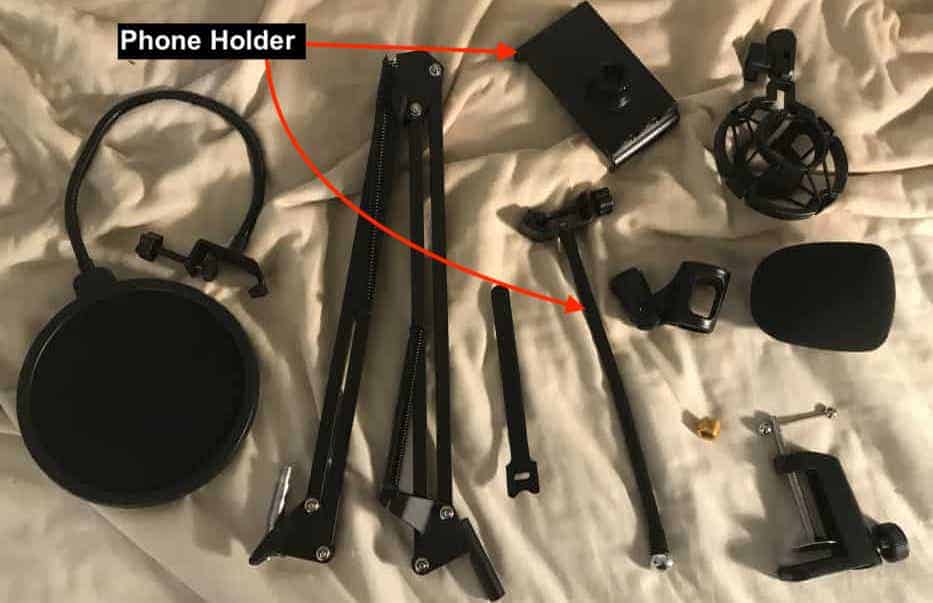
I bought this boom arm bundle around a year ago now and it’s crazy how much this thing has helped me out. It comes with a few handy tools that I use nearly every day including the boom arm itself, the pop filter, the phone holder, and the foam wind guard.
For the sake of making guitar TikTok videos, the phone holder is really going to come in handy. Another thing that I commonly use for this purpose is the SIOTI camera mount that I mentioned above. That little guy is a real winner and I couldn’t recommend it enough.
5) Lighting Kit – GEEKOTO Softbox Light and Boom Arm Light
GEEKOTO Softbox Light

This is an inexpensive Softbox light that’s really an introduction to this type of lighting. I was pleasantly surprised by how much light this thing gives off and how big of a difference it makes for the quality of your videos and photos.
When photographers and others talk about the importance of lighting, they mean gear like this albeit more of them and much higher quality. While this might not be the best softbox light that you can get, in fact, it’s far from it, it’s still a great light to get for the beginning stage of making videos.
The GEEKOTO version of this light is decent and I’m certainly glad I got it, but I mostly only use it if I really want to make a serious video.
For a quick video, I won’t bother using it due to the small amount of effort that it takes to bring it over to where I’m playing and turning it on. Yeah, it doesn’t take much effort to do that, but you need something quick and easy for when creativity strikes.
Boom Arm Light

Purely because of convenience, I commonly use this adjustable boom arm light that mounts right onto my desk. This is one of those purchases I’ve made in recent months that has really paid off in a number of ways.
Not only does it make lighting my videos much easier, but it’s also great for when I’m working at night and I don’t want too much light.
The one I got here is a good one to buy because you can adjust the strength of the lighting as well as the color.
You can actually change the color of your videos after you’ve uploaded them to TikTok, but it’s nice to be able to film with a much warmer light rather than an industrial-style one that’s bright white.
6) Digital Audio Workstation – GarageBand
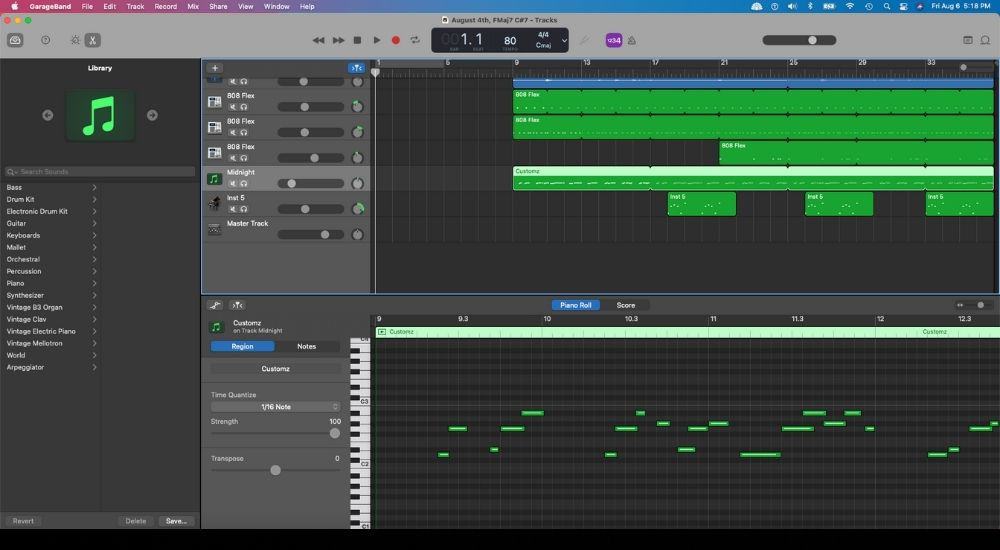
Garageband is what I use to track the guitars while I’m recording myself with my iPhone. Additionally, it’s the place where I’ll add drums, effects, and other instruments to the guitar recording before I send everything over to iMovie.
iMovie, I use primarily for matching the audio and then turning up the total volume, but it’s in Garageband where I’ll do the editing on just the audio.
You don’t need to use just Garageband. FL Studio 20 or pretty much any other DAW like Logic will work as well, but I chose Garageband because it’s the one I use and most importantly: it’s free.
7) Video Editing Software – iMovie and/or ScreenFlow
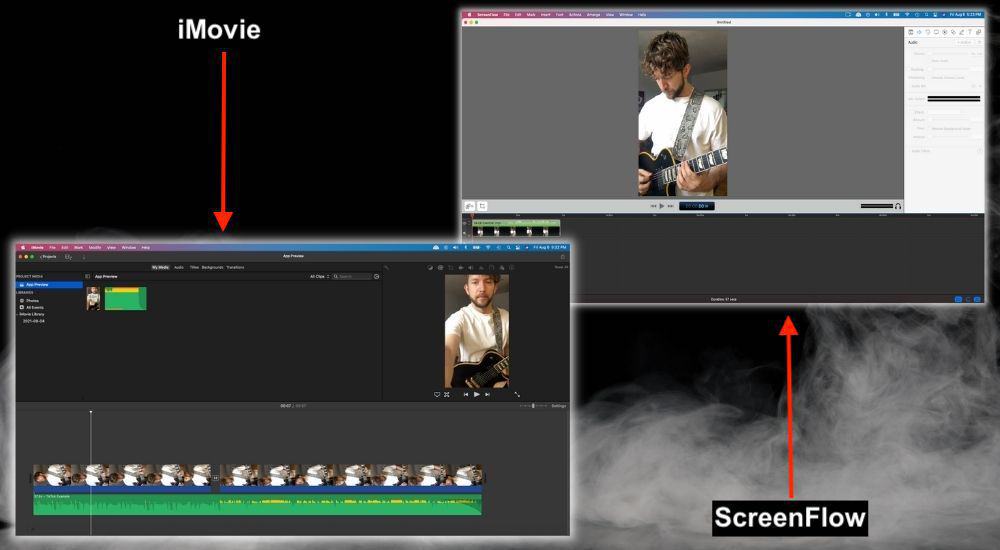
I use both of these software, however, for the sake of this article, I’ll be focusing primarily on iMovie simply because it’s the free version that we all have access to.
With that said though, using ScreenFlow is way better for making videos like these for a number of reasons that I can explore some other time, in fact, you should buy it from their site if you plan on creating videos regularly in the future.
How to Set Up Your Equipment to Record TikTok Guitar Videos
1) Connect the Audio Interface to Your Computer

A) Connect the Thunderbolt to USB cable that I mentioned earlier to the back of your Scarlett 2i2.
B) Connect the other end to your computer. As I’ve said in many of my other guides, if you have a new computer you’ll need a USB to USB-C adaptor like this one. If your computer is pre-2016, you won’t need one.
C) Plug your guitar cable into the audio interface.
D) Turn the gain up on your audio interface until the ring light around the gain knob turns green when you play open chords. However, if you’re using a guitar with active pickups like my ESP Eclipse on zZounds, you’ll need to turn the audio interface down.
Optional
E) Connect headphones like Beyerdynamic’s DT 990 Pros (on my Product Page), to the audio interface. You don’t really have to do this if you have speakers connected to your computer or you’re cool with just using the laptop speakers.
F) You can turn the Direct Monitoring button on if you want, but this is only if you have your headphones connected.
Essentially, this allows you to hear the sound of your guitar with almost zero latency because you get a chance to hear the sound before it hits the digital audio workstation (DAW). Check out the video in the next section to see everything in real time.
2) Connect Your Guitar and Choose Your Amp Sim of Choice
Connect your guitar by looking at the video above or the picture in the first section, and then what you want to do is get everything ready for recording.
There are just a few things that you have to do. I already outlined a few of the steps in the video shown above but I’ll show it here as well.
A) Connect Your Guitar and then Open Garageband
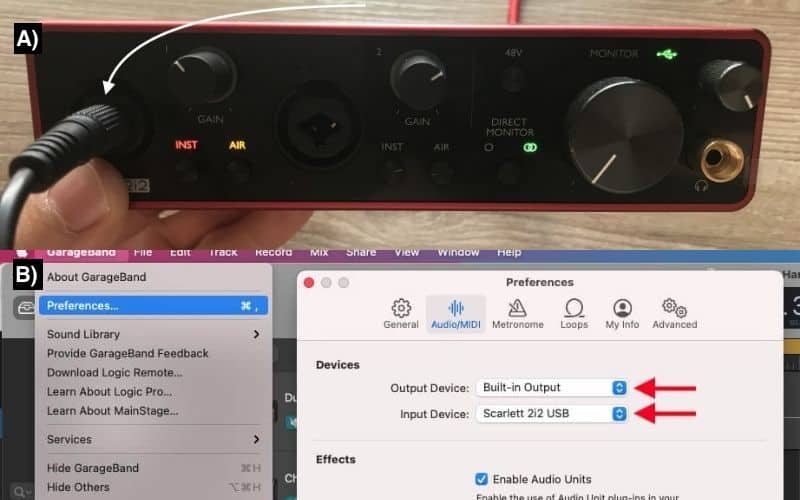
B) Go into Preferences and then Select “Scarlett 2i2” USB as your Input Device and then “Built-in Output” if you’re using speakers that are connected to your headphone port, or if you’re just using the laptop speaker.
C) Choose Your Amplifier Simulator and Then Turn On The Monitoring Button
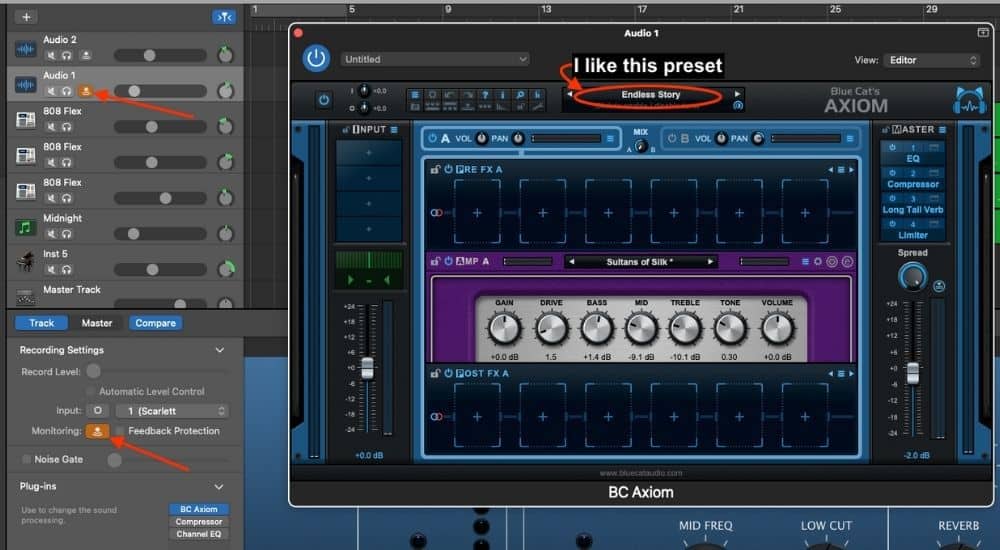
I prefer using Blue Cat Audio’s Axiom as part of their Axe Pack. I use this plugin pretty much exclusively these days if I’m not using my Hughes and Kettner/Mesa Boogie set-up which I mic with the Shure SM57. Check out BlueCat’s free trial on their page.
You can also use Garageband’s Amp Designer which I have a guide on here, however, I recommend just getting Blue Cat Audio’s Axe Pack because it has everything you would ever want from a guitar plugin, including all of the effects and you can even use it with a MIDI pedal.
3) Setting Up Your Camera and Lighting
For this section, I’ll show you 2 different ways for how I go about doing it. One involves the use of the GEEKOTO softbox light with my Manfrotto stand and the other uses my desk light. We’ll start with the easiest one first as well as the one that I use the most.
LED Desk Light with Magic Fun Boom Arm’s Phone Holder
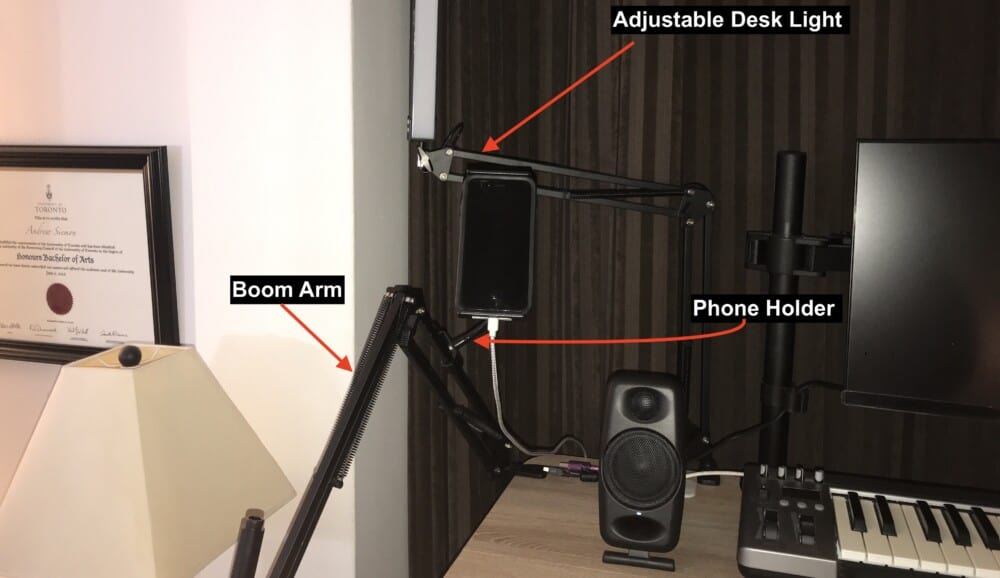
This is what use simply because I already own the Boom Arm, the Phone Holder, as well as the desk light. This isn’t the best because the desk light is too close to the camera on the phone, but what I like about it is the fact it’s static.
That means it can sit like this forever and I’m always ready to start recording. I just have to turn on the phone and the light and hit record. The next way involves my Manfrotto Stand and the GEEKOTO softbox light which results in a better-looking video but takes a little more time to set up.
If my apartment were bigger, I would leave it all up all of the time but I don’t have that option at the moment. This is also one reason why I think I’ll probably get a ring light and then leave that on my table at all times.
Manfrotto Stand with GEEKOTO Light Box

If I wasn’t sitting on this grody old couch, it would probably be a lot cooler, but it is what it is. Essentially, I just sit down and press play on the iPhone in the Manfrotto Stand, and then the amplifier/cab is mic’d up and connected to the audio interface that’s sitting on my desk.
You can find all of the relevant gear at the following links:
- Manfrotto Camera Stand
- Music Stand/Notes
- Hughes and Kettner Amplifier
- Mesa Boogie Cabinet
- Shure SM57
- K&M Mic Stand
Another way that you can do all of this is to just use a simple Manfrotto desk tripod. There are quite a few of these on the market and some of them are definitely better than others.
I would suggest getting a Manfrotto smartphone tripod like this one because they work perfectly and they’re high-quality.
How to Record, Mix, and Upload Your TikTok Guitar Video
1) Film Your Garageband Guitar Recording Process
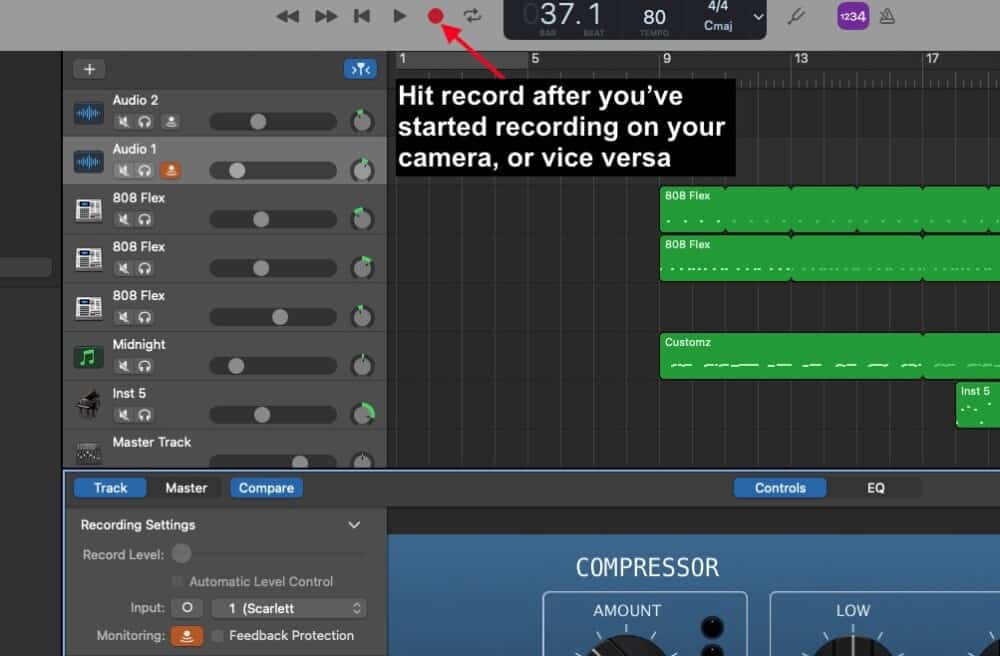
Now that you’ve set up your lighting and all of your stands, you just have to press record in Garageband and on your camera. Sometimes I’ll record something brief, and other times I’ll record for an hour. Once you’re finished recording, you stop both the audio and video and then get the files ready for export.
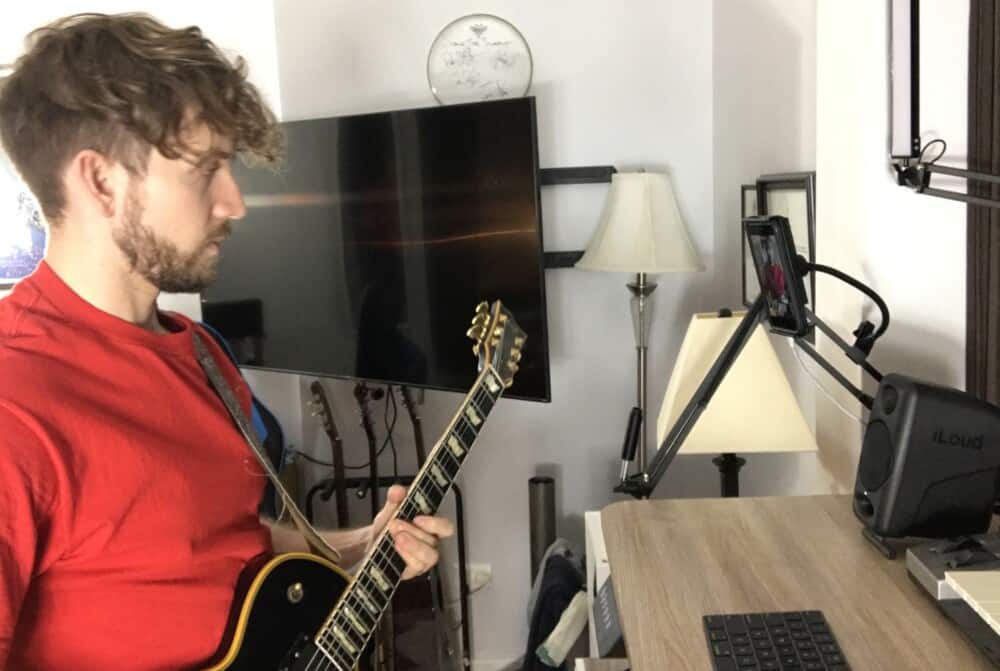
Quick Tip: You may think it’s best to press start and stop a bunch of times whenever you make a mistake, but it’ll actually save you a lot more time to continue filming for as long as it takes. Just go through the footage after and find the good part, and delete all of the rest.
2) Mix and then Export the Track

A) Mix and Enhance the Guitar Sound
For this part, you can check out my article on how to make guitars sound better or my other article on how to mix but don’t worry because this won’t take that much time.
What I normally do is I’ll just add a bit of EQ and compression to the guitar if it needs it, notably, the Channel EQ’s “Clean-Up Guitar,” and then the “Rock Guitar” preset on the compressor.
For the song that I used for this tutorial, I never actually bothered adding any dynamics processing on the guitar riff because I found the Blue Cat Audio Axiom amp sim I used was good enough on its own, but I digress.
Once you’ve added your effects or whatever you want to the track, we’ll head down into the master track.
B) Add EQ, Compression, and AUPeak Limiter on the Master Track
Go down into the Master Track and then add a Channel EQ, Compressor, and AUPeakLimiter and with the right settings, you can increase the total volume while avoiding clipping and other issues.
One thing that you should note is that TikTok and other mobile applications are obviously on phones, so keep in mind that the tendency is for the sound to be “tinny.”
It might not be a terrible idea to compensate for that by increasing the low-end just a bit and dropping down the high-end frequencies. I’ll show you what I used for the song that I made for the video and you can copy it if you’d like.
Channel EQ
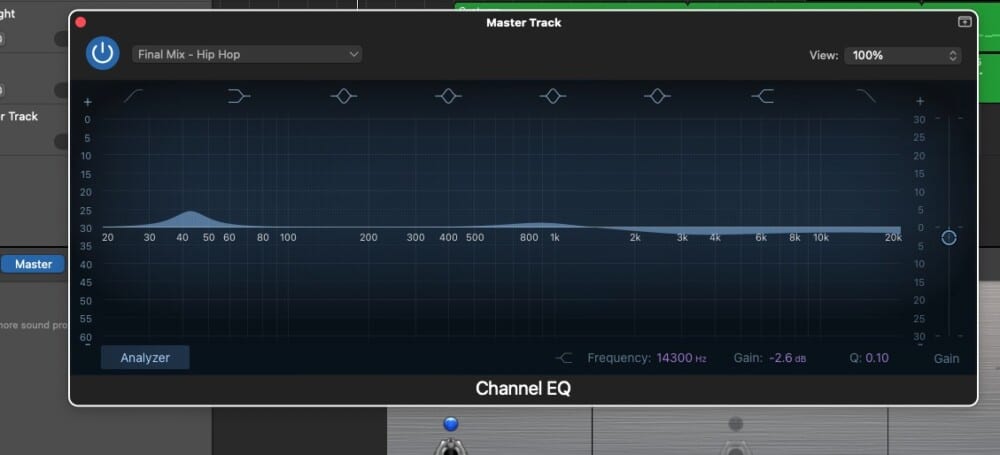
I used the “Final Mix – Hip-Hop” mastering preset that’s found in the Channel EQ settings, and then I dropped the frequencies from 2500kHz to 20,000kHz by 2-3dB. You’ll notice I left that slight boost in the low-end as well, although, I would probably widen the Q on it if I were to do it again.
Compression

For the compressor, I’ll just use the Platinum Analog Tape because it always seems to sound awesome no matter what I use it for. It could just be the volume/bias effect where the human ear equates volume with “better,” but I don’t care. It sounds good.
AUPeakLimiter

The AUPeakLimiter is really where you can get the total volume up on your track. I’ll usually set the pre-gain on the Limiter to +10dB to +14.5dB – somewhere around there.
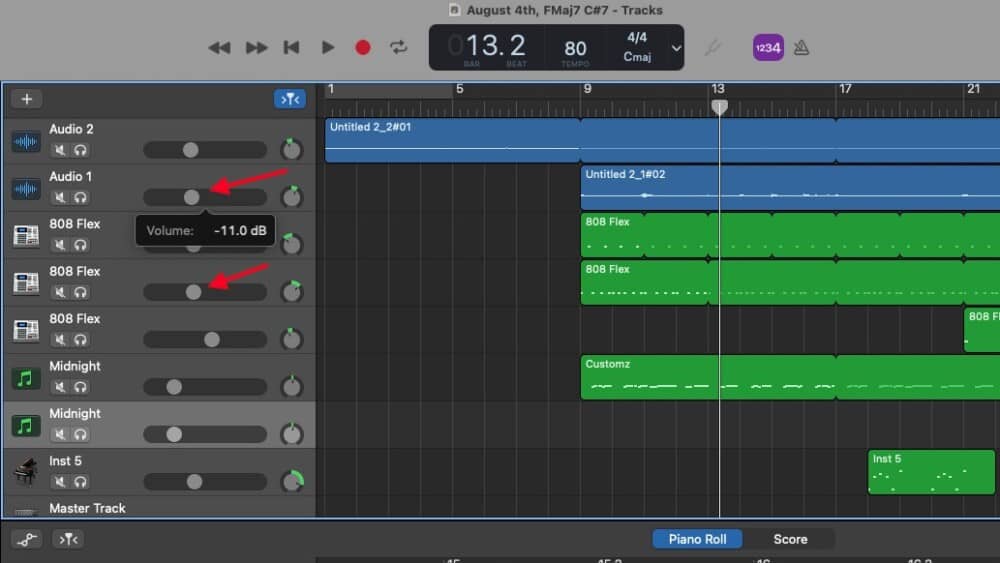
Another thing that you want to do before you export your song is to drop your VU meters on all of your tracks way down: -10dB to -15dB is a good rule of thumb.
You can do this in proportion to how they were originally. In other words, if one guitar was at -8dB, drop it down to -12dB, and then apply a -4dB decrease to every other instrument as well. This will ensure that you’ve made proportional changes, and the actual mix of your recording won’t sound any different.
C) Export Your Track as an AIFF
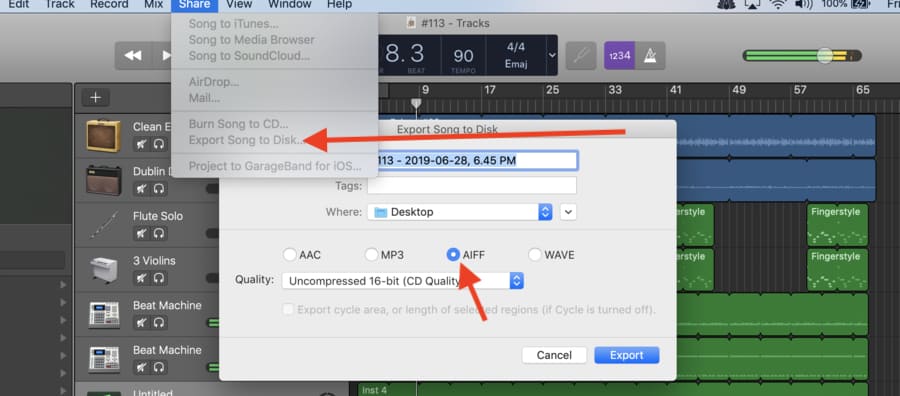
Now you just have to hit “Share” on Garageband’s toolbar, and then Export it to your desktop that way you can easily drag it into iMovie when you need it.
3) AirDrop the Video from your Phone and Import it Into iMovie
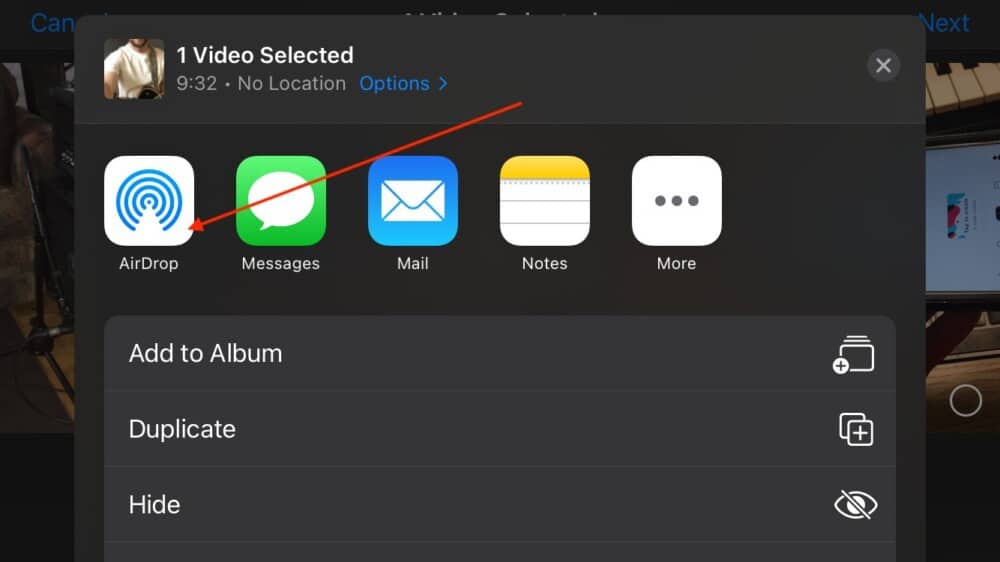
AirDrop your video footage to your desktop. Open up iMovie and then drag and drop the audio file and video footage into iMovie. From here, you have to match the audio and video which is the time-consuming part, although, there is a useful trick to make it quick.
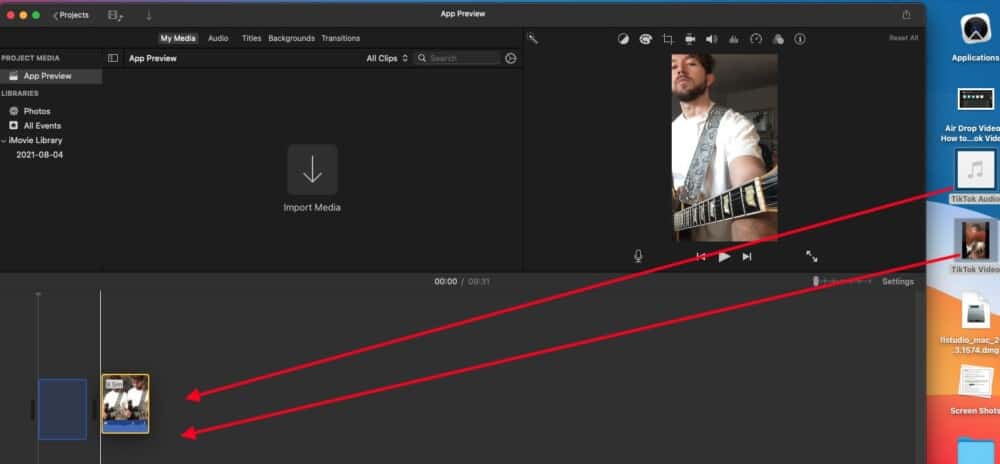
What I do from here is I separate the audio from the video footage. Zoom in on the audio of the video and compare the loud and quiet peaks to the audio of the main track that you exported from Garageband. This will give you an idea of how to match everything so it sounds good.
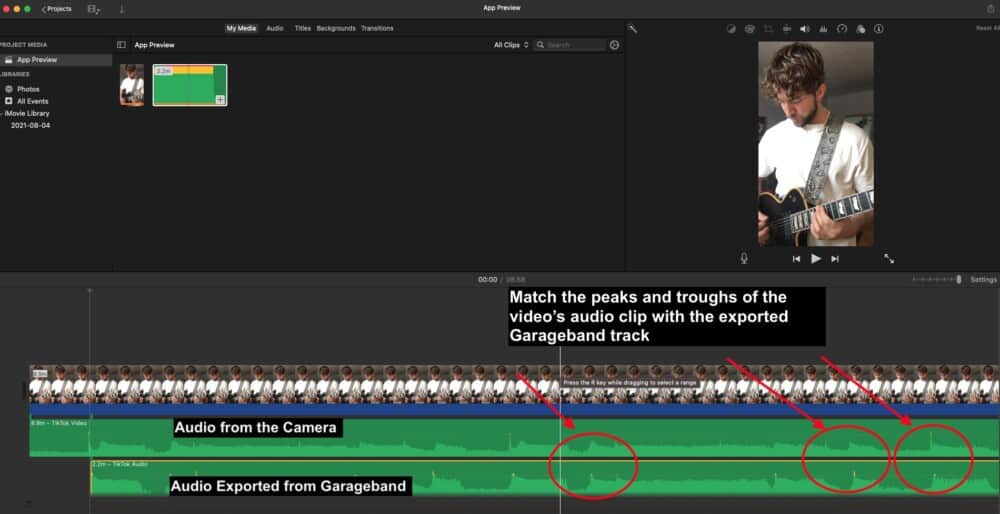
You can see what I mean by comparing and contrasting the troughs and peaks with the image shown above. Explained in another way for the sake of clarity, take the time to delete whatever part of the clips you need to in order to make matching the audio/video easier.
For example, there were about 30 seconds of the iPhone camera footage that had to be deleted so it was close to the exported Garageband audio. Another important thing I’ll say about this is that using the ScreenFlow Editor from Telestream’s website is a far better tool than iMovie.
If I had to use iMovie all of the time, I probably wouldn’t even bother to make videos. Let’s move on to the next section which involves actually getting the footage into the vertical format so it can be used on TikTok. This part took me a while to figure out, so hopefully this saves you a lot of time and headache.
4) Crop to Fit and Turn it Sideways for Exporting
When I looked up online how to get vertical video out of iMovie, there were quite a few tutorials saying how you had to use App Preview to get the footage to be vertical, however, that didn’t work for me.
To export vertical video from iMovie, you have to use the standard Movie project, select Crop to Fill to bring up the horizontal box, and then flip the recording on its side. Export the video on its side, and then click “Rotate Right” in the Quicktime Video Player menu.
A) Crop to Fill
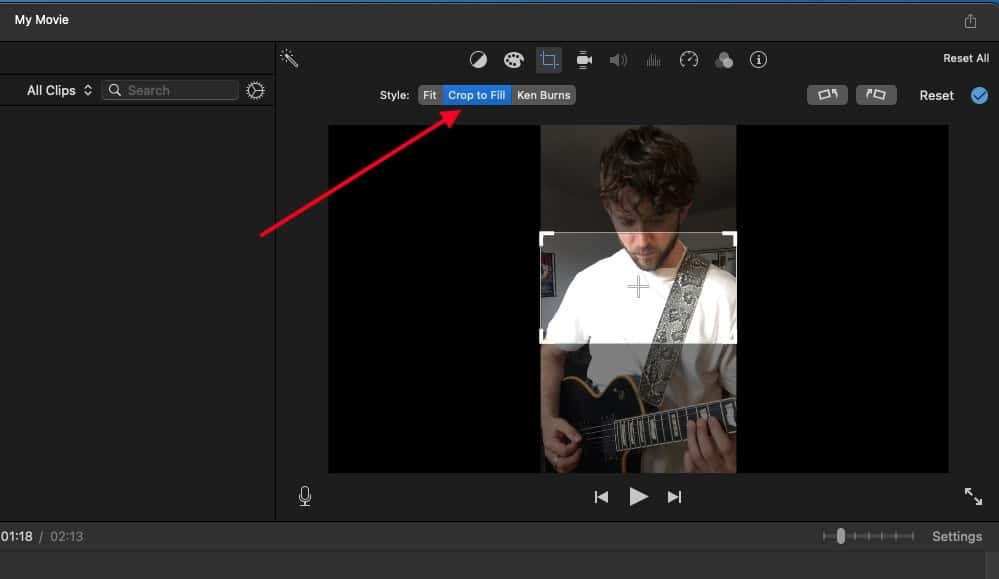
B) Turn the Video on its Side
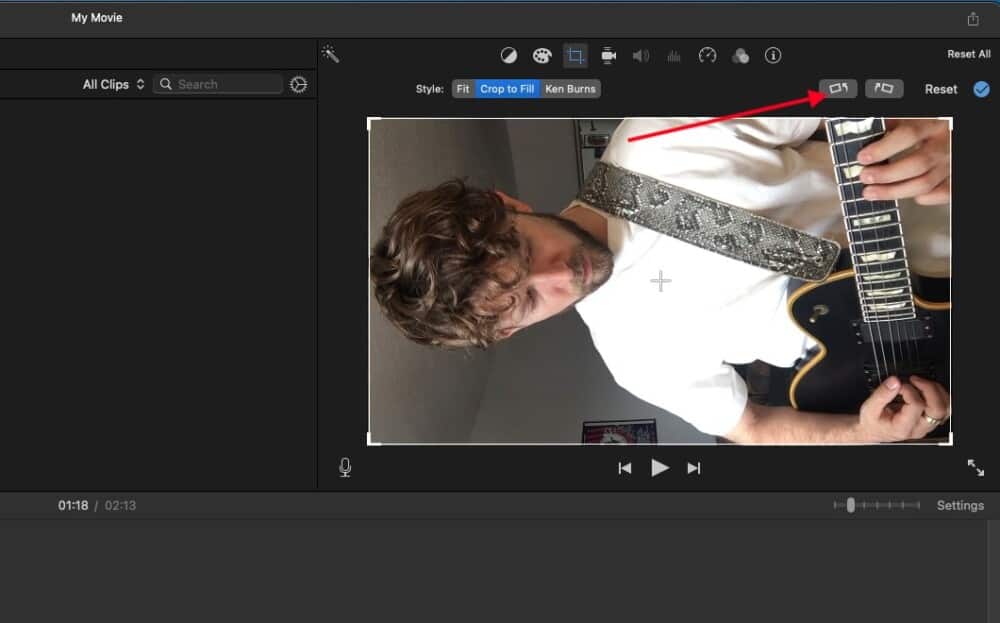
C) Export The Video On Its Side and then “Rotate Right” in Quicktime Video Player

D) End Result

Now you have a vertical video that’s ready to be uploaded to TikTok. It’s worth mentioning that, if you want, you can export the video in the highest quality format available, that way it looks and sounds the best it can on TikTok. I would recommend doing it this way. Let’s move on to actually getting it on TikTok.
5) Upload to TikTok
For this section, you want to upload it with the mobile version of TikTok and not the desktop version for a number of reasons.
You simply don’t have access to all of the features that make TikTok a cool application to use, including the filters, captions, backgrounds, effects, and the ability to overdub your own recordings over other people’s work.
I AirDrop the video from my desktop to my phone for this reason. Once it’s on your phone, you can upload it to TikTok and you’ll have access to all of the features and the ability to add your own captions over top of the video which is more intuitive than what iMovie is capable of.

1) Once it’s on your phone, you just have to open TikTok and then click on the “Upload” button the bottom right-hand side of the screen.
2) Select the Video in the TikTok Upload Screen. Make sure your video isn’t in the middle of being uploaded to the iCloud.
3) Select the part of the video that you want to post, which in this case, is probably all of it.
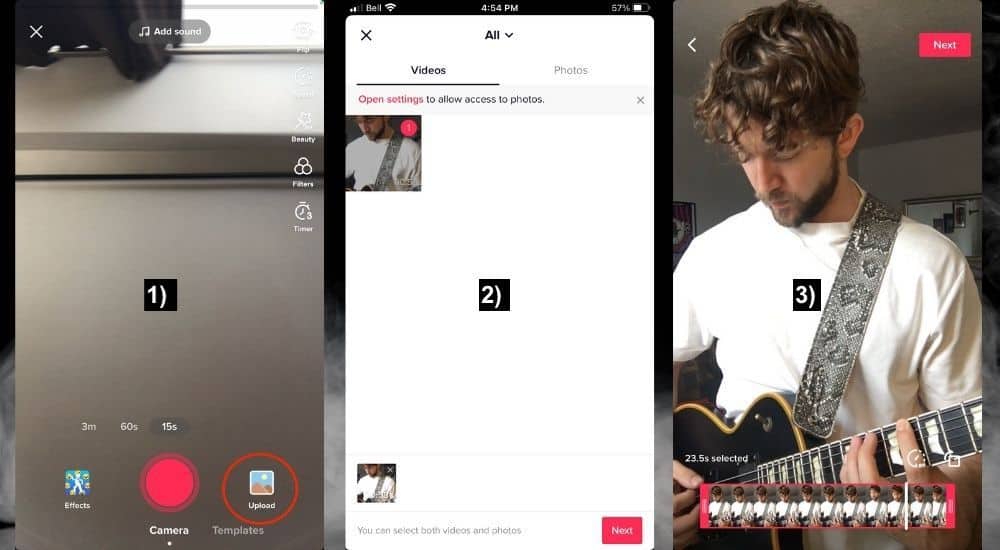
6) Use TikTok’s Editor to Add Text, Captions, Effects, Filters, and More
As I’ve already said, TikTok has a lot of cool ways to edit your videos, add effects and filters, and collaborate with other people. The ability to collaborate with other people is what makes it much cooler than other platforms.
1) You can add text by just clicking on the Text icon and then typing whatever you want.
Whenever you open an editing tool, you’re given the range of the clip on the bottom, and then the red bar determines at what point of the video the effect will show. Remember this, because this is the fundamental way that the TikTok effect-editor functions.
2) To delete whatever you’ve done thus far, drag and drop it to the top center of the interface. You’ll know that the trash can works when it turns red and opens like what you can see in this image.
3) Adding effects and filters works in the same way that I mentioned before. The red bar designates at what point of the video clip it will start working. You’ll see how you can add multiple effects to one video in a moment.
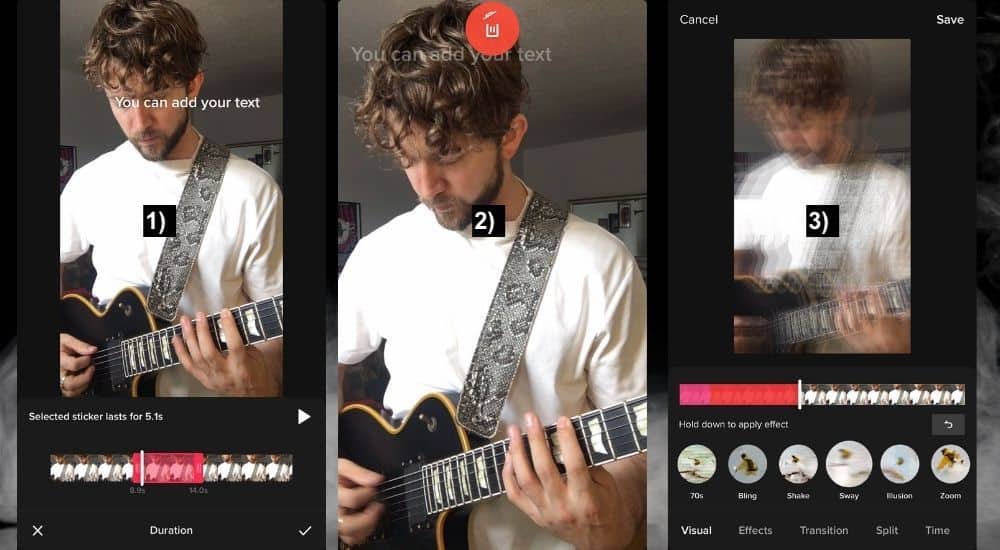
4) To add multiple effects to your video, you just have to click on your effect of choice which is shown by the little circles. You click on them and then designate at which part of the video the effect will take place, which is shown by the coloured rectangles.
5) The stickers function in the same way.
6) You can also choose what type of filter or mode you’d like to use, although, these last for the entire video clip rather than just one part.
7) And finally, perhaps what is the coolest feature of all is the “Voice Over” tool, which allows you to take other people’s content (as well as your own) and record over top of it. This feature is really cool and obviously very, very useful for musicians and producers.

8) Once you’re done with all of your editing, you just have to click “Save,” and then “Post,” and then your video will be live on TikTok.
Posting covers is different though (my guide). Make sure to add tags that are relevant to your industry. Getting back on the topic of cool features, the ability to duet is another one that we should definitely talk about.
How To Duet A TikTok Guitar Video
Making duet videos on TikTok is pretty straightforward. Like I said earlier, TikTok is made for stuff like this and the platform does a really good job of making collaborations easy.

To duet a TikTok guitar video
1) Click on the 3 ellipses in the bottom right of the video
2) Then click on the Duet symbol
3) Click the red button to start recording over the video.
Important Things to Note About Posting Guitar Videos to TikTok
1) Instagram and TikTok Compatibility – Don’t Do It!
There are a lot of options and features that make it easy to transfer videos to and from TikTok from Instagram and vice versa, but it’s wise not to do this.
It may be tempting to upload your TikTok videos to Instagram Reels but it’s not a good idea because you may be algorithmically punished for doing so.
The reason for that is that Instagram and TikTok are competitors, and these companies don’t want to promote any content that encourages people to leave their platforms. I learned this from Adam Ivy whose YouTube channel you can check out here.
As he said in the video that I just linked to, if you are going to use the same content for both platforms, just make sure you use the raw content, and by that, I mean the raw video that you made before uploading it to either platform.
2) Using a Ringlight and an iPhone Is Fast and Easy – But It Won’t Sound The Best
If all of this seems complicated to you, I understand. It’s why I mentioned using the ring light with your iPhone. A lot of people do it this way and they make great content, however, the long method I just showed you is better if you want a video with polished audio.


 Written By :