To Make YouTube/Instagram Videos with iMovie and Garageband
1) Connect your instrument to Garageband with a Scarlett 2i2
2) Put your iPhone camera on a SIOTI camera mount
3) Record video and audio with Garageband and the phone simultaneously
4) Sync the audio and video files together in iMovie
Equipment You Need For Making Instagram/Youtube Videos
Each link provided below takes you to Amazon. Normally, I would recommend getting the Focusrite Scarlett 2i2 (and frankly, it’s an audio interface that I think you need to own anyway), but in this case I find that using an iRig HD 2 – which is a far more portable device – is better for Instagram and YouTube movies.
1) iPhone 11 Pro Max (here)
2) Audio Interface (Scarlett 2i2)
3) SIOTI Camera Mount (on my page)
These links take you to my product page.
Optional
4) Manfrotto Camera Stand
5) Studio FX Lighting System
The Software You Need
1) Garageband.
2) iMovie.
I’m sure there are a number of ways one can go about this, but this is how I do it.
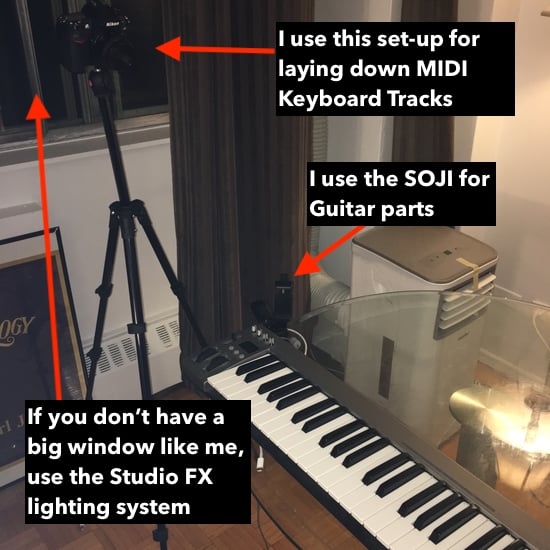
1) Essentially, I use the SIOTI Camera Mount, which is great for iPhones and other Phone cameras, and I clip it on to my desk like what you can see in the image below:

I had to take the picture with my phone, which is why the mount is empty.
2) I’ll play around on the guitar/MIDI Keyboard until I’ve figured out a nice riff or lick to play in a song, and then I’ll hit record on the camera and just leave it on while I’m recording many different takes of the music in Garageband, just to try and get it as perfect as possible (my guide on how to connect your guitar to Garageband).
The key behind this tactic is to leave the phone/camera on while I’m playing which allows me to capture pretty much everything.
There’s nothing worse than recording a guitar/MIDI Keyboard part in Garageband and not videotaping it at the same time because then, you have to go back and fake it, which – contrary to what some people believe – is actually a lot harder than just filming yourself playing and getting it right the first time.
Make sure you’ve recorded yourself laying down the riff, whatever instrument you’re playing.
The set-up I’ve shown above is how I record myself playing the guitar. If I’m going to lay down a track with the MIDI Keyboard and record myself playing it, I’ll use the camera stand, which looks like this:

3) I hit ‘Record’ in Garageband while my iPhone is recording me playing the song.
4) At this stage, I’ve got my guitar part recorded and the camera has captured everything as well.
We’re solid.
What I do now is I grab my phone and I highlight the part in the footage using the Edit feature in the iPhone’s interface, and I crop out the desired piece of footage that goes with the music.
You can see what this looks like in the image below:

5) Once I’ve cropped out the desired part, I use the Bluetooth AirDrop feature to drop the file directly on to my desktop.
6) I’ll grab my Etymotic ER4SR headphones which are the best earbuds for this type of thing – and listen to the recording in Garageband to make sure everything sounds good, maybe even turning the volume up or down to make it so everything is audible in the Instagram video.
It’s important to note that most people who are viewing your videos on Instagram, probably on YouTube as well – but not as much – are looking at the videos on their phone.
So keep in mind that not all frequencies are going to shine through a phone speaker as much as you’d like.
Typically, the low-mid to high-range frequencies will be the loudest for a regular phone speaker, whereas the sub-bass and bass frequencies will be practically non-existent.
In the case of the guitar, it’s a better idea to actually turn down the volume because the iPhone speaker, as I just mentioned, will play mid to high-range frequencies the loudest.
If you’re laying down a bass track, especially one that’s in the lower octave-range, then you want to increase the bass as much as you can so the audio can be heard when someone plays it back through their iPhone.
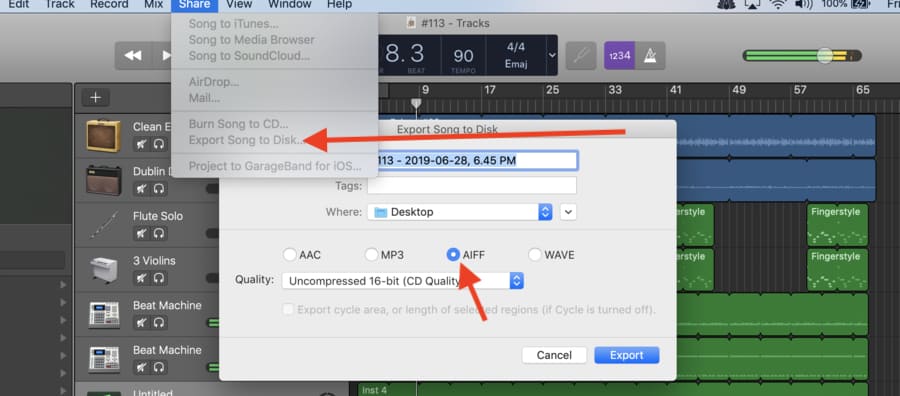
7) After I’ve gotten all of the levels set appropriately, I’ll export the song as an AIFF File using the ‘Share’ button in Garageband’s toolbar.

8) Now, I’ll open up iMovie.
9) I’ll drag and drop both files into iMovie, the Garageband AIFF file as well as the video recording.
10) It’s important to detach the audio from the iPhone video recording because you don’t want the iPhone recording’s audio messing with the more higher-quality recording of the Garageband AIFF file.

11) And this is perhaps the most time-consuming part.
You have to match up the video recording with the Garageband file, however, the better you are at cropping out the desired footage from the iPhone file, the easier it is to match it up in iMovie afterward with the AIFF file.
12) You’ll notice that the two files are on top of each other in iMovie which looks the image shown above.
13) What I like to do is I use the “Moving Two Fingers Apart” function on the TrackPad – which is just one of the editing commands Garageband comes with (my guide on those) – to essentially maximize the size of the file that I’m editing
Or, you can just simply slide the meter on the right-hand side of the iMovie interface. It’s this button here:

This makes it a lot easier to match up the two files because you can make tiny adjustments.
14) At this point, it’s simply trial and error to get everything to match up. Once you get the two files to match up very close, you want to maximize the file size that was just mentioned in point #13 and make very small changes to make sure the audio and the video are matching up as much as possible.
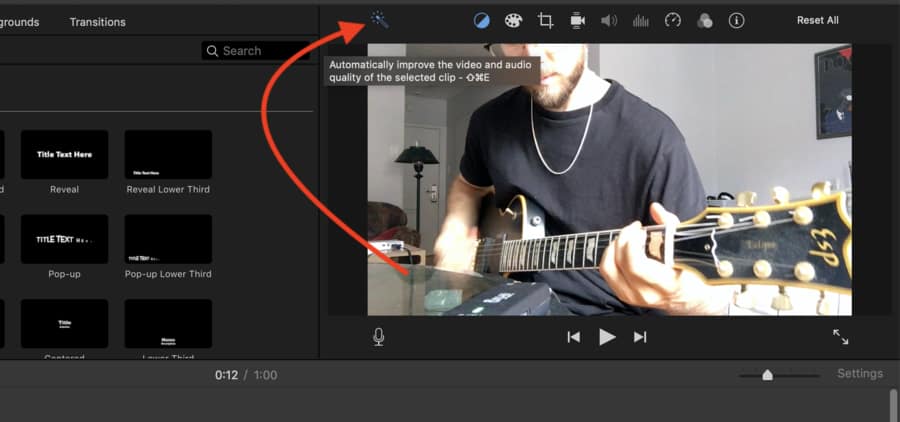
15) From here, I might use the function in iMovie that increases the lighting and contrast so the footage looks as good as possible. It’s the function that looks like this in iMovie’s interface.

16) Another thing you can do is increase the total volume of the track to about 150%.
It’s important to watch that you don’t increase the volume too much, because you might cause some distortion and clipping.

17) In the final stage, I’ll add a “Soft Bar” setting which lays on the very bottom of the Video.

The idea behind this is to brand my videos that way people can see that it’s me whenever I upload something.
Moreover, it differentiates you from the hundreds or even thousands of posters who don’t brand their videos.
Make sure you have the Title set up on your video so it’s in the center of the video screen, because you may find that when you upload it to Instagram, it’ll be too far to the left or right, and then viewers won’t be able to see the brand you put on the video.

So now, the video has been created. You’re ready to go on to the next step.
You can export the video from iMovie to your desktop, which takes around 2-3 minutes, assuming it’s 1 minute long. Remember, that Instagram only allows 60-second clips at a time.
Once the File is waiting for you on your desktop, you can use the AirDrop function to drop the file on to your Phone.
When it’s finally on your iPhone, you can upload it to Instagram along with all of the hashtags you want to use.
Remember to make the image wide-screen so it shows your entire video, including the branding you put on it.
Furthermore, ensure that you’ve used the “Cover” setting to determine which part of the video will serve as the cover that everyone else sees on Instagram.

And Voila! You’re done.
Uploading To YouTube
Uploading videos to YouTube, Soundcloud, and Music (formerly iTunes), is pretty easy and it’s a topic I’ve explored at length before.
Other Important/Useful Things To Remember
It’s really up to you to determine how many hashtags you want to use.
The rumor is that now, Instagram’s algorithm likes it when you use from 3-8 hashtags, however, I’ve found I don’t get as much engagement when I do that, so I prefer to use the maximum of 30.
Try to use a couple of hashtags that have millions of posts attached to them, preferably around 3-8 million.
And then use some smaller ones, for instance, #guitaristsunite, or #instabeats, which have less than 100,000 posts in them at a time. The key is to dominate certain hashtags.
If you choose one that’s 250 million posts within the hashtag, your chance of dominating it is almost zero, especially if your account is new.
If you’re trying to grow your Instagram following, it’s best to do this every single day. Moreover, you want to engage with other people’s content on a regular basis if you want to see your account grow.
Regarding lighting, I typically just do my Instagram videos in the morning right beside my window and have the light shining in as much as possible.
I find that works just fine, however, you could purchase a light system, such as the one recommended at the beginning of the article.
You could also get your hands on Final Cut Pro, as well, which would help considering it has a lot more functionality and special features, however, I find that iMovie works just fine for basic video editing.
Make sure to always respond to people who comment on your stuff, whether it’s in the form of a like or a comment.
From what I understand about Instagram’s algorithm, it rewards engagement above all else, so if you get 15 comments on your post, respond to each one, and now you have 30.
YouTube Video Tutorial
Conclusion
Anyway, that’s all for today. Make sure to share this on social media if it was helpful to you.

 Written By :