Quantization is a valuable feature in music production because it aligns notes to a grid, ensures precise timing, enhances rhythmic consistency & improves the overall tightness and polish of a track. It requires finesse though.
To quantize in FL Studio
1) Select the notes to be quantized
2) Open Snap settings and choose an appropriate grid
3) Press ‘Ctrl/⌘’ + Q; to do a “Quick quantization” of the notes selected, or;
4) Press ‘Alt/Option’ + Q; to open the quantize panel, where you can edit each quantization option.
How to Quantize MIDI in FL Studio (The 3 Main Ways)
1) In The Piano Roll
Quantization helps to align every note to the time grid.
But remember, for your song not to sound too mechanical, there has to be a little margin of error (emphasis on little). The error shouldn’t be obvious, but very subtle.
With this in mind, there are three ways of quantizing MIDI notes recorded in FL Studio.
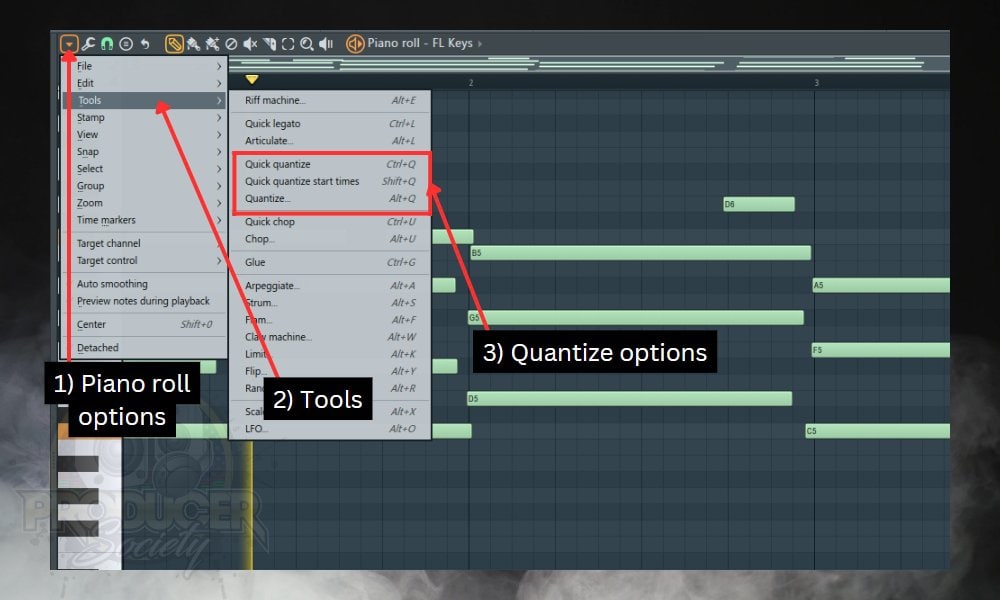
These options can be found by going to the “Tools” menu of the piano roll.
Go to tools by clicking on “Piano roll options” at the top left corner of the piano roll. Piano roll options > Tools.
There are keyboard shortcuts for each of them:
1) ‘Ctrl/⌘ + Q‘ for Quick quantize
2) ‘Shift + Q‘ for Quick quantize start times
3) ‘Alt/Option + Q‘ for Quantize.
A) Quick Quantize
This option makes use of the global snap settings you’ve selected and aligns the start and end times of each note. (The Piano roll snap setting overrides the global snap settings if it is not set to “Main”).
This Quick quantize option does a 100% adjustment and alignment to the grid, so consider the other options if you don’t want a 100% quantization.
B) Quick Quantize Start Times
This one differs from the previous option only in the fact that it doesn’t affect the end time of the notes. It only moves the start of each note to the grid (selected by snap settings) and leaves the notes ending.
C) Quantize
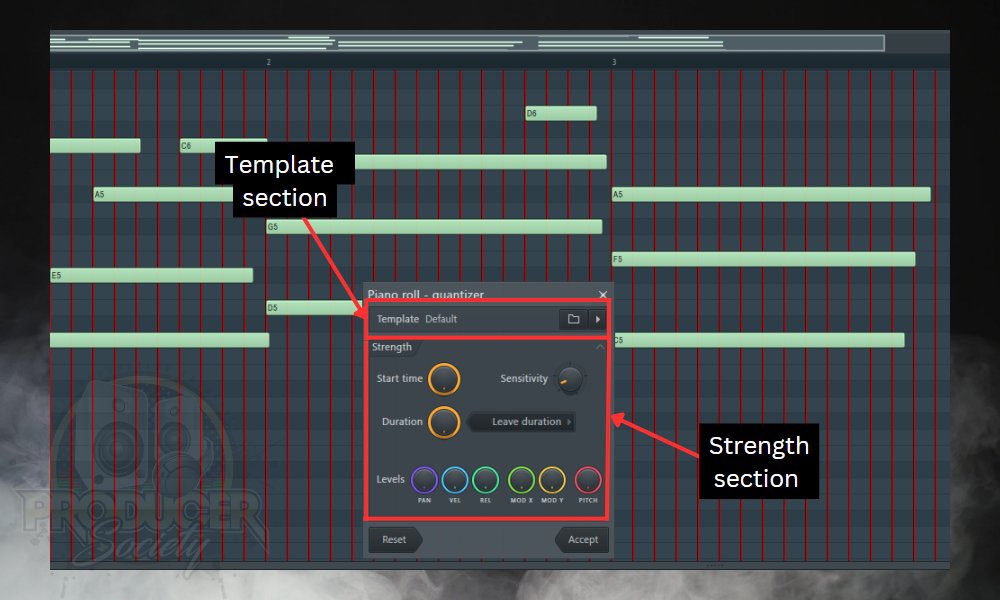
Here you can control the level at which the quantization will be applied. You can also select different templates or quantize options.
You’d notice that red lines appear on the piano roll when you open the panel. The red lines represent the grid line that you can use to visualize/preview the effect of your quantization.
The quantize panel features 2 sections: Template and Strength.
i) Template
The template section features two buttons: “Select groove template” and “Show preset list“.
Show preset list opens the preset list.
The different presets present several quantization settings you can use instead of manually tweaking each parameter in the “strength” section.
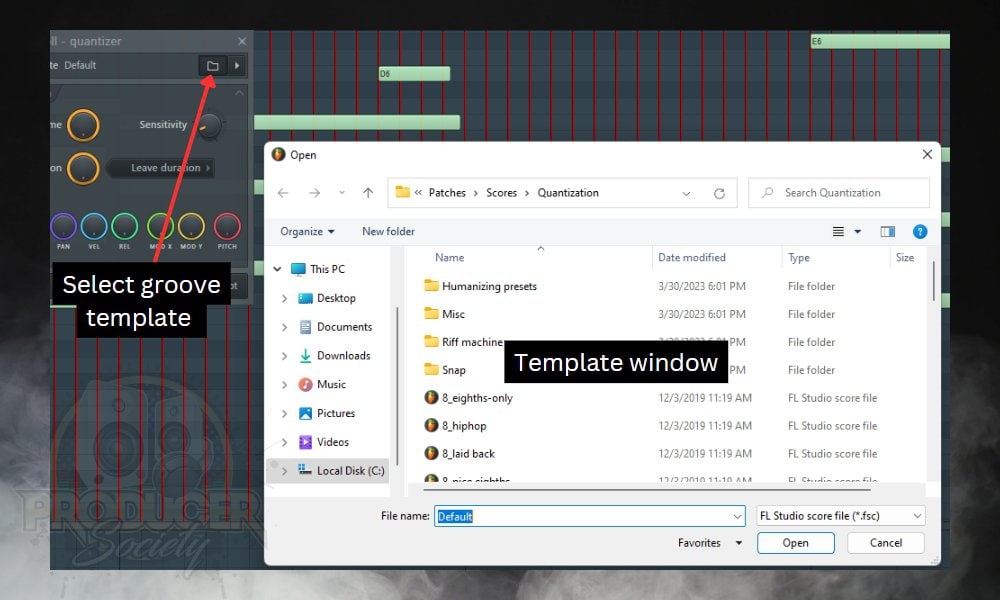
The difference is that clicking this button will launch a pop-up window where you can navigate the various presets and grooves, while clicking on the “Show preset list” button will just bring up a drop-down to navigate the presets.
ii) Strength
This section features several parameters you can tweak manually to get a more specific result.
Start Time
The Start Time knob determines the strength/level at which the start of each note will be aligned to the grid.
The lowest value applies no quantization while the highest level does a 100% quantization. You can use this knob to apply quantization that is not exactly on the grid, to preserve the humanization in your recording.
Sensitivity
Sensitivity is closely related to start times. It sets a window of sensitivity that influences how sensitive any quantization you apply will be.
Duration
Duration controls how strong the note duration will be quantized. There are a few different modes for quantizing note duration, set by the Duration quantizing mode button beside the Duration knob.
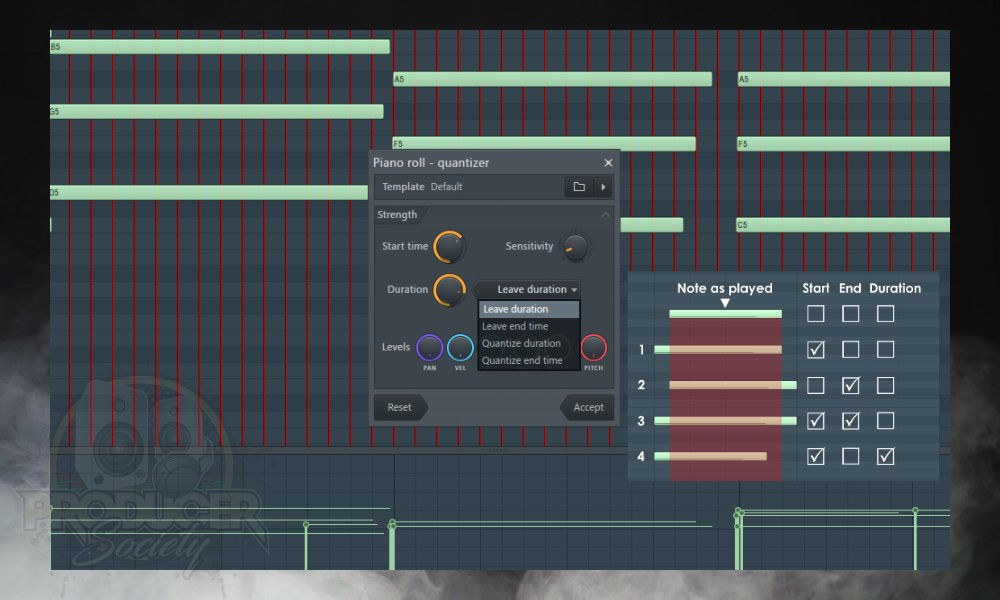
The different duration quantizing modes are: “Leave duration“, “Leave end time“, “Quantize duration” and “Quantize end time“. The Duration knob only affects the last two options.
The difference between “Quantize duration” and “Quantize end time” is that quantizing the duration makes sure that no note crosses any grid line while quantizing the end time only moves the end of each note to the nearest grid, no matter how many grid lines it crosses.
The last row of buttons – Levels – are for mixing in the individual note parameters of the score file (preset) you’ve selected.
2) How To Record With Quantization (Input Quantization)
Sometimes, you’d want to have notes quantized as you record them into FL Studio. This is known as “Input Quantization”.
To enable input quantization, right-click the record button and under the Quantize section, select which parameters you want to quantize.
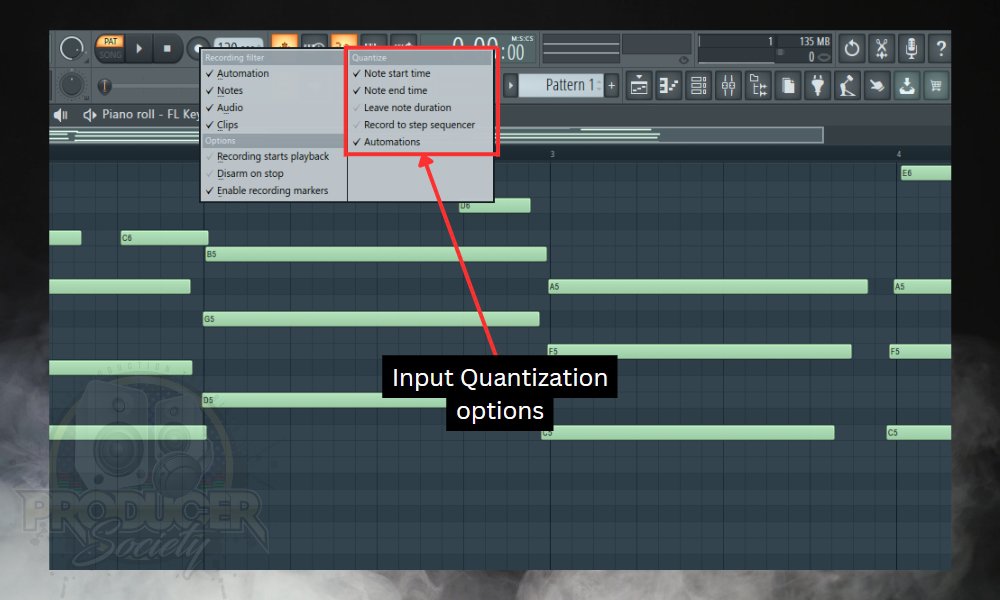
You can select to quantize, start time of notes, end time, or duration. The option to record to step sequencer is also available.
The last option allows you to quantize automation. The kind of automation this works best for is on/off automation like sustain pedals etc.
One thing to note is that selecting to quantize “Leave note duration” will override “Note end time” and vice versa. Also, if your global snap is set to either “None”, “Line” or “Cell”, there will be no input quantization.
After selecting what parameter you want to ‘input quantize’, start recording. The quantization goes into effect once you stop the playback/stop recording, and you’ll see the notes aligning to the grid. This also does a 100% quantization.
How to Quantize Audio in FL Studio (3 Tactics)
Quantization can also be applied to audio. This helps to align poorly timed audio to the grid.
This works by time-warping the audio clip i.e., stretching some parts while compressing some other parts to make the transients aligned to the grid.
Take note that stretching and compressing audio may come with some unwanted artifacts, so if you can record the audio again, you should do that instead of quantizing.
There are different ways to quantize audio in FL Studio. Let’s consider these methods below:
1) Quantizing The Connected Audio Clips
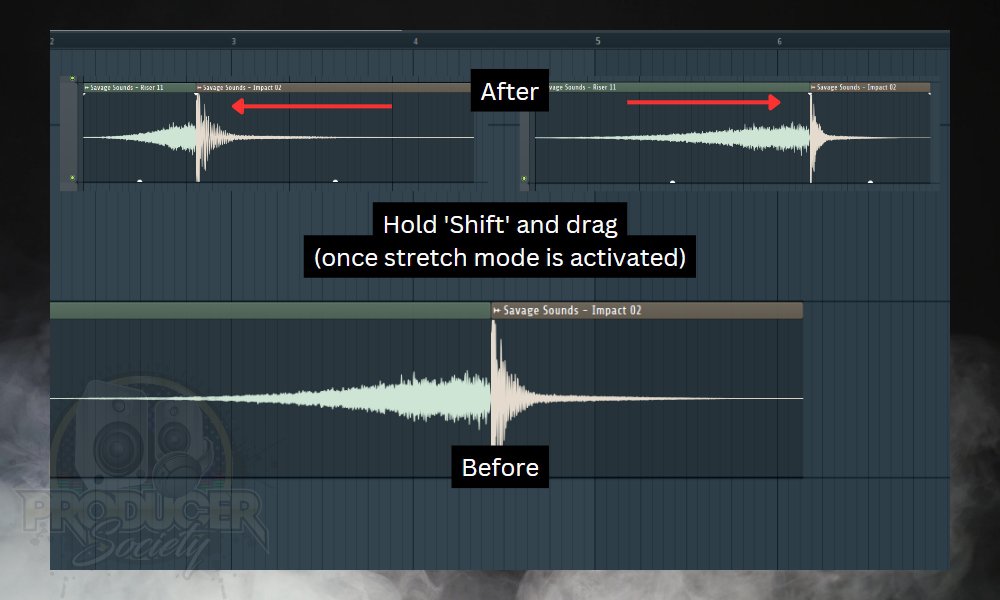
To do this, you first enable Stretch mode. Then hold the shift key, click either the end of the first clip, or the start of the second clip, and drag (while holding shift) to time-warp.
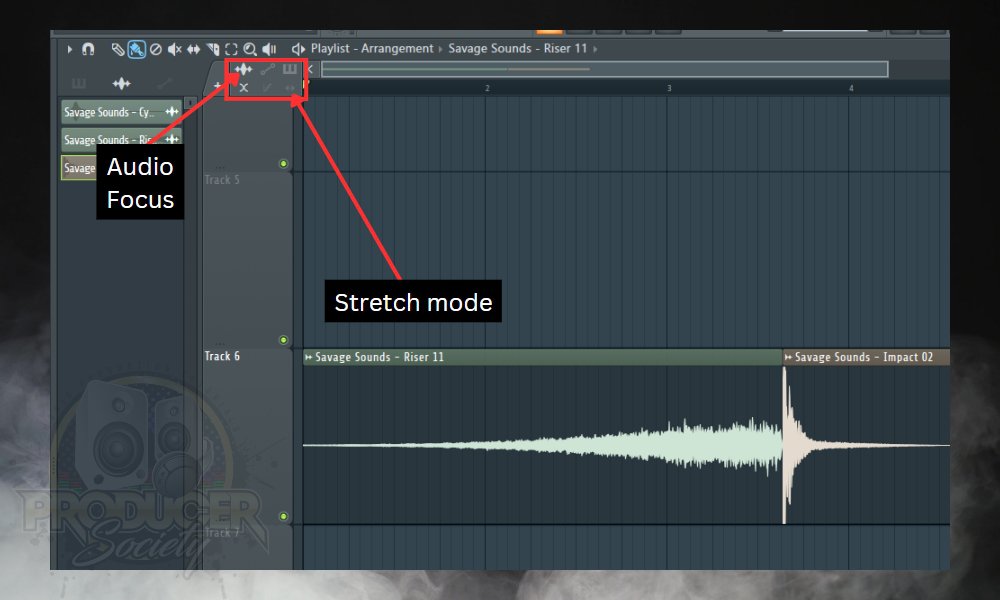
Alternatively, click an audio clip on the playlist, and the focus will be set to audio automatically.
Click the stretch button (button on the right). In older versions of FL Studio, stretch is enabled by the checkbox beside “Stretch”.
2) Aligning Audio To The Project’s Tempo
For the audio loops you import to your project, the tempo of the loop will most likely be different from that of your project.
In this case, you have to ‘quantize’ (fit to tempo) the loop by aligning the tempo. There are 2 ways to do this: Stretching the loop to fit the grid, or using the ‘Fit to tempo‘ function.
A) Stretching Loops To Fit The Grid
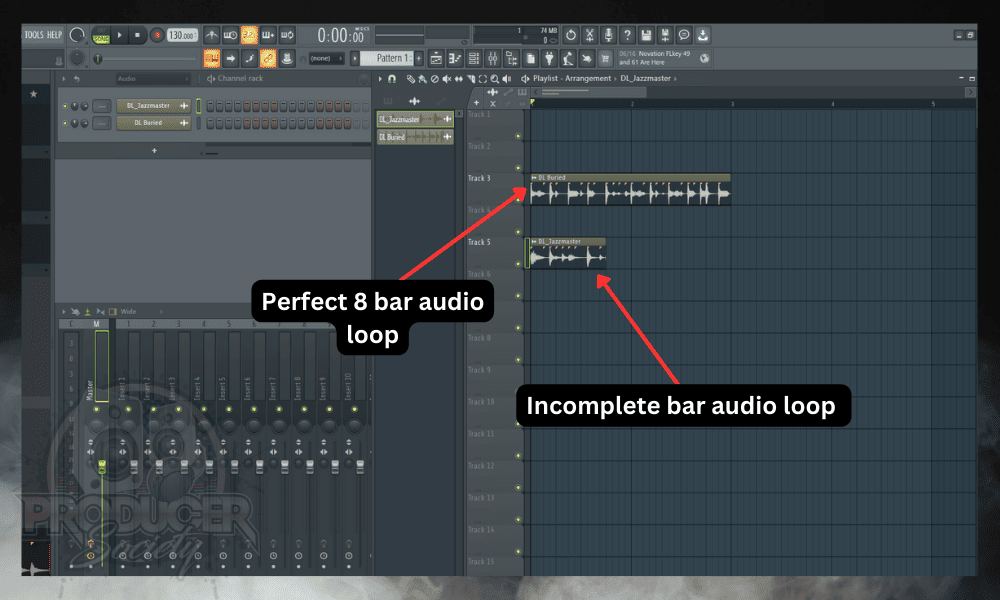
To Stretch loops to fit the grid, you have to first enable Stretch mode. Go to the “Focus pane” in the playlist’s upper left corner.
Select ‘Audio focus’ (the waveform icon). Or, you can click an audio clip on the playlist to switch to audio focus. Then, click the ‘Stretch’ ↔️ button. ‘Stretch’ in earlier versions of FL Studio is a checkbox.

When resizing, disable any snap setting selected, or do that temporarily by holding the ‘Alt/Option’ key while resizing.
B) Using “Fit To Tempo”
This other method is useful for all loops (perfect or not). To start with, you need to know the tempo that the loop was recorded.
Many loops come with their original tempo already added to the file name, but if this is not the case with you, there’s a way to find the tempo.
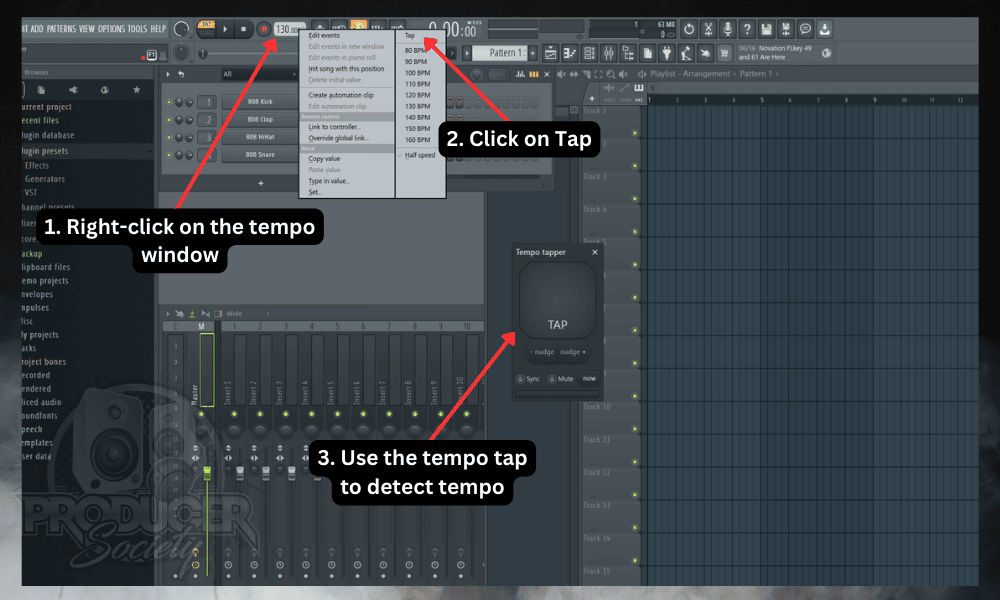
As the loop plays, use your MIDI keyboard/mouse/computer keyboard to tap along.

This will tell you the loop’s tempo.
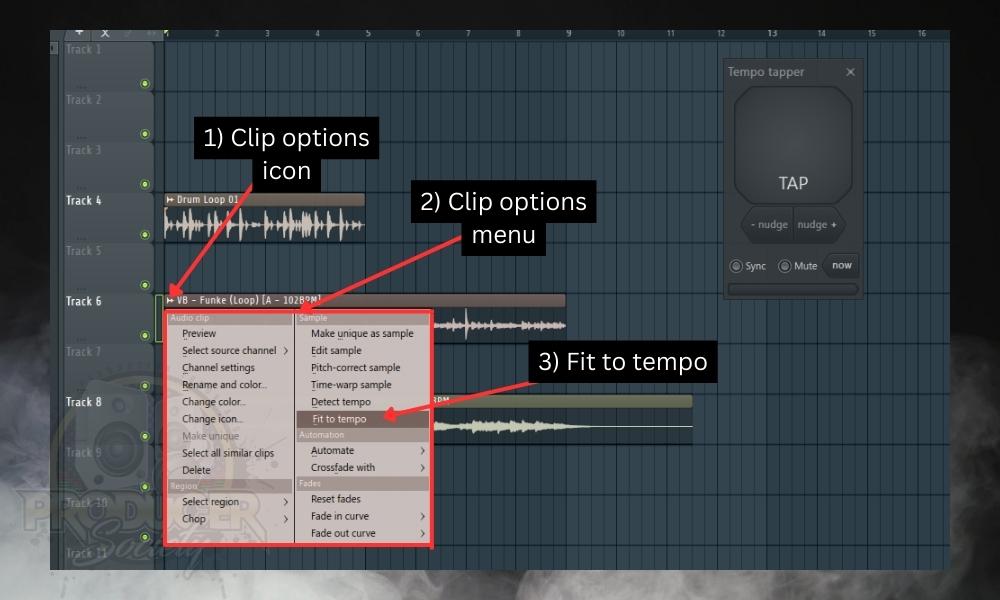
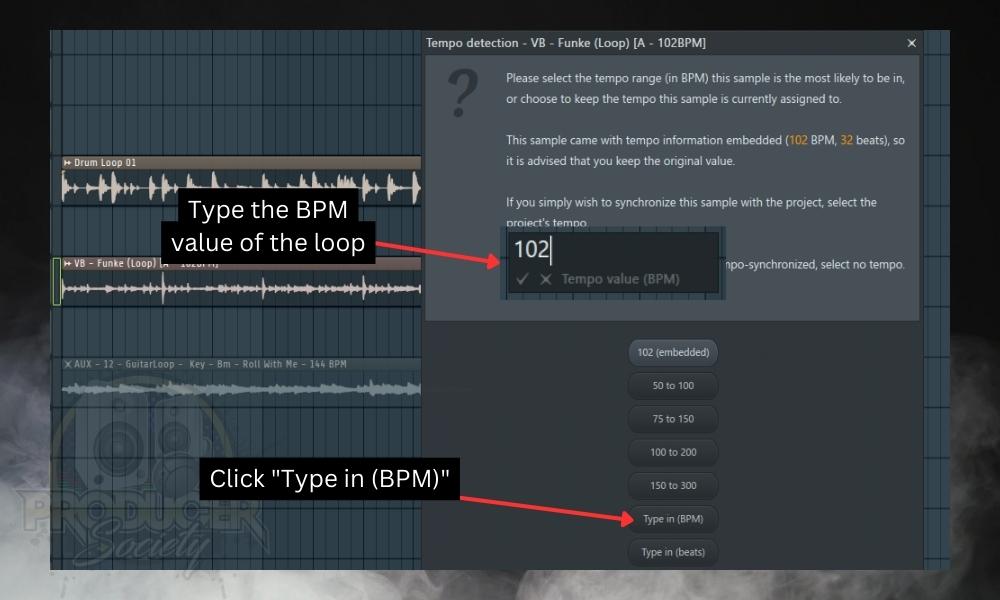
3) Using Newtime To Quantize Audio
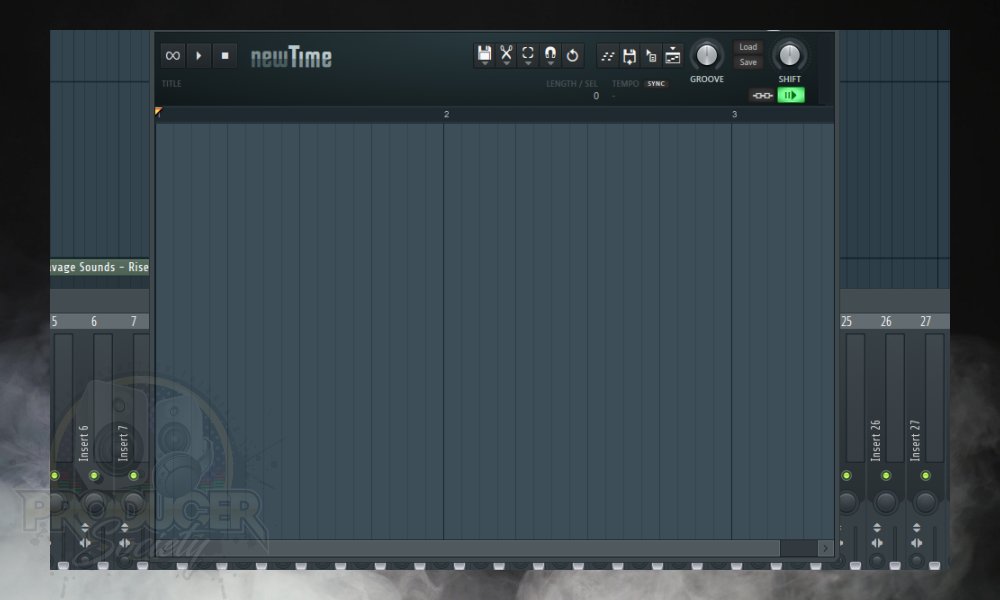
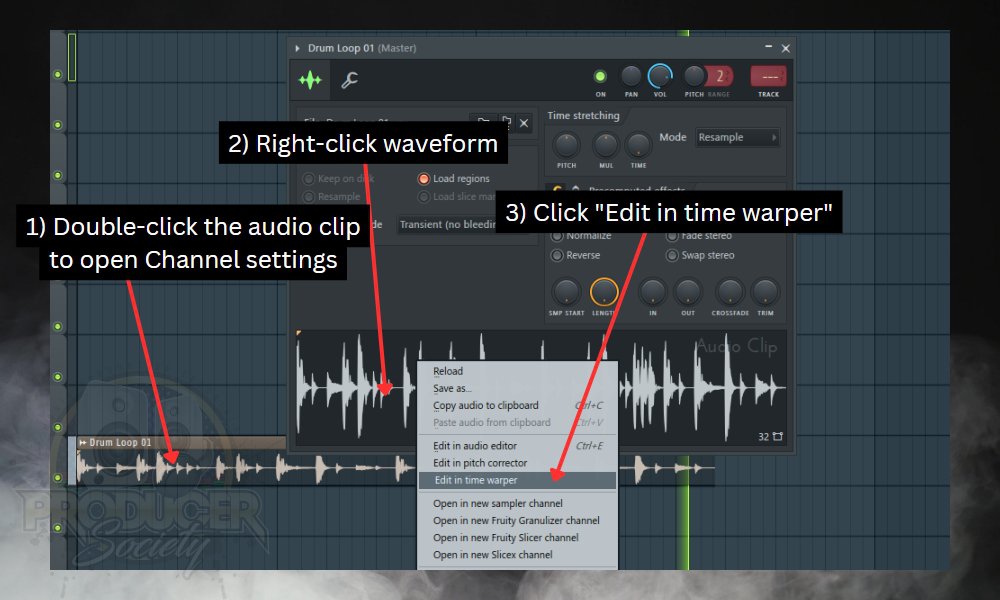
This will open Newtime on the master track in the mixer by default.
Another way to open Newtime is by opening the mixer, selecting a track, and loading Newtime onto an empty Insert.
After that, you then drag and drop your audio clip, either from FL Studio’s browser or your file explorer, to Newtime’s interface.
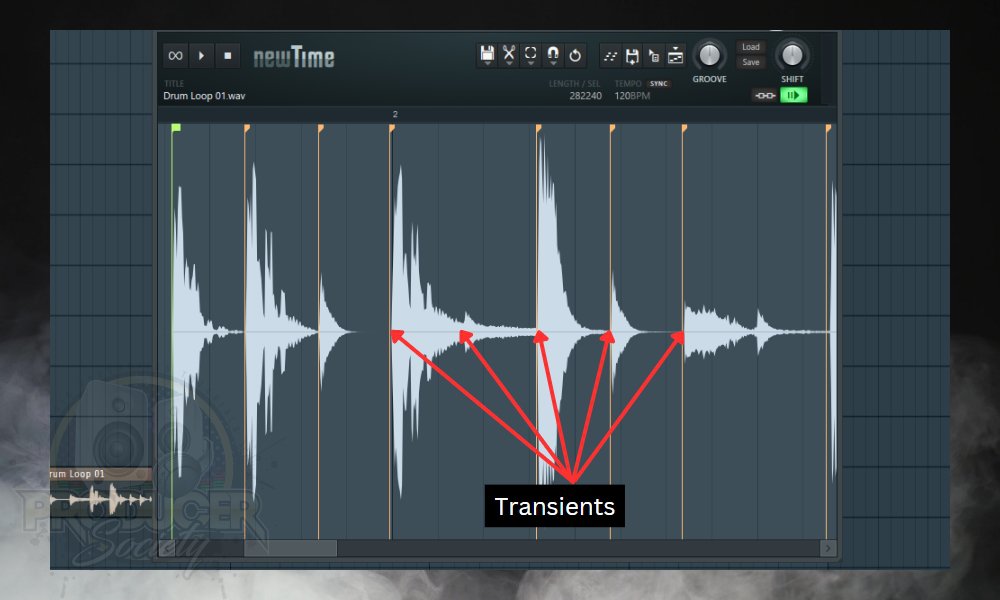
If the audio clip comes with markers, Newtime uses the existing markers.
“Transients” refer to the initial high-energy peaks of a sound wave. These typically occur at the start of a note or sound, which define its attack and contribute to its perceived loudness and clarity.
If your audio clip has no clearly defined transients, Newtime probably won’t create markers. Then when it creates markers, it leaves some transients without markers (ghost notes in a drum sample for example).
And these transients may be necessary for quantization. It is possible to add your markers in these situations.
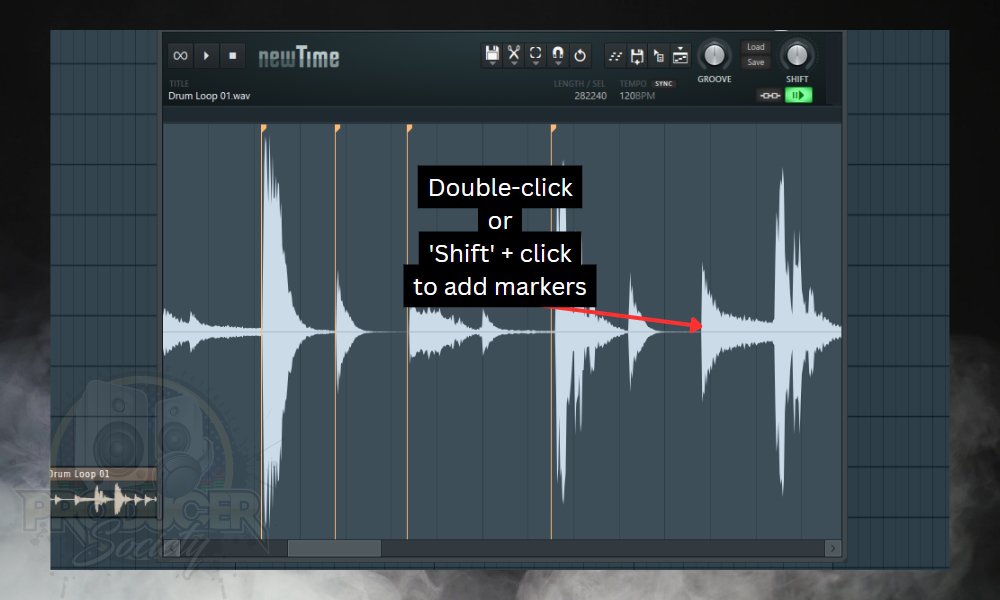
But for precision, you should hold shift (which shows a preview of where the marker would be placed) before clicking.
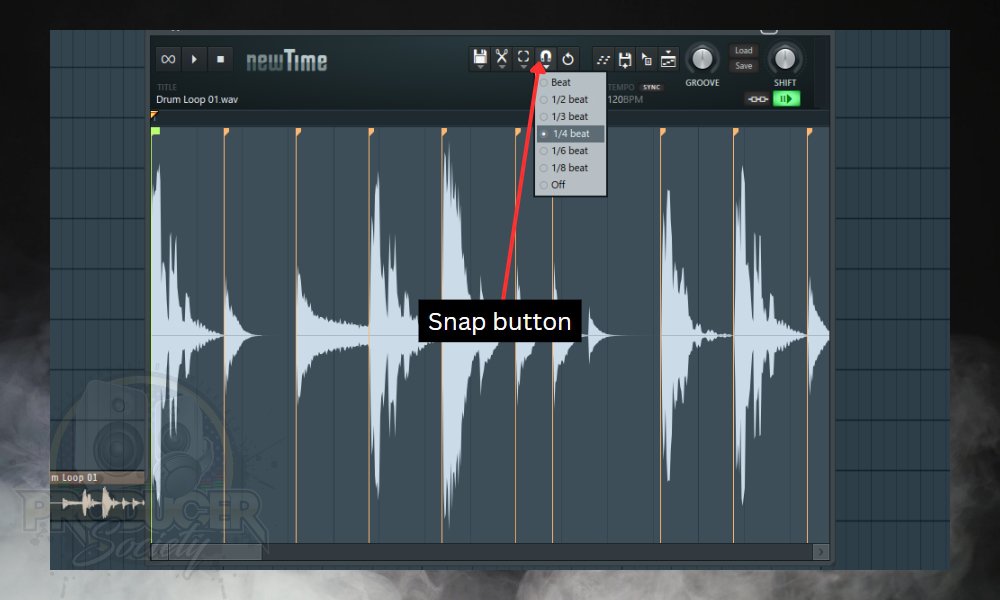
Click snap and select what grid you want from the drop-down. You can choose from whole beats to 1/8 beats.
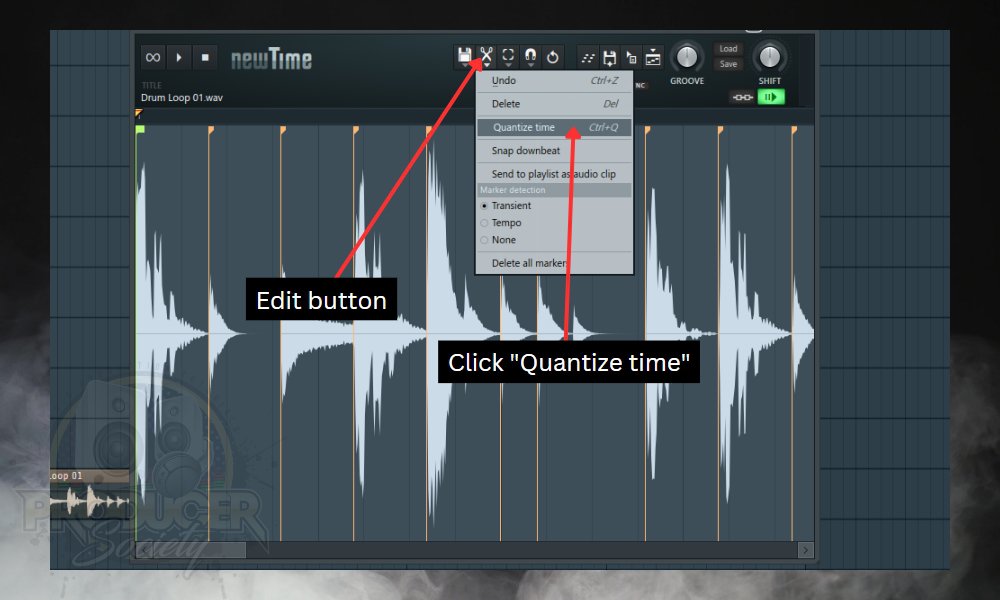
Once you do this, all the markers will be adjusted to the nearest grid line.
Alternatively, you can use the keyboard shortcut ‘Ctrl/⌘ + Q’.
Many times, this doesn’t give exactly want you want, but you can always adjust individual markers. When clicking and moving markers, hold the Alt key to disable quantization temporarily.
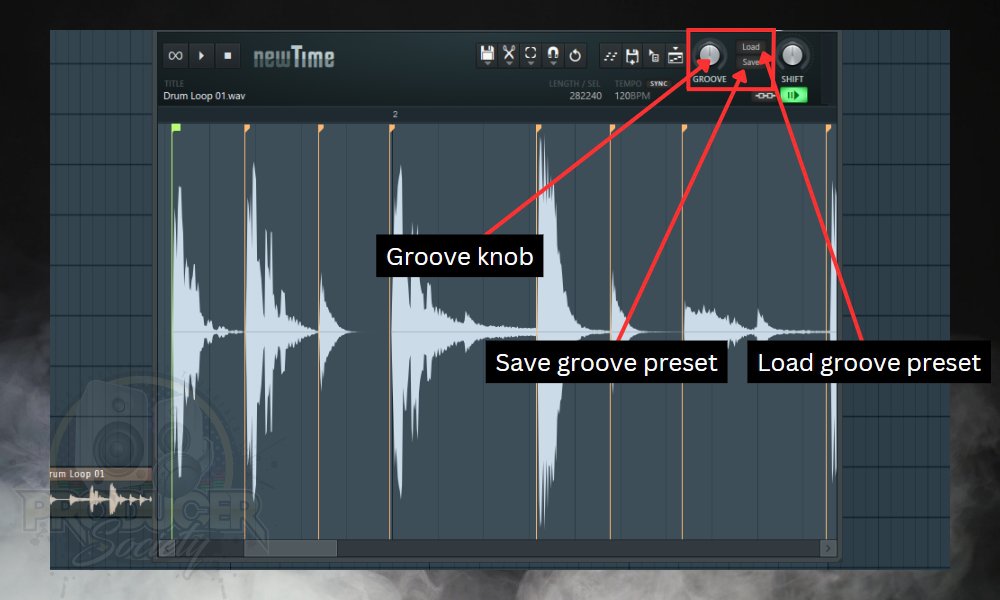
Select a groove using the “Load” button. You have from 25% to 100% as choices. There’s also an option that says “Quantized” which I believe does the same thing as quantizing from the edit menu.
The only difference would probably be that you can control the strength of the quantization using the groove knob.
Use the groove knob to set a level of strength for the groove. This would be useful for keeping a level of human-esque quality in the audio.
There’s also a “Save” button you can use to save a groove setting you would like to use for other projects.
How to Use Quantization In The Playlist
In the playlist, you can apply quantization to Audio clips, pattern clips, and automation clips. The kind you can apply here is the quantization of start times.
This is useful after duplicating clips that don’t end at the grid. When you duplicate clips, the next clip starts immediately after the end of the original clip, whether or not the clip ends on the grid.
This way, the next clip doesn’t start on the grid, and it is stressful to start adjusting each clip. In this case, it is useful to be able to align the start time to the grid. Quantizing start time will also prove useful in other ways too.
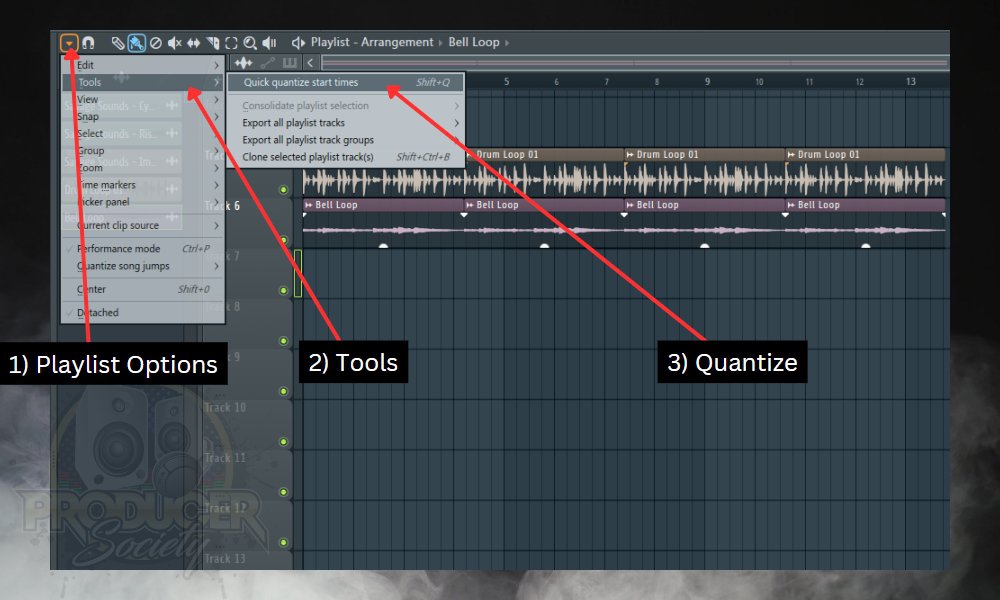
From there, select “Quantize start time”. You can also use the keyboard shortcut ‘Shift + Q‘.
6 Tips for Using Quantization in FL Studio
1) Use Shortcuts
Shortcuts make your workflow faster. ‘Ctrl/⌘ + Q’ for Quick quantize; ‘Shift + Q‘ for Quick quantize start times; ‘Alt/Option + Q‘ for Quantize.
2) Use Presets/Grooves
FL Studio has great presets that can meet your needs. Sometimes you do not need to go through the manual process of adjusting each parameter to your taste. Just check the presets out. And they can serve as a source of ideas.
3) Do Not Use 100% Quantization For Everything
Keep in mind that music needs to sound natural. Some instruments like pianos, guitars, bass, drums, and most other acoustic instruments will benefit from a little deviation from the grid.
100% strength quantization won’t always be needed, but I guess it depends on what you’re doing.
4) Select The Notes/Clips You Want To Quantize
If you apply quantization without selecting the specific notes or clips to be quantized, the quantization will be applied to the whole playlist or pattern (piano roll).
5) Listen To The Result
After you have used the quantization tool, listen to the result to check, and if you need to manually adjust some notes.
6) Record With a Metronome or Click-Track
When recording, ensure you have the metronome turned on, to reduce mistakes. Quantizing only helps to align your clips/notes to time, not correct mistakes.
Do you have any tips or ideas for how to quantize in FL Studio? Be sure to let me know in the comments. I’d love to hear what you think.
Other Articles You May Be Interested In
- How to Snap to Grid in FL Studio + (7 QUICK Tips)
- Making Triplets in FL Studio Mobile [A Step-By-Step Guide]
- Using The Quantizer In Garageband (How To, Tips, & Tricks)
- GarageBand vs FL Studio – What’s the Difference?


 Written By :