 Written By :
 To connect an audio interface to a mixer, use a 1/4″ TRS cable to connect the mixer’s output to the audio interface’s 1/4″ input (some mixers also use XLR or RCA cables). After you’ve turned on your computer/mobile device, open your DAW and configure it so the audio interface is your input device.
And this is the brunt of how you connect an audio interface to a mixer. I have a small MouKey MAMX3 mixer which uses 1/4″ TRS input/outputs, but some mixers use RCA cables or XLR cables as I said a moment ago. Regardless of which connection you use, the principles are fairly similar.
A Step-By-Step Guide To Connect An Audio Interface To A Mixer

There are a few different ways of connecting a mixer to an audio interface, and the image I’ve shown above is just one of the 3 that I’m aware of.
As I said at the start of the article, you can use 1/4″ instrument cables (either balanced or unbalanced), XLR cables, and also an RCA connection.
There are pros and cons to each type of connection, but at the end of the day, they all practically do the same thing.
I would say that in the modern era, 1/4″ instrument cables and XLR connection are probably the most common connection, as well as USB (more on USB in my guide), but I digress. Let’s walk through each part of this process in detail.
1) Turn on Your PC/Mobile Device And Your DAW

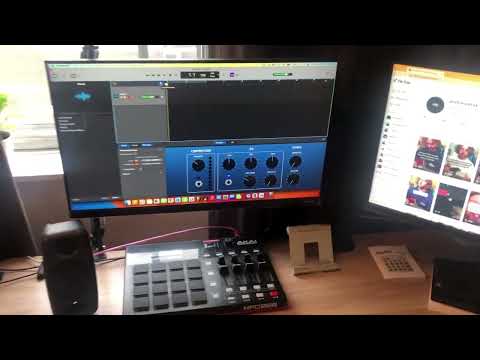
Of course, you’ll need access to a digital audio workstation which almost any mobile device or PC is capable of housing. GarageBand is a great start, but FL Studio Mobile or BandLab will work just fine as well.
Open up your DAW like what’s shown above and turn on your monitoring button. As I explained in my guide to monitoring, this will allow you to actually hear what’s going on.
Make sure you don’t have your levels set to loud when you’re setting everything up though because you don’t want to blow out your speaker or something like that by accident. Once you’ve opened your DAW, connect your audio interface with the appropriate cable.
These days, a lot of new audio interfaces use USB-C which is great because USB-C is more compact, versatile, and charging and transfer speeds tend to be faster than other connection types.
2) Connect Your USB Audio Interface With the Appropriate Cable (USB-C/USB)

You don’t have to necessarily use a Scarlett. I also own a Focusrite Saffire 6USB, iRig Pro, iRig HD 2, and a PreSonus AudioBox USB96 and they all work fine for this (my article on this). As a matter of fact, I’ll be using the Saffire 6USB for the rest of the tutorial.
3) Connect 2 Balanced Cables From the Audio Interface’s Inputs To The Mixer’s Outputs

Connect two 1/4″ instrument cables to Input 1 and Input 2 on your audio interface, and then get ready to run them to your instruments, whichever one’s you plan on using.
As a general rule, I would set the gain to between 1/2 and 1/4 to the max just to avoid blowing out your speakers or doing anything crazy or unexpected. You can use these levels more accurately later.
4) Plug Your Guitar And Piano Into the Inputs Of The Mixer

You’ll also need to connect your mixer to a power supply assumably. The MouKey MAMX3 comes with one in the box.

Similar to the gain on the audio interface, it probably wouldn’t be a terrible idea to set the levels to around halfway, that way you’re not at risk of blowing any speakers or causing insane clipping. To be safe, even try 1/4.
5) Ensure The Volume Of The Mixer’s Outputs Isn’t Too Loud

As you can see, there are quite a few controls but the meaning behind them isn’t complicated. Each input has its own volume knob as well as a switch for mono/stereo.
If you want a mono signal you want the button elevated and if you want stereo, you press it. If you’re new to mixers, the MAMX3 is a great introduction by the way because it’s simple.
6) Press the Stereo Button On the Mixer

And then we want to set our levels on the mixer as well as on the audio interface.
7) Don’t Forget To Adjust The Audio Interface Gain and The Mixer’s Input Gain

Strum your guitar, practice your vocals, or play the piano and see how the audio interface responds to the signal. As you may already know, a red light almost always means clipping and green means that your signal is just right. And finally, we have the results of this little experiment shown down below.
A lot can be done with a mixer, a lot more than what I’ve outlined here. Additionally, it’s important to add that you could also set up two instruments with your audio interface without even using a mixer.
One thing that’s cool about the mixer is that you could add 8 more instruments to your audio interface because of the additional ports on it. Ultimately, a mixer just gives you way more control over your levels.
What Gear You Need to Connect An Audio Interface To A Mixer
Now let’s talk about some of the equipment that you may need. The first and most obvious thing other than the mixer is the audio interface.
1) An Audio Interface – Scarlett 2i2 or iRig PRO I/O

Newer audio interfaces, at least from what I’ve seen, don’t have the RCA cable ports on the back. I imagine that if you purchased a professional-grade audio interface, they would have those connections on the back but I haven’t seen them too much.
I mention this because some mixers could be connected in this way I imagine, as they could also be connected with XLR cables. If you are going to use an iRig Pro or a Scarlett 2i2, just know they do not come with RCA ports.
2) A Mixer – MouKey MAMX3

If you’re looking for a device that won’t break the bank or cause you any problems, the MAMX3 is a great choice. Yeah, it’s missing many of the ports that other more advanced mixers have, but it can do a lot considering the price.
3) 1/4″ Instrument Cables (2 Balanced and 2 Unbalanced)

You can find many balanced and unbalanced cables on the internet, but here are some balanced ones on Amazon. From what I understand, it’s not entirely necessary, at least it wasn’t for me when I made this tutorial.
However, it’s generally suggested by people who know more than me to run a 1/4″ balanced cable from the mixer to the audio interface.
I imagine that if you’re in a nightclub setting or in a place with a ton of electronics, it would probably be best to use balanced cables. The reason for this is that balanced cables have a mechanism inside them whereby they’re capable of cancelling out any noise or interference.
It’s important for relatively hot signals, ie, microphones, to use a balanced cable because you don’t want to amplify the noise and interference – you only want to amplify the vocals.
4) Computer or Mobile Device

I’m currently using a 2017 MacBook Pro and an iPhone X. I would recommend getting the newest MacBooks with a solid-state drive, at least 1TB of storage space, 16GB of RAM, and an iPhone capable of using iOS 16 with at least 64GB capacity.
These, in my opinion, are just the best for music production. Now that we’ve gotten that out of the way, let’s walk through some of the other methods for connecting a mixer to your setup.
2 Other Ways to Connect An Audio Interface To A Mixer
1) With An XLR Cable

Kettner Creative has a good video on how to pull this off, particularly if you’re trying to start a podcast or something like that. The pros of using XLR cables, as I said earlier, are they’re balanced cables and they reduce a lot of noise.
They’re also great for when you need a really long cable and minimal interference across that distance, unlike unbalanced instrument cables which are best for short distances.
But they tend to cost a bit more as well, although, not enough (in my opinion) to cause any real concern. It’s not like cables in general cost that much.
2) With RCA Cables
![RCA Cables - How to Connect An Audio Interface to a Mixer [A REAL Guide]](https://producersociety.com/wp-content/uploads/2023/01/RCA-Cables-How-to-Connect-An-Audio-Interface-to-a-Mixer-A-REAL-Guide.webp)
The only thing in my entire studio that uses RCA cables is my iLoud Micro Monitors. Everything else connects with a 1/4″ jack, USB-C/USB, or XLR connection. So why would you want to use RCA cables? They’re super old and a lot of analog equipment uses them. RCA cables are also fairly inexpensive.
XLR vs Balanced 1/4″ TRS – When to Use Each and Why
![XLR vs Balanced 1/4" - How to Connect An Audio Interface to a Mixer [A REAL Guide]](https://producersociety.com/wp-content/uploads/2023/01/XLR-vs-Balanced-1422-How-to-Connect-An-Audio-Interface-to-a-Mixer-A-REAL-Guide.webp)
In most cases, you’ll see 1/4″ instrument cables with just one ring and a tip, which means they’re unbalanced, whereas probably every single XLR cable is balanced. But you can actually buy balanced 1/4″ cables as well, and you know they are balanced because they’ll have an additional ring right before the tip of the cable.
In most cases, you won’t need to use a balanced 1/4″ instrument cable except when sending a guitar signal out from a mixer.
Admittedly, I’m not the greatest source on where and when to use balanced 1/4″ instrument cables. I’d recommend checking out this article from Sweetwater on cables, as well as these two Reddit threads (one and two).
2 Tips For Connecting An Audio Interface To A Mixer
1) Use Balanced 1/4″ Cables If You Want To Minimize Noise and Interference
While I said earlier that balanced cables weren’t totally necessary, and they’re not in most cases, it wouldn’t be a terrible idea to have one to connect from the mixer to the audio interface.
Your guitar is connected to the inputs of the mixer with an unbalanced cable, and then you connect from the mixer to the audio interface with balanced cables.
2) You May Need To Use A Direct Box
In some instances, it may actually make sense for you to use a Direct Box as Fender explains in their article here. Electric guitars are high-impedance instruments and plugging in a high-impedance instrument directly into a lower-impedance input like a microphone input could result in a loss of volume, tone, clarity, etc.
A direct box is something that I don’t have a lot of experience with, but I know they are particularly useful if you’re connecting a guitar and a guitar amplifier to a mixer.
The DI Box will act as an interface between your instrument and the mixer, setting up the signal in such a way that it’s optimal for the mixer. There are a lot of direct boxes on the market, but you could always try one like the Behringer X122USB.
The ones from Radial tend to be more popular and tried-and-true, but a price comes with that. I would describe them as the BOSS Pedals of Direct Boxes.
Other Articles You May Be Interested In
- How To Connect 2 Instruments to A Looper Pedal [Full Guide]
- How to Connect A Looper Pedal To A Mixer [EASY]
- The Difference Between Line and Inst on Focusrite Products
- The Scarlett 2i2 and Solo – Everything You Need to Know
- Is the Scarlett 2i2 a DAC (Digital-to-Analog-Converter)?
Gear Mentioned
1) Scarlett 2i2
2) USB-C Adapter
3) MouKey Mini Audio Mixer
4) Scarlett 2i2
5) iRig Pro I/O
6) Balanced 1/4″ Instrument Cable
7) Behringer X122USB Mixer