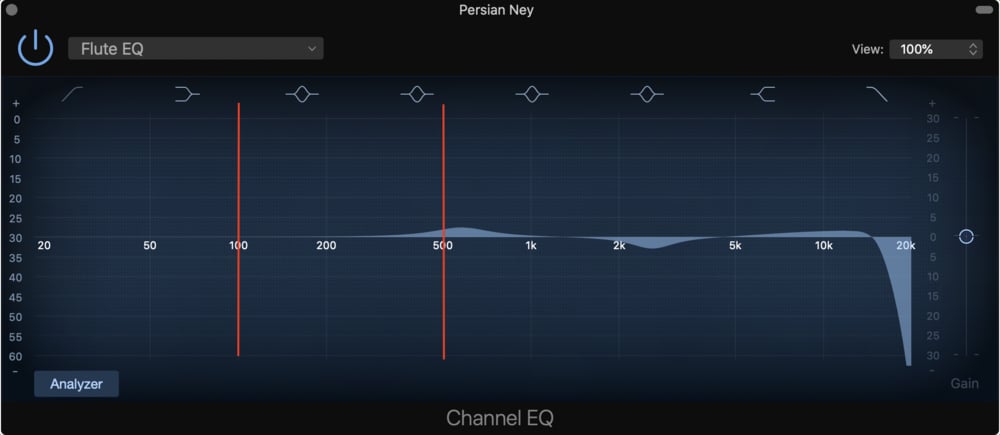
Because the frequencies of the flute lie between 300Hz and 5000Hz, it’s best to increase the frequencies around 500Hz to add warmth, attenuate the frequencies at 3000Hz to decrease the amount of breathiness, and increase the frequency range between 4000Hz to 5000Hz to adjust the brightness.

With that said, how you apply EQ to the flute depends on what notes you’re actually playing.
EQing a flute is a practice where there are many ways of going about it simply on account of the various kinds of flutes. You have the concert flute, the piccolo flute, the bass flute, the alto flute, soprano flute, tenor flute, and the treble flute, just to name a few.
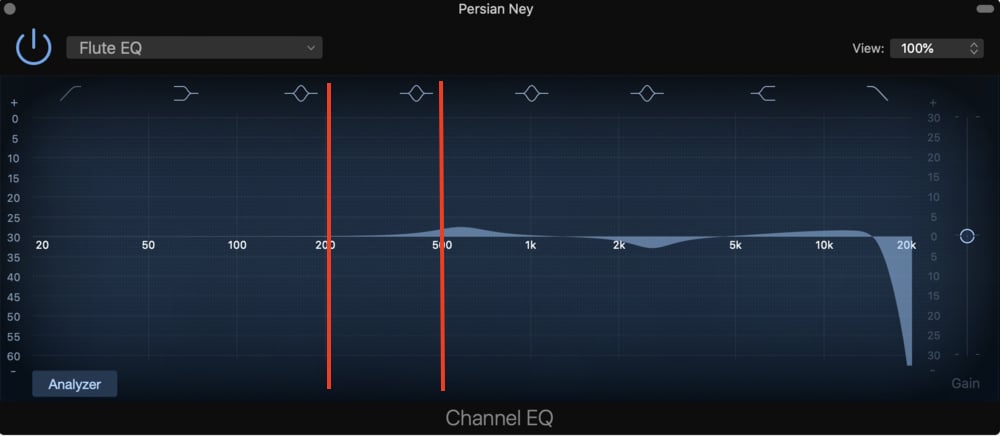
While everyone has their own way, the setting shown above is what I found to work the best.
For instance, if you’ve recorded a track using notes around the C1 octave (middle C), it’s going to sound quite a bit different frequency-wise than at C3 (get PianoForAll – the best way to learn piano for music production – if these terms aren’t clear to you).
Additionally, how the flute sounds in your recording depends a lot on the type of microphone you’ve used as well as from what distance the player was positioned from the actual microphone (the AT2035 on my Product Page is a great mic for this).
With all that in mind, this article is going to offer somewhat of a guideline, or rather, a starting off point from which you can figure out your own EQ settings for the flute.
Microphone Types for Flute Recordings
There are three different kinds of microphones on the market.
You’ve got the ribbon microphone, the dynamic, as well as the condenser microphone. These are certainly the most common and I’ve touched more on the differences between them before.
In the sub-section below, I say that one has to pay particular attention to one area of the frequency spectrum depending on the microphone type, but of course, you should pay attention to all of them.
In other words, pay attention to every area of the frequency range, but focus a little bit more on the area I’ve designated.
Condenser Microphone
According to the Recording Mag, condenser microphones are commonly used for jazz flute recordings, the microphone that creates sounds through a vibrating electrically-charged plate/diaphragm (more on this in my guide).
The diaphragm is powered by phantom power from an external source such as an audio interface like the Solid State Logic 12.
A condenser microphone is ideal for recording many of the flute’s transients and sounds.
What this means for your EQ strategy, is that it may make more sense to pay closer attention to the higher range frequencies when EQing the flute recorded with a condenser microphone.
Dynamic Microphone
A dynamic microphone like the Shure SM57 I use, on the other hand – the microphone that uses a magnet/coil/wire assembly to amplify the audio signals from the diaphragm – tends to create a sound with fewer high frequencies and therefore less detail as well.
And what this means for your EQ strategy, is that a flute recording using a dynamic microphone is going to be the most balanced.
In other words, you’ll have to pay attention to the low, mid, and high-frequency ranges with the same amount of detail.

Ribbon Microphone
As I said in my article on the ribbon mic, the MXL R144, the ribbon microphone has the reputation of being the darker of the three types. Sweetwater claims that the ribbon microphone is actually a dynamic microphone, although it’s slightly different.
Ribbon microphones like this MXL R144 use a very thin strip of metal, usually aluminum, that’s suspended within a magnetic field and it acts as both diaphragm and the transducer element itself.
A consequence of the ribbon microphone’s construction is that it’s about as sensitive as the condenser microphone but it has a much darker quality.
In other words, if you’ve recorded a flute with a ribbon microphone, it’s going to have a darker quality to it. There will be more low frequencies in the recording.
In this case, a flute recording use a ribbon microphone will tend to produce higher notes without as much sibilance, while the lower range frequencies are more warm and full.
According to Recording Mag, ribbon microphones tend to respond to EQ very well, and it’s a great option for recording a classical flute soloist on their own.
For EQing a flute recording using a ribbon microphone, pay special attention to the lower to mid-range frequencies.
You may have to attenuate/decrease these frequencies by just a little bit, or perhaps even increase them if you want a very full, warm, sound.
Different Flute Types
As I mentioned above, there are a number of flutes available to a player, with a few of them discussed near the beginning of the article.
Depending on which one you’re using, you just have to think for yourself about what frequencies the flute is using. For instance, if you’re using a piccolo flute, it tends to be much higher than a regular flute.
Because it’s much higher, the frequency range will be higher.
An alto flute is different from the others as well, in the sense that it may take more air to produce sound.
This means there will be more breathiness in the recording, which you can account for in the EQ and the microphone positioning as well.
Important Things To Consider
1) Reducing or Increasing Airiness
It takes a lot of breathing power and air in order to work the flute.
Because of this, the microphone can pick up on a lot of extraneous noises from your playing, depending on the position from which the flutist is playing.
How you stand/sit in relation to the microphone is important.
Some people suggest having the flute approximately two feet from the microphone for the best results, with the microphone positioned around half-way down the body of the flute.
The idea behind this is to produce more of a natural flute sound with a lot of those air sounds.
Conversely, if you want less air in your recording, you may position the mic a bit further back. Depending on how you position the microphone will affect the way you adjust the Channel EQ.
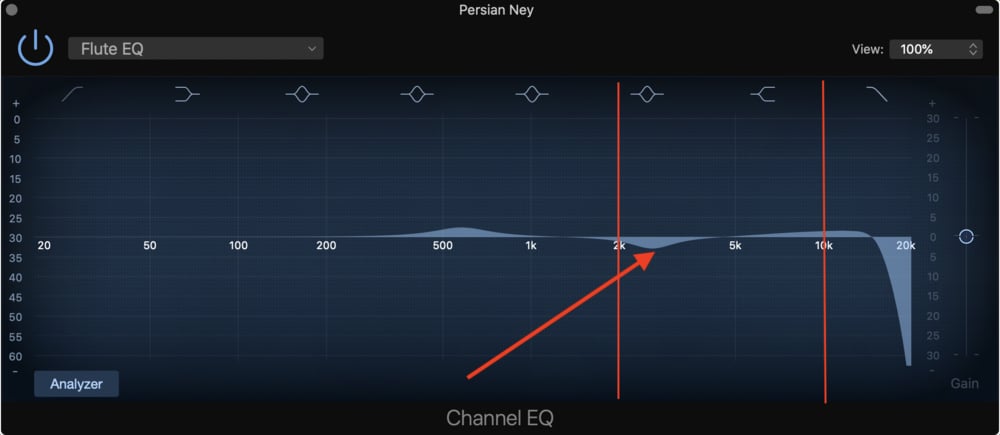
As I said above, I find that the airy qualities of the flute tend to be in the high-mid to high-range frequencies, so if you find they’re too overbearing, just go ahead and attenuate the frequencies around the 2000Hz range with a relatively narrow EQ.
This looks like what you can see in the image below:
2) Clicking Sounds
In addition to the airy sounds that come from playing the flute, the microphone may also pick up on the sound of your fingers clicking on the keys.
Like the element of breathiness or airiness, whatever you want to call it, this can be accounted for using microphone placement.
I think of this a lot like the guitar because the guitar can have a similar problem, notably, the sound of fingers squeaking across the strings, which you can read more about here.
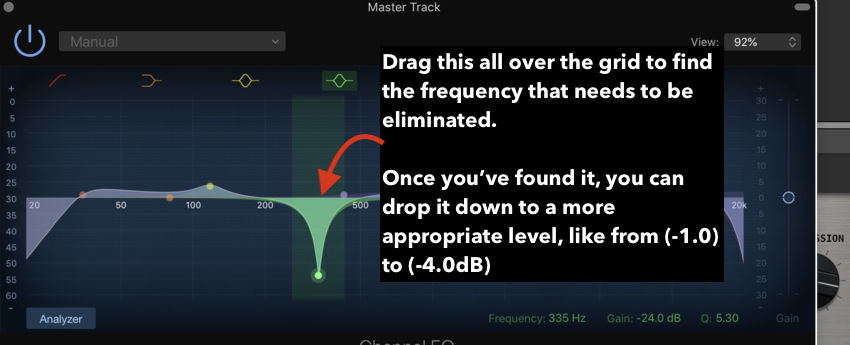
If you want to attenuate the sound of your fingers hitting the keys, you have to use a Channel EQ sweep in order to find the frequency at which the sound lies.
An EQ sweep is when you use a really narrow Q to sweep it across the frequency spectrum to find the undesirable frequencies. You can create an EQ sweep either through an increase or a decrease.
For the lack of a better term, a “decrease EQ sweep” looks like something you can see in the image below:
Because I don’t own a flute, I can’t tell you for sure where this undesirable frequency lies, you may just have to find it for yourself.
On the other hand, a flutist may like the sound of the clicking and consider it as a natural part of the instrument. In other words, you may not want to eliminate it. It’s up to you.
Flute EQ Guideline
In this section, I’m going to offer up a series of guidelines you can use for EQing your flute recording.
0-250Hz
This is the area where there aren’t many frequencies shining through in a flute recording.
As I mentioned above, the frequency range of a flute typically lies between 300Hz and 5500Hz or so, so any increases or attenuations in this area, 0-250Hz, will make a tiny difference.
However, if you do decide to increase these frequencies by quite a lot, it might create somewhat of a rumbling sound which you could confirm by soloing the frequency with Fab Filter’s Pro-Q EQ plugin.
These frequencies tend to be exhausting when they’re too strong.

200-500Hz
Like other instruments, the lower part of this range is the “muddiness” frequency, where all of the mid-range obfuscation lies.
Without the jargon, it’s the most common frequency in which many other instruments also have frequencies, moreover, it’s very easy for the human ear to pick up on these frequencies.
For that reason, it’s best to attenuate in this area, rather than increase. You’ll find that by dropping out this area, you’ll clear up the sound of the mix.
2000 – 4000Hz
Here is where we start to get some of the “airiness,” or “breathiness,” as people like to call it. Moreover, the flute has a lot of sound in this particular range so pay careful attention to how your attenuations and boosts sound.
When I tried EQing a flute, I found that it was best to attenuate this area, rather than boost it.
You can see what this looks like in the image below:

10,000 – 12,000 Hz
I don’t hear any sounds from the flute in this range, regardless, you could try and boost this area for a presence and brightness increase.
How To EQ A Flute
I experimented with some flutes when I was making this article, and I found that the following EQ setting sounded the best:

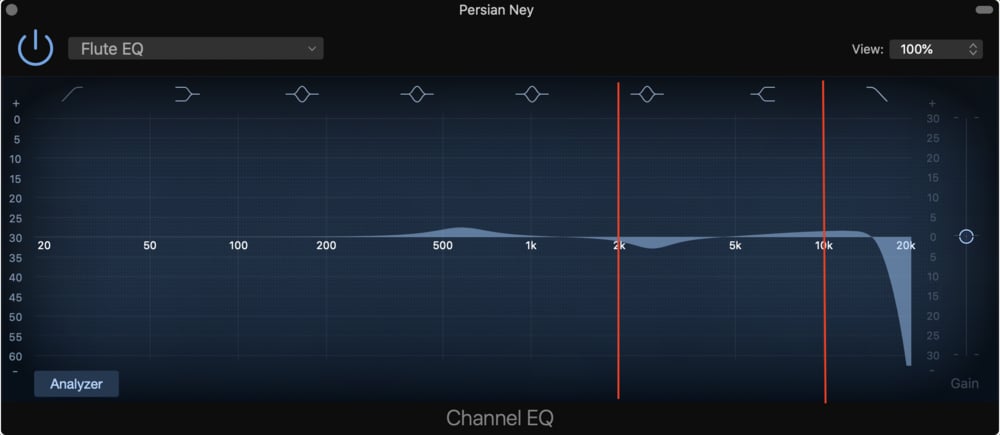
As you can see, I’ve boosted the 600Hz range for more warmth, decreased the frequencies around 3000kHz to eliminate some of the “breathiness,” and I also boosted the range between 6000kHz and 11,000kHz for more brightness.
It’s best to keep your EQ adjustments at a minimum. In fact, most engineers that I’ve listened to say that EQ should be almost entirely subtractive, in other words, no boosts (and I’ve said this before in my EQ guide as well).
Of course, recommendations like these are merely guidelines, however, I find it’s best to follow the common practices of more experienced engineers before figuring out your own way.
YouTube Video Review
Conclusion
Setting up a Channel EQ has to be one of the more fun aspects of mixing, I have to say.
A lot can be done to improve the quality of a recording, however, it’s important to record the instrument correctly from the start to get a great sound.

 Written By :