DSK’s Saxophone and Iowa’s Alto Sax are two of the best, free, saxophone plug-ins for Garageband. While they’re not as good as a real saxophone, a lot can be done to improve their quality and sound with dynamics processing and effects.
Garageband has a number of VST instruments that sound pretty good, but the saxophone is severely limited. Thankfully, there are other plug-ins we can download and use to get a much better-sounding instrument.
Access the DSK Sax here and the Iowa Alto Sax at this link.
There is also Iowa’s Soprano Sax, which is of similar quality, and it also has the ability to switch between vibrato and non-vibrato which makes it more versatile.
I’ve already shown you how to install third-party plug-ins in Garageband in my other article, so now that you’ve downloaded the plug-in, I’m going to walk you through DSK’s Saxophone, including how to make it sound great.
How To Use DSK’s Saxophone For Garageband

As I’ve said already, the DSK Saxophone doesn’t sound as good as a real saxophone or a premium VST.
One of the main reasons why I’ve chosen the DSK Saxophone for this tutorial is because it has a natural vibrato to it, which seems to sound much closer to the real thing.
If you listen to a real saxophone player, they tend to use a bit of vibrato on each note. You can see what I mean from this Eric Marienthal video.
Unfortunately, the DSK Saxophone is missing that highly compressed fluttering sound that really gives the real saxophone its vibe.
The DSK Saxophone comes with 7 main parameters, and they are the following: Attack, Decay, Sustain, Release, Velocity Curve, Reverb, and Level.
We’re going to explore what each one does and how to optimize the settings for the best possible quality.
Attack

The four main parameters, attack, decay, sustain, and release, function as compression settings.
For instance, by adjusting the attack, you change the speed at which the compressor latches on to the signal and compresses it.
One can see this dynamic at work when we put the attack all the way to zero, to the left, and all the way to the right – maximum.
When the attack setting is on the lowest possible setting, this means there is no attack at all, which means that the saxophone begins playing right away with no compression at all on the sound.
On the other hand, if we crank the attack all the way to the right, it sounds like it has a “fade-in” effect.
The reason for this is what I mentioned above.
When the attack is set to the maximum, the plug-in’s compressor latches on to the sound immediately and begins compressing it, which tends to create somewhat of a “faded” effect.
I would say there are two primary purposes of the attack function in this particular case:
1) Slurs and Fast Lines
An attack set higher will make it sound a lot better for fast lines and notes played in succession.
In other words, it’s great for a saxophone section in which many notes are played quickly and closely together, almost as if they’re slurs, or as guitarists call them, “hammer-ons and pull-offs.”
2) Long Notes
On the other hand, if we’re going to have the attack set to the lowest possible setting, this makes it sound a lot better for notes which are held for an extended period of time.
Go ahead and experiment with your own “attack” settings, and see what you like best.
I typically keep it right at the half-way mark.
Decay and Sustain
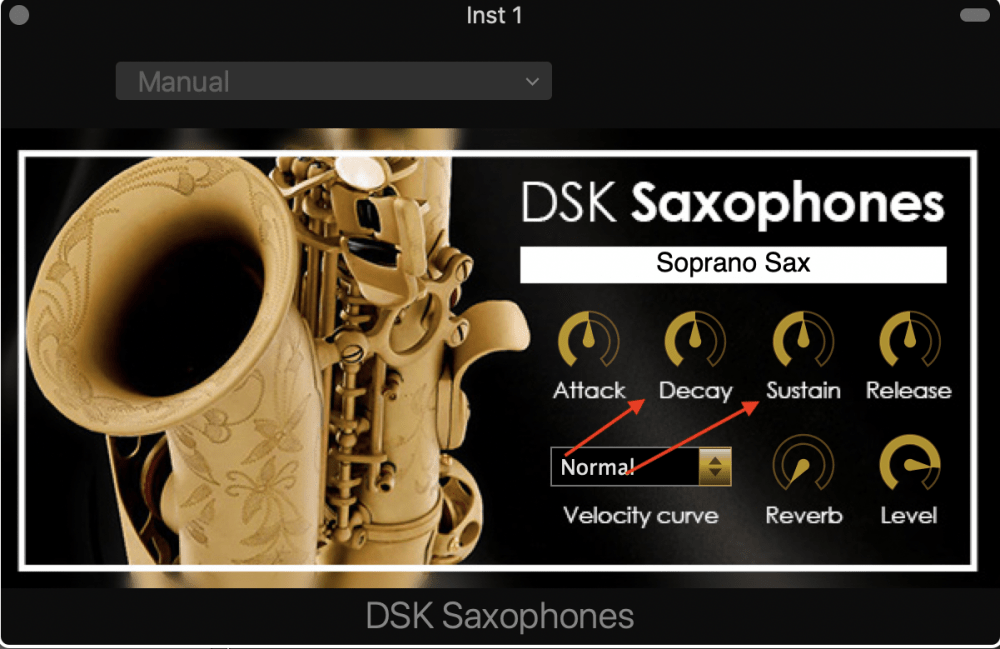
The decay and sustain work in conjunction with each other. For instance, if you’ve cranked the sustain, but the decay is set at its minimum value, it won’t do much.
However, if you have the decay turned on half-way and the sustain turned all the way up, the note will continue playing at a similar level.
In other words, when you hold down the note on the MIDI keyboard (I recommend using the Oxygen Pro Series) with the sustain all the way to the maximum, the note will continue to play at the same volume and intensity.
But if you turn the sustain all the way off, to the left, the note will dissipate despite the fact you’re continuing to hold down the note.
However, they both have to be turned on, so keep that in mind. Also, get PianoForAll (from their website) if you want to understand the secrets of getting the piano on your side for the sake of music production. It’ll help your saxophone lines big time too.
Release

From what I’ve experienced thus far, the release is the final setting among the main four where there is a substantial difference between a maximum and minimum setting.
In summary, the release is a setting that adjusts the degree at which the note fades after you’ve stopped pressing on the MIDI keyboard. If you go ahead and crank it to the maximum, it’s easy to hear the difference.
When the setting is increased to its fullest capability, that means that the note will have a lot of sustain to it, meaning, it will continue to play for a few seconds after you’ve let off the MIDI keyboard.
Conversely, if there is no release at all, that means that the sound will abruptly stop playing the moment you’ve taken your finger off the MIDI keyboard.
In terms of making the saxophone from DSK sound realistic, I think that the release should always be set at mid-way.
Now we’ll move on to the other more intuitive settings, the velocity curve, reverb, and level.
Velocity Curve

The velocity curve, if you’re familiar with music production at all, should be quite intuitive.
Essentially, what it does is that it controls the strength or volume of the note by default.
The piano is a useful comparison.
If you strike the key very hard, as hard as you can, this is hard, strong, or maximum velocity, but if you play it as lightly as possible while still pressing on it enough to make a sound, this is the minimum velocity or the softest one can possibly go.
In this particular case, there are three main settings, “Normal,” “Weak,” and “Strong.”
“Normal,” is self-explanatory. The notes are played at a normal strength or velocity, in comparison to “Strong,” where the notes are loud and strong, and “Weak,” where the notes are soft and quiet.
In terms of making it sound as realistic as possible, I would probably just stick to “Normal,” because it is going to be the most versatile setting.
Reverb
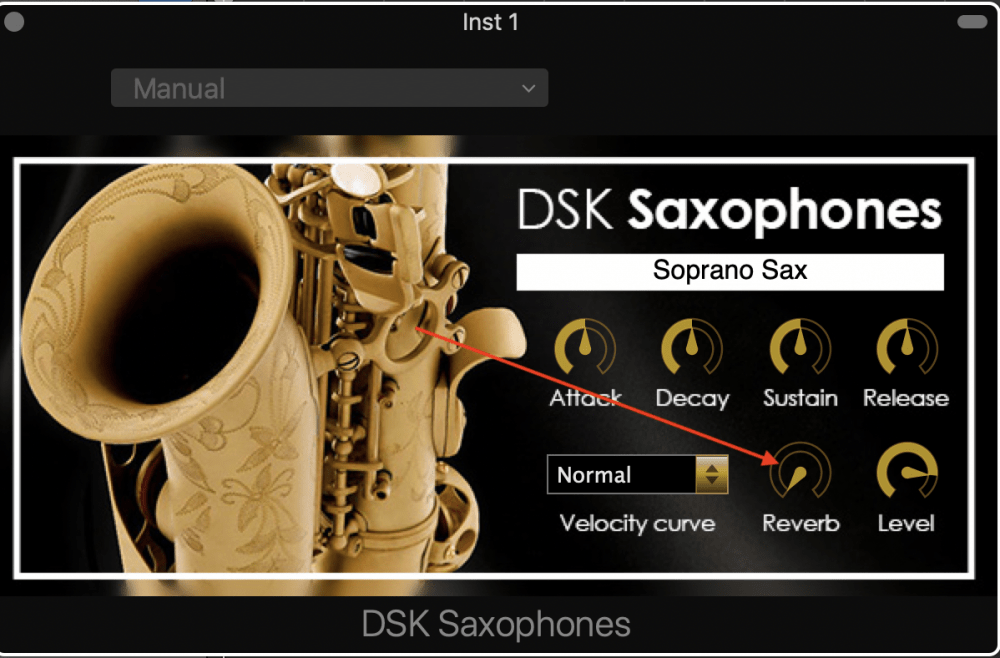
The reverb is self-explanatory, as I hope you know.
In case you don’t, the reverb setting creates an effect where it appears as if the sound is coming from a long distance away, and the degree at which it’s set, adjusts the distance.
For example, a reverb with the setting cranked to the maximum will make it appear as if the sound is coming from a long distance away, whereas a reverb setting of zero or low, sounds like the sax is right at the microphone.

Depending on what kind of sound you want, I would argue that the reverb setting is best to leave it turned right off because Garageband has better plug-ins to use for Reverb, which we’re going to explore in a moment.
Level

The level adjusts the volume or the output level. This is also self-explanatory.
Essentially, it just increases the maximum volume of the plug-in, with all of the effects and parameters at the same level.
I would say that it’s best to keep this at half-way, or perhaps three-quarter way.
Just keep in mind that you don’t want it set to the maximum, otherwise, you may run into some clipping. This, of course, can be fought by decreasing the VU meter of the track region on which the plug-in is set up.

How To Make The DSK Saxophone Sound Good
On account of Garageband and Logic Pro X’s fantastic presets, a lot can be done to increase the quality of the saxophone with minimal work.
For this section, I’m going to touch on a few dynamics processors and then two effects: Channel EQ, Compression, Reverb, and Delay.
With these dynamics processors and effects, we can increase the quality of the saxophone.
Channel EQ
There are a few different pre-sets available for the saxophone in Garageband, including the Saxophone EQ, the Sax Section, Tenor Sax, and Soprano Sax.
Obviously, each pre-set corresponds to a type of saxophone.
Go ahead and try each one. I find that the Saxophone EQ is the best one right out of the box, however, what I usually do is I just use subtractive EQ, with a few minors boosts. I find this is the best way of approaching EQ and I’ve said this before in my Channel EQ article.
You can see what this EQ setting looks like in the image below:
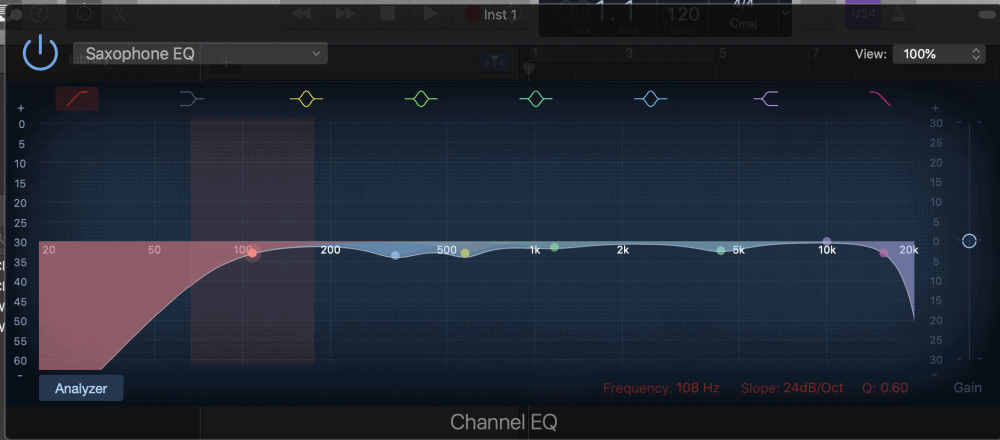
As you can probably notice, it’s almost entirely subtractive. In other words, no boosts. I’m trying to only use subtractive EQ these days with very minimal boosts.
This setting is just a guideline, and the same thing can be said for the other Channel EQ settings as well.
What you think sounds best will vary according to your style and preferences, in addition to what sound you’re aiming for.
Compression
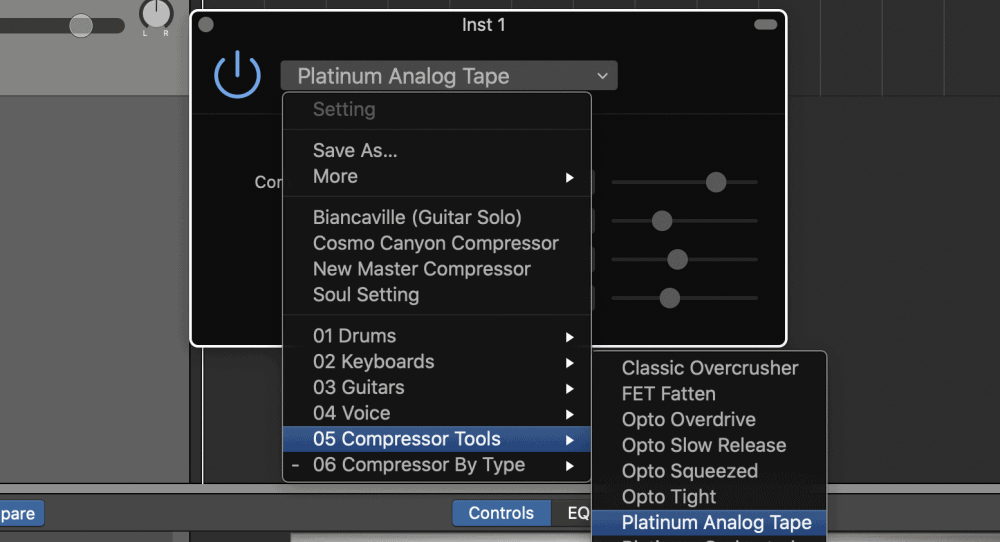
Regarding compression, I find that the platinum analog tape pre-set is fantastic for the Saxophone, however, if you need more settings, you should try Fab Filter’s Pro-C compressor.
However, I modify the preset slightly in a number of ways, mostly in the ratio, and perhaps the attack just by a little bit. The compression, admittedly, doesn’t do a lot for the sound, but it does even out the peaks as well as boost the quiet parts.
Moreover, it increases the total volume tremendously. Go into the settings and choose, “Platinum Analog Tape,” like what you can see in the image below:
As I said already above and in my comprehensive tutorial, compression is more for shaping the loudness of the signal, rather than adjusting the quality or tone of the sound.
In terms of the modifications that I’ve made to it, I dropped down the compressor ratio to 3:1, and I also changed the attack to around 35.0ms.

Other than that, not a lot of other changes need to be made to it.
Reverb
I typically don’t use custom versions of reverb. And by that, I mean that I’ll normally use something simple like the standard reverb control in the bottom-right-hand corner of the Smart Controls, however, these days I would rather use something premium.
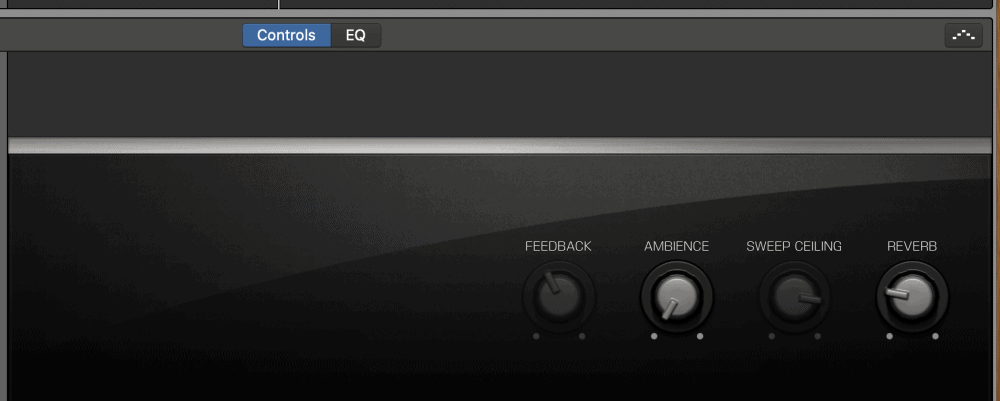
In this case, I chose to experiment, and I found that there are great reverbs to use for brass instruments, right in the pre-sets.
For the saxophone, I used the “Space Designer,” within the Reverb setting in the Smart Controls.

If you take a look into the pre-sets, you’ll find a lot of options there for different types of rooms and instruments. The pre-sets are practically limitless.
It’s under the section, “Medium Spaces,” and then “Rooms,” and then you’ll see where the reverb setting says, “2.0s Sax Reverb.”
You can see what it looks like in the image below:

However, I didn’t leave the pre-set the way that it is, because it’s quite strong.
I dropped the Output of it down to around -21.0dB – a significant reduction. I find that it’s too much at the -10.0dB level that it’s set at.
Stereo Delay
For the Stereo Delay, I almost always use the same setting that I’ve dubbed, “Stereo Delay Setting,” and I use it for vocals and other instruments that just need to be thickened up a little bit.
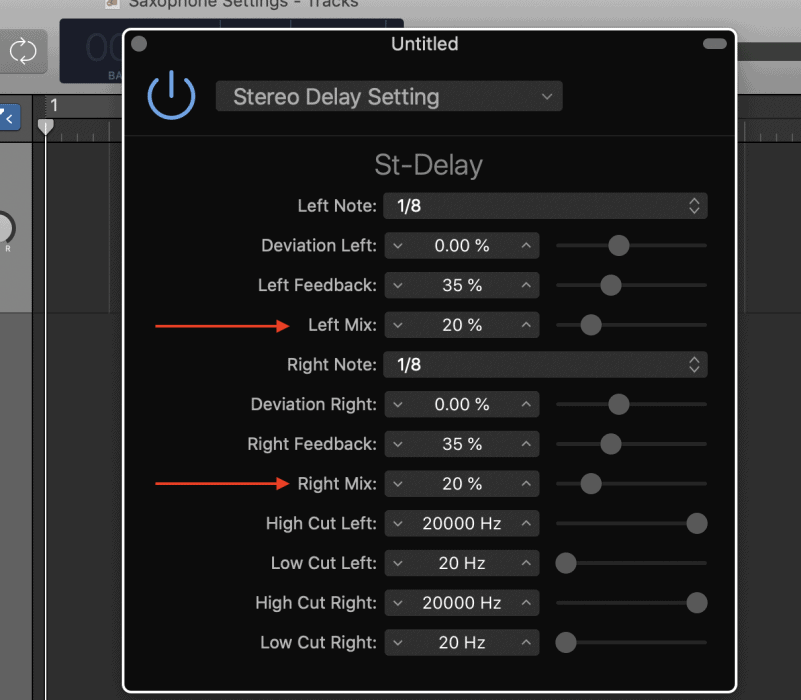
In the case of the saxophone, however, I increased the left and right mix of it to around 20%, because I find that it sounds the best like that.
Tenor and Soprano Sax
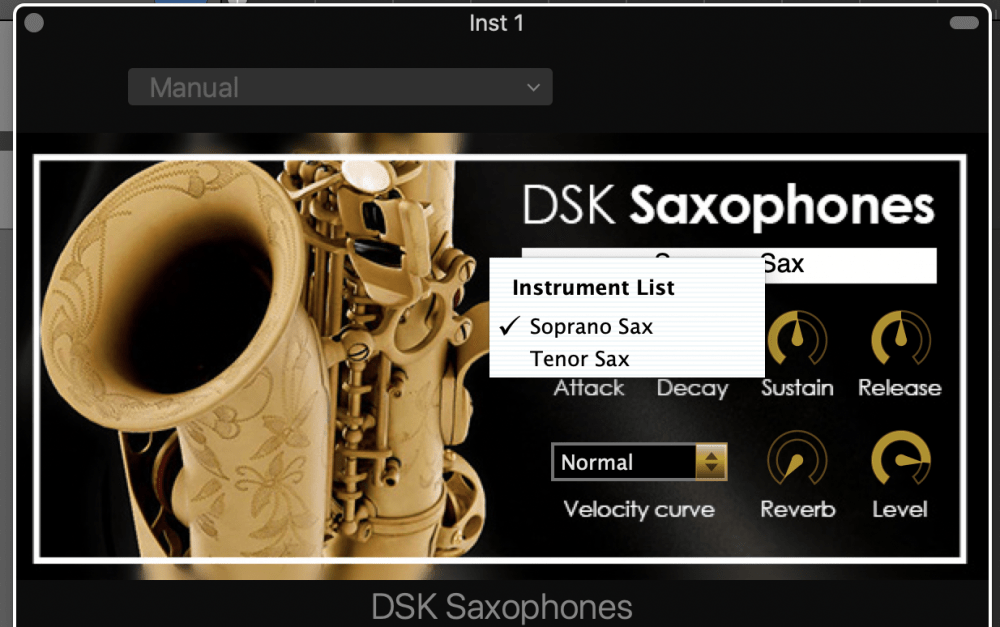
The DSK Saxophone also has the ability to flip between the tenor and soprano sax, and the difference is definitely noticeable.
I prefer the Soprano sax, personally, but the tenor one is cool too in its own way.
You access this by simply clicking on the white bar where it indicates what type of sax it is.
Important Things To Note
- After going back through and comparing the VST saxophones to the real thing, it’s really quite striking. Thus far, it seems like there aren’t many free VSTs for the saxophone that resemble the real thing in the higher registers of the instrument.
- Regardless, the saxophone sounds the best between the ranges of C1 and C3, and near the ending of C3 on Garageband’s musical typing, but once you extend beyond that point, it sounds less and less realistic.
- If you really in the market for a serious VST for the saxophone, Audio Modeling’s Saxophone plug-in from Plugin Fox is fantastic (which I mentioned above), and it’s easily the best one that I’ve heard thus far.
- If you’re looking for a more comprehensive batch of brass instruments and horns, then Native Instruments is a good choice as well.
- Don’t forget about Iowa’s Soprano Sax. It’s a great plug-in as well that I didn’t cover much here because much of the controls are the same.
YouTube Video Tutorial
Conclusion
I hope this was helpful to you.


 Written By :