Note: This is for educational purposes and personal only. You cannot use this method to distribute files you do not own the rights to.
GarageBand iOS is one method for making a ringtone easily, and most people will have you do it this way because it takes the least amount of time. In conjunction with some other applications, it can get even easier. So how do you do it?
To make a GarageBand ringtone from a video
1) Download MP3 Converter from the App Store
2) Screen Record a video
3) Import it into MP3 Converter
4) Export the MP3 as a ‘Ringtone’ to GarageBand iOS
5) Select the Project, click Share > Ringtone > Export > Use Sound As > Standard Ringtone
How To Make A GarageBand Ringtone From a Video (iOS)
Making ringtones with GarageBand (my guide), especially the iOS version, is super simple. If you intend on going without GarageBand iOS, no worries because there are other options. However, there’s no question that using GarageBand is the best free way to make ringtones.
You can also use programs like Loopback Audio which I showed you in my other guide, just as one example. To make a ringtone out of pretty much anything, you just need to use a few things. One is the MP3 Converter, the other is GarageBand iOS, and lastly, you need Screen Record enabled on your phone.
What You Need To Make A GarageBand (iOS) Ringtone from a Video
1) MP3 Converter and GarageBand iOS
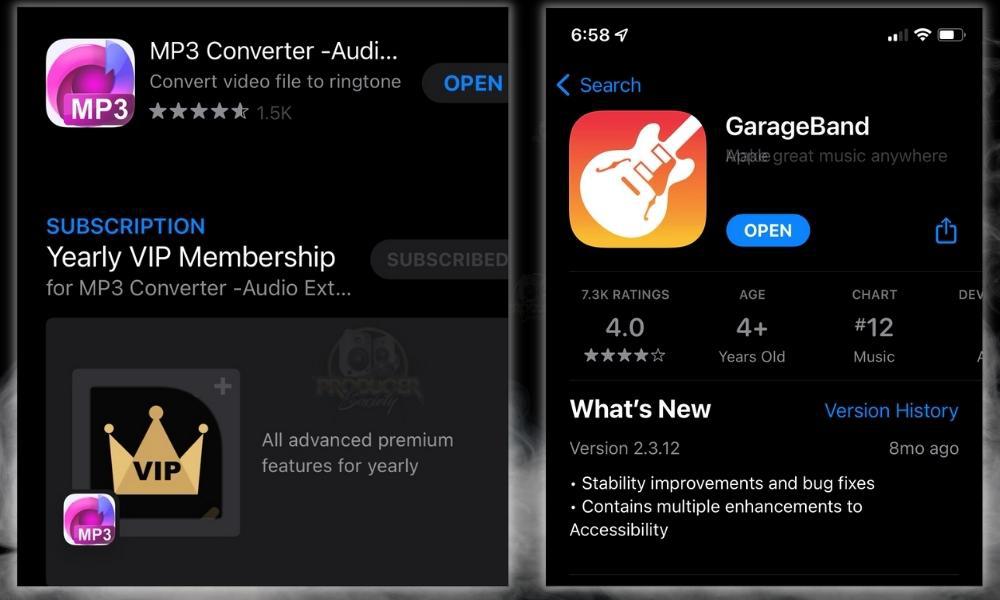
MP3 Converter is a great tool for creating ringtones because it allows you to turn any video file into an MP3 right on your phone.
The first 3 days are a free trial, however, you need to pay approximately $8 per year afterward to hold on to the app. If you plan on making ringtones all the time, this is for you.
GarageBand iOS, on the other hand, is a free application that every Apple product user has access to the moment you buy one of their products. In conjunction with screen record, these two software together are how you will make this possible.
2) Screen Record Enabled
![Enable Screen Recording - How to Make A YouTube Song Your Ringtone on iPhone [SIMPLE]](https://producersociety.com/wp-content/uploads/2022/05/Enable-Screen-Recording-How-to-Make-A-YouTube-Song-Your-Ringtone-on-iPhone-SIMPLE-2.jpg)
The first thing you need to do is you need to get all of this stuff ready to go. Get the free trial of MP3 Converter, install GarageBand iOS, and then enable Screen Record. Once you’ve done that, you can get started by navigating to the video you want to make your ringtone.
1) Screen Record Your Video
![Screen Record Your Video - How to Make A YouTube Song Your Ringtone on iPhone [SIMPLE]](https://producersociety.com/wp-content/uploads/2022/05/Screen-Record-Your-Video-Safe-How-to-Make-A-YouTube-Song-Your-Ringtone-on-iPhone-SIMPLE.jpg)
On my iPhone, I have to swipe up toward the top right of my screen to open the tools and utilities like what’s shown in the image above.
From there, you can press the Screen Recording button and it’ll give you a 3-second countdown before it starts. This should be more than enough time to go back to your video and press play on it.
After you’ve navigated to your video, you’ve recorded it, and you want it to stop, you don’t have to swipe back to the tools and utility menu to stop it. You just have to click on the red clock on the top-left of the screen and that’ll give you the option to stop it.
![Clock - Stop - Screen Recording - How to Make A GarageBand Ringtone From A Video [Full Guide]](https://producersociety.com/wp-content/uploads/2022/05/Clock-Stop-Screen-Recording-Saved-to-Photos-.jpg)
The Screen Recording will save your videos to your Camera Roll unless you’ve configured your device to put videos and photos elsewhere.
2) Import It Into the MP3 Converter
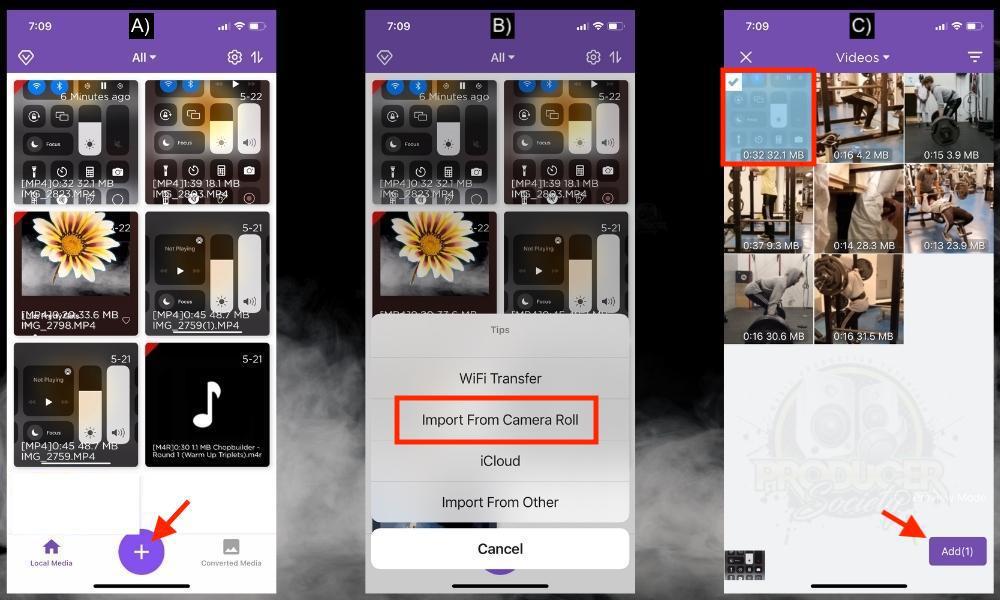
The next thing you want to do is open the MP3 converter and then import the file into it. MP3 Converter is decent at discovering files, so you can just press the “+” symbol to start. Select the video from your Camera Roll by highlighting it, and then press “Add (1).”
3) Share It As A Ringtone
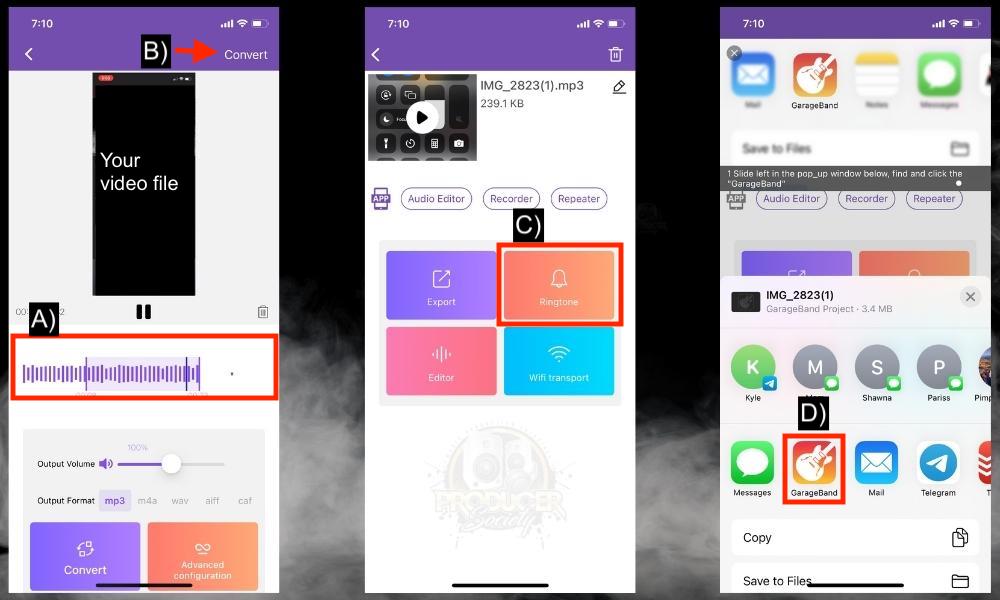
Most ringtones, as far as I know, need to be 30 seconds or less. The nice thing about MP3 Converter is you can crop videos right inside it, assuming your Screen Recording went over the limit, or it needs to be changed in some way. You do that by selecting the region as shown in the image above, (A).
Click “Convert” B) when you’re ready to send it to GarageBand iOS, and then press the Ringtone option as shown in option C). Click the GarageBand icon in step D) and then you can open up GarageBand iOS.
This is the final stage, and while it seems like there are a lot of things to do, it takes seconds once you’ve figured it out and you’ve done it a couple of times.
4) Use GarageBand iOS to Set It As Your New Ringtone
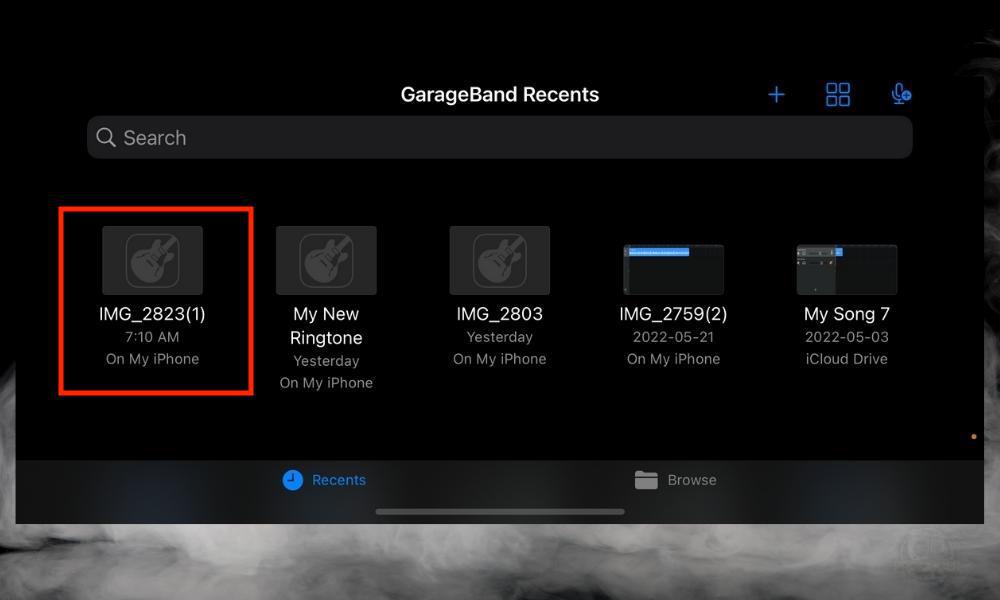
In order to bring up the menu on the file, you have to do what’s called a “long-press.” This just means that you press on the file and hold it until it opens the menu.
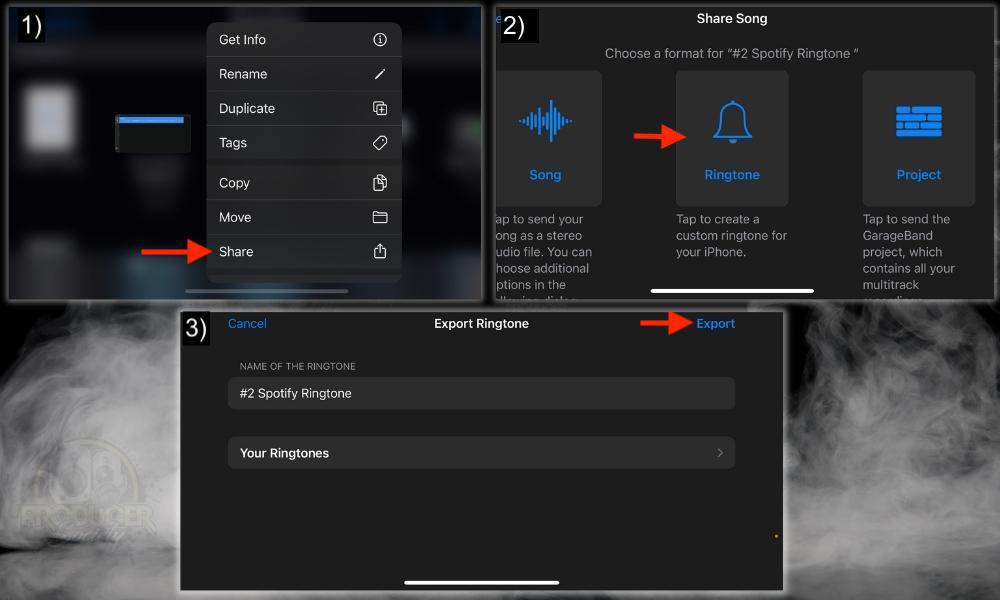
Click Share > Ringtone > Name the Ringtone > then Export. You’re in the final steps now.
![Setting Up the Ringtone - How to Make A Spotify Song Your Ringtone [iPhone]](https://producersociety.com/wp-content/uploads/2022/05/Setting-Up-the-Ringtone-How-to-Make-A-Spotify-Song-Your-Ringtone-iPhone-.jpg)
There are other ways to set your ringtone too. For example, you could just navigate back to your iPhone’s settings, then select Sound & Haptics, Ringtones, and then choose the ringtone you’ve just made. Setting it up in GarageBand iOS is definitely the most streamlined way of going about it though.

How to Make A GarageBand Ringtone From A Video (macOS)
For this section, I’m going to show you how to make a GarageBand ringtone without iOS. The secret to pulling this off is the software iMazing, which is a really cool file manager for iOS products, including iPads, iPhones, etc.
I already showed you how to do this in my other guide on how to make ringtones with GarageBand, but for today, I’ll also demonstrate how to use the GarageBand video editor too.
I recently started using it and I like it a lot because it simplifies the content creation process. With that all said, let’s get into it. I’ll tell you what you need first.
What You Need To Make A GarageBand (macOS) Ringtone from a Video
1) YTMP3 Converter
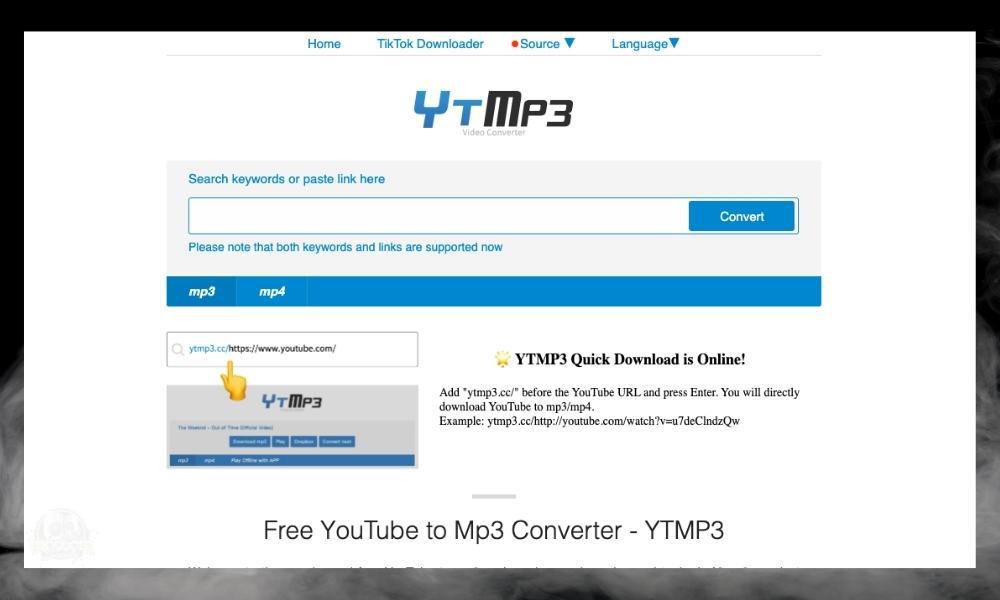
YouTube to MP3 Converter, like the title suggests, takes videos from YouTube and turns them into MP3s. I would’ve shown you this method in my other guide on how to make your YouTube video a ringtone, but I actually forgot at the time.
2) iMazing
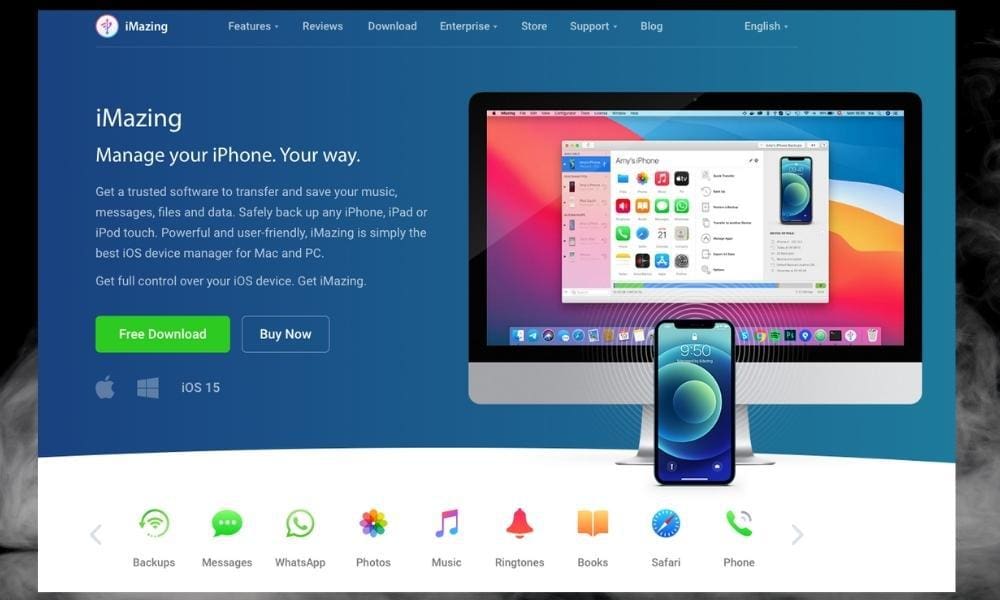
Over the years, Apple has made many changes to its operating system. Consumers have hailed many of these changes, but not all of them. While I still enjoy using Apple products a lot and I foresee myself using them for a long time, some of the way files are managed and organized is a bit annoying.
iMazing is a way to get around that. Not only can you easily make ringtones for your iOS device, but you can organize all of your files in a very simple, streamlined, and convenient way. You can compartmentalize everything in one place.
It’s also a good way of getting ringtones on your device (my guide), without having to rely on the old version of iTunes. Anyway, now that you’ve got iMazing and you’re aware of YtMP3, we can get started.
1) Input the YouTube Video URL Into ‘Youtube to MP3’
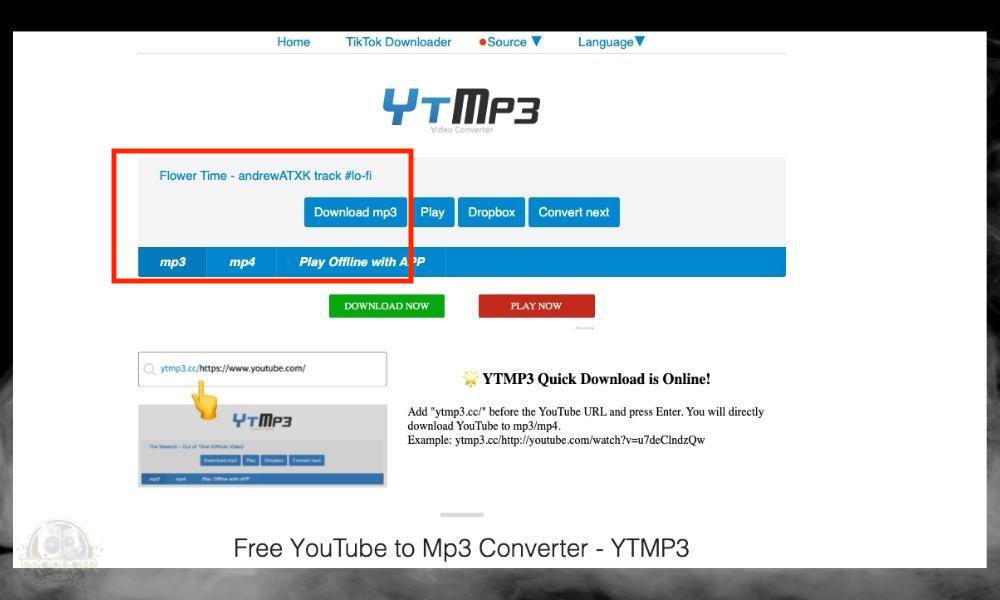
The moment you paste the video link into the YtMP3 converter, it’ll automatically get the file ready for download. Select the option “Download mp3” and then it’ll send it to your Downloads folder at the bottom of your browser (at least if you’re using Google Chrome like I am).
Alternative: If You Already Have the File
If you already have the file and you don’t need to use the YouTube converter, you can easily just import it right into GarageBand macOS and do all of your editing there. I’ll show you how to do that now.
i) Import the Video File Into GarageBand
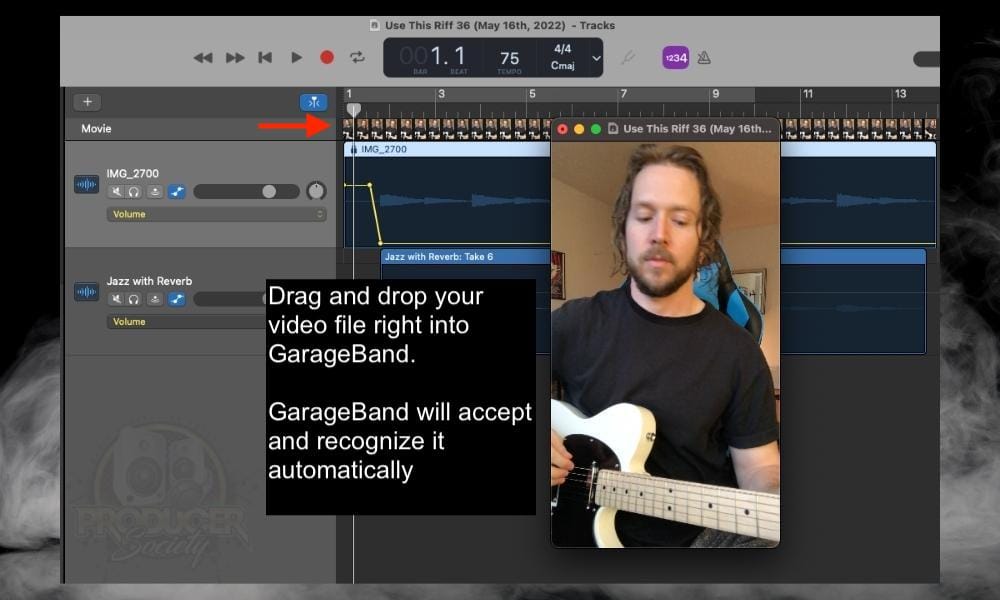
Just drag and drop the video file right into GarageBand and it’ll recognize it immediately. It’s really cool because you can see the video too. One annoying thing, however, is that you can’t change the timing of the video file in the workspace.
ii) Remove the Video and Keep the Audio
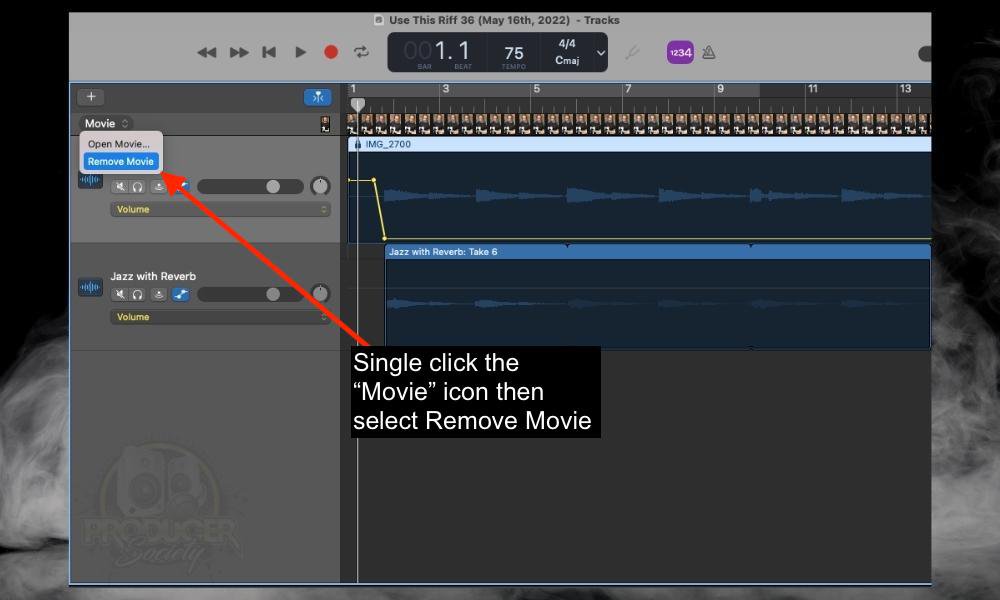
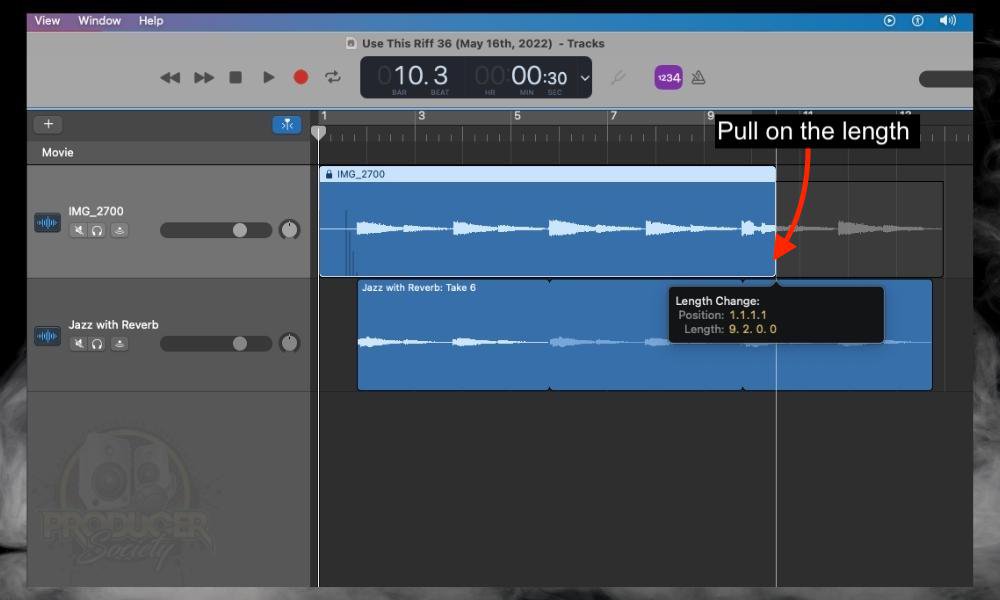
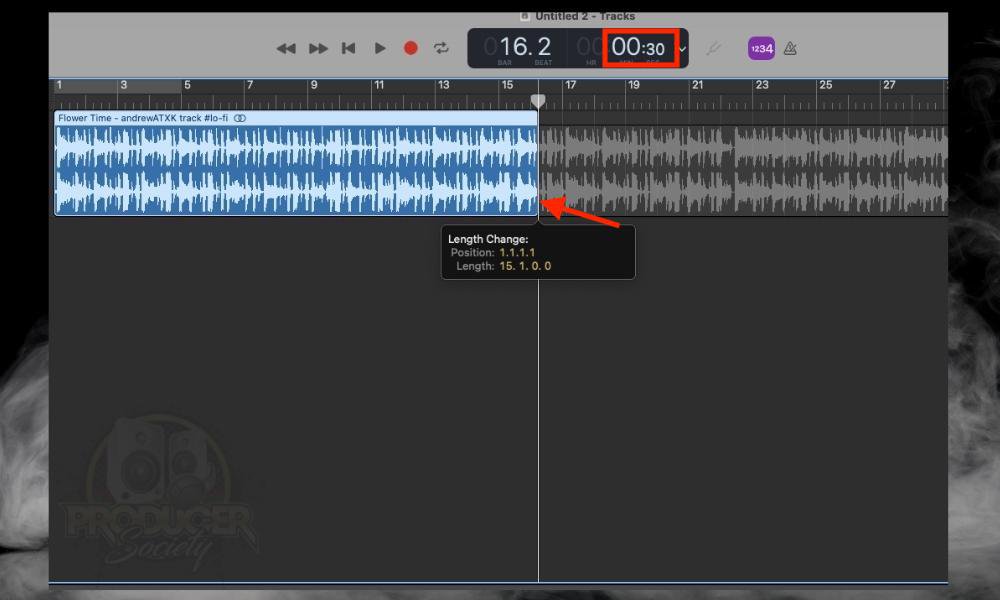
At this stage, you should probably crop the file down to 30 seconds. This will ensure that when you make your ringtone later, it’ll be the proper length.
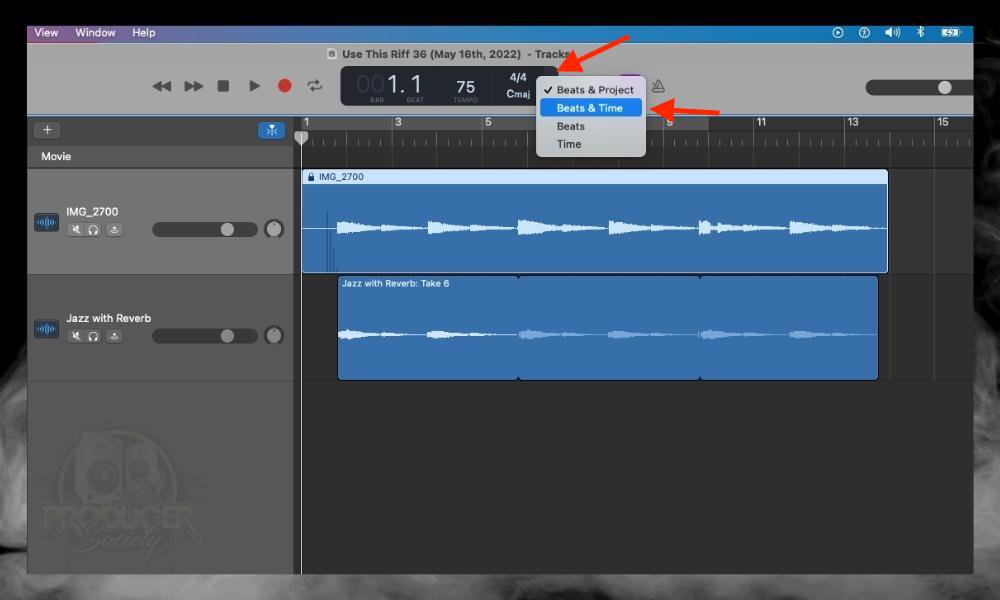
To crop the video file down to its proper length, click on the Tempo display and choose the option where you can see how long the file is in minutes and seconds. “Beats & Time” is the option you’re looking for.
Then, use your mouse to retract the audio file by going to the end of it and looking for the tab that allows you to adjust the length of your GarageBand regions.
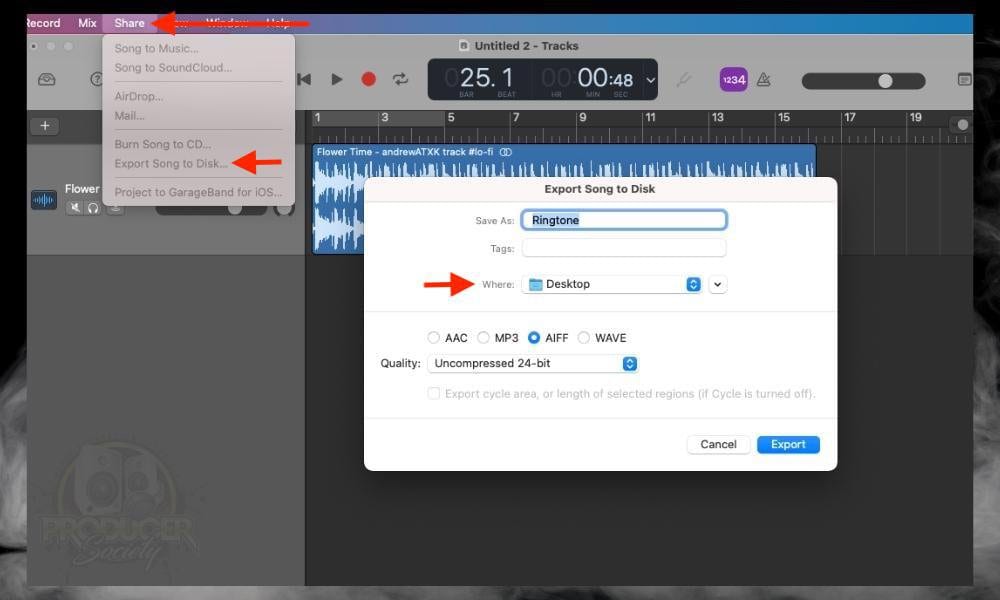
iii) Share > Export Song to Disk > Desktop
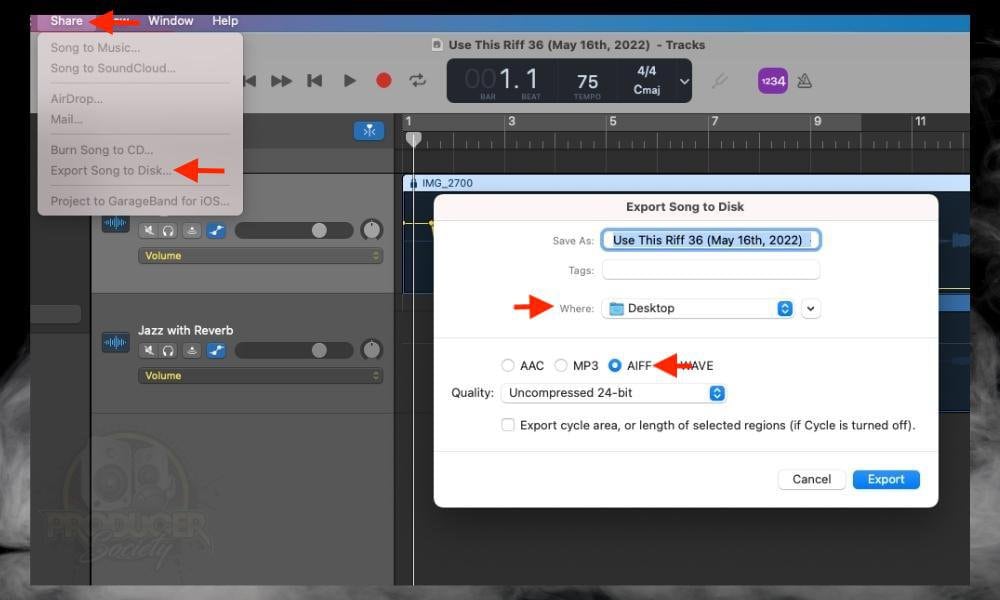
Skip #2 if you’ve done it this way and go to #4 instead.
2) Download the File and Import It Into GarageBand macOS
When you click “Download mp3,” the YtMp3 converter will send the file for download down to the bottom left of your browser. It’ll also send you to an annoying page where they try and get you to click on some weird ad.
You obviously don’t want to press on that. Send the MP3 file to your desktop, open up GarageBand, and then drag and drop the audio file into GarageBand’s workspace.
Tip:
If GarageBand won’t let you do this, you may have to do as I showed you in this tutorial and run it through Audacity first.
I believe GarageBand recently made this update whereby you can’t import MP3s as easily as you once could. I can’t say for certain, but what I can say is that running the Mp3 through Audacity first seems to solve the problem.
3) Crop the Audio To 30 Seconds or Less
4) Export It to Your Desktop
5) Connect Your iPhone to Your Computer and Open iMazing

Configure iMazing and iPhone together just by following the steps. It’s pretty straightforward if you haven’t already done it.
6) Go to ‘Ringtones’ and Import the MP3 File Into The Library
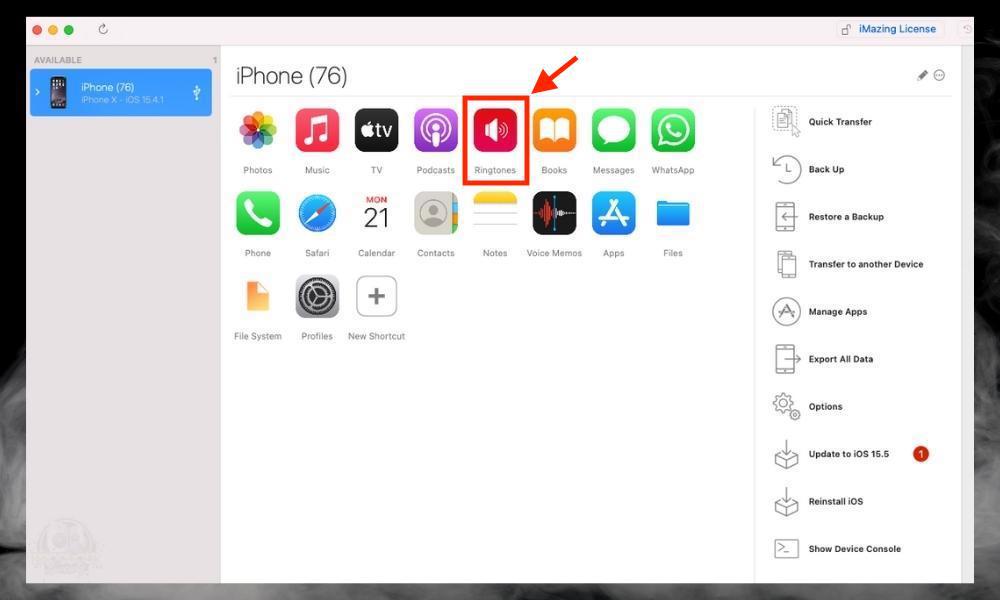
The interesting thing about iMazing is that it makes changes to your phone’s files immediately. So when you import, export, or delete a file from iMazing, it’ll happen instantaneously on your device.
At this stage, the ringtone will be waiting for you in the “Ringtones” section of your phone. Follow the steps below to set it up.
7) Navigate to Settings > Sounds & Haptics > Ringtones > then Select Your New Ringtone
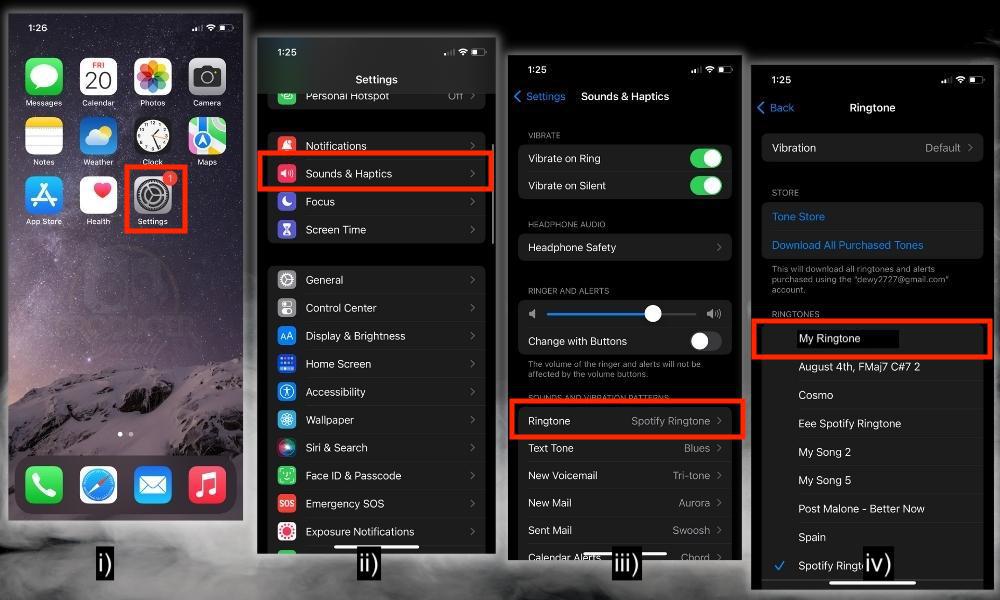
Choose “Settings,” then go to “Sounds and Haptics,” then “Ringtone,” and then your new ringtone should be sitting there waiting for you. Select it, and it’ll work.
Important Things to Note About Making Ringtones With GarageBand
1) Make Sure To Use Your Own Works
If you’re taking other people’s intellectual property without their knowledge, this is copyright infringement. So make sure that you contact the person who owns the property, or just use it on your own material so you’re within the bounds of the law.
Gear Mentioned


 Written By :