 Written By :
 EQ is definitely a bit tricky when you’re first starting out, due to the fact a lot can be changed from sub-frequency ranges all the way up until 20,000kHz.
The best way to use EQ on your guitar recordings in Garageband is to utilize the equalizer presets.
If you’re new to recording guitar in Garageband, and you’re looking to drop some EQ on your track, you can go into the pre-set menu and experiment with all of the different presets, which are very good, especially after a bit of tweaking.
Using EQ pre-sets is a great move for beginners for two primary reasons.
One reason is that using pre-sets is going to save you a lot of time, and two, it has the added benefit of introducing you to the way in which a sound can be manipulated simply by boosting or attenuating certain frequencies (I made a similar argument in my tutorial on the Amp Designer).
Each preset in Garageband has a name that indicates what purpose it’s for.
For instance, I typically use the “Clean Up Guitar” EQ preset, and the E-Bass EQ for bass guitar, however, looking at the other presets will allow you to see the way in which EQ is typically set up on a guitar, and for what purpose it serves.

There was a time when the purpose of using a Channel EQ was to make our tracks sound as natural as possible. However, in the modern era, the average listener is used to their music sounding louder, crisper, brighter, punchier, and with more bass.
This is even more important for vocals considering most listeners want a flawless singing performance (one reason you should practice with Singorama – before getting a vocal coach).
Regardless, many of the changes are quite subtle. But when applied efficiently and impactful on all of the tracks, the difference can be striking.
Furthermore, a good way to look at EQ, in my opinion, is not so much to change the sound completely but to make it sound better in combination with all the other instruments. And in many other cases, to make space or room for the track to shine through, in fact, I’ve explained this before in my guide on what EQ is and how to use it.
However, in this tutorial, we’re going to talk about EQ as it relates to guitars, acoustic, electric, and so on, in addition to how the sound can be manipulated and improved.
In the image you can see below, what I’ve done is I’ve attenuated (lessened the force of) all of the frequencies below 50Hz, decreased the signal between 50Hz and 100Hz by just a little bit, and I also added a little boost to the 1000kHz area. This is what my most common guitar EQ looks like.

Typically, a regular guitar’s frequencies lie between 100Hz and 9,000kHz.
Anything below 100Hz is not really that present, and anything above 9000kHz isn’t really heard that much either.
The vast majority of the changes we can make to the guitar’s EQ will be between 100Hz and 9000kHz, but that doesn’t mean that changed frequencies above or below these points won’t make a difference.
Now let’s talk about the frequency spectrum and what increasing each range will do to the sound and the feeling of the track.
For this section, I’m going to use some of the most common terms that people use for guitar tone.
It’s important to note that most EQ changes should be done in combination with the other tracks, rather than soloing each instrument/sound and EQing it from there.
However, if there are any nasty frequencies you want to eliminate in Solo, go ahead, additionally, more superior plugins like Fab Filter’s Pro-Q 3 EQ from Plugin Boutique will actually allow you to solo certain frequencies and not just the track.
Another tactic to use is what’s called an EQ Sweep, which means that we’re jacking up the frequencies and then literally sweeping the EQ across the Channel EQ plug-in to find the offending frequencies that need to be eliminated.

For further illustration, you can check out the YouTube video at the end of the post.
Additionally, understand how to increase or decrease the width of the EQ boost or cut. You do this with the “Q” option, on the bottom right-hand sign of the Channel EQ plug-in.

It’s also good practice to mix in and out of Mono which I’ve explained in more detail elsewhere on the site.
20Hz to 80Hz – Sub Frequencies
In this area, there are almost no frequencies from a guitar, so the most common practice for EQing guitars is to set up a high-pass filter, or in layman’s terms, decreasing the frequency range in this area altogether.

50Hz to 200Hz – Low Frequencies.
There aren’t a ton of sound on a guitar that falls between these frequency ranges.
For that reason, and similar to the frequency range above, it’s best to simply cut all of the frequencies below 90 Hz.
This is sort of like a “High-Pass” filter, which means we’re getting nothing but the higher frequencies to pass through, however, it’s a little less intense than a typical HPF.
I’ve noticed that if we’ve attenuated the frequencies at 100 Hz, it will affect the way the Low E string sounds when strumming a chord.

Mid-Range Frequencies
200Hz to 300Hz – Low-Mid Frequencies
Many instruments have frequencies in this range including the piano (get PianoForAll if you’re serious about music production), and for that reason, this is a common area to attenuate.
Because after we’ve added a lot of instrument tracks, there will be many instruments competing for the same frequency ranges, so an attenuation of this area allows for the creation of audio space.
This frequency range has the tendency to add a bit of body and warmth to a guitar sound.
Some people would say that this area is where you can add a bit of “crunchiness,” however, I find that when boosting this frequency on a clean guitar, it has the effect of adding bass.
Typically, a boost in this area of around 2-3dB should be more than enough to add boom to the sound of your guitar.
However, in the opposite case, we could subtract the frequencies between 100 Hz and 200Hz and you’d notice that the sound becomes more clear.
That’s because we’ve dropped the signal between 100Hz and 200Hz, which allows for more sound from the higher ranges, from 500Hz to 5000kHz, to stand out.

300Hz to 700Hz – Mid Frequencies
An increase in EQ in this area will begin to add a sound that people commonly describe as “boxy.”
A significant EQ boost in this part of the guitar signal will begin to create almost what sounds like a “hollow” sound, almost like cardboard, so this area is particularly sensitive.
An increase will push the signal into the direction of “boxiness,” but eliminating the frequencies altogether will have the effect of bringing out too much low frequencies and high frequencies. The middle sounds missing, and therefore the sound isn’t “full.”
General practice for adjusting the EQ in this area is to actually attenuate the signal by around 3-5dB, rather than increase it.
If you try it right now you’ll see why, it has the effect of eliminating any muddiness, and therefore allowing the crispiness of the higher frequencies to shine in addition to the lower-end frequencies of the guitar signal.

600Hz to 900Hz – Upper Mid-Frequencies
This area, and arguably down to 300Hz, has the frequencies that create a “deep” and “wide-open” sound.
Attenuation of the frequencies in this area will have the effect of increasing the low and high frequencies, and you’ll end up with a track without depth.
If we were to turn up all of the frequencies between around 300Hz to 800Hz by 10dB, the effect would be almost similar to an old-school radio from decades ago. It kind of has a twangy or Lo-Fi essence to it.
In my case, I’ll typically increase the signal at 495Hz by around 3dB and I’ll have a reasonably wide Q, of about 0.83, on it.

High Frequencies
1000Hz to 5000kHz – High Frequencies
Between 800Hz and 5000kHz is an area in which we can introduce presence and clarity to the sound of a guitar.
This is the last part of the majority of the guitar’s frequencies, and this area is also called the high frequencies.
Anything past 5000Hz and the difference in the sound, whether attenuated or increased, is not as impactful as the lower frequencies just mentioned.
Although, the increase of higher frequencies past 5000Hz, might add a bit of shine to certain sounds, for instance, on harmonics or other high notes on the guitar.
This is one of my favorite areas to play with while adjusting the EQ of a guitar sound (I use the PRS SE Custom 24 on ZZounds).
If we wanted to create a funk guitar sound, which tends to be quite twangy, an increase between 1000Hz and 5000Hz by around 5-10dB would work.

The general guideline for where these frequencies lie is in the image below:

5000Hz to 20,000Hz – Highest Frequencies
This area almost has a “metallic” sound to it when the signals are boosted. When I EQ guitars, I almost never attenuate or boost these sounds a lot, however, I find that a small boost in these ranges has the effect of adding a bit of shine and brightness to the higher notes, which I like.

Important Ideas, Tactics, and Concepts to Consider
It’s crucial to at least look at the Channel EQ of each instrument that you have that takes up a lot of space, and see exactly where the vast majority of frequencies lie. This is also true for the guitar. This knowledge will inform our decision when adjusting the EQ.
As I mentioned above, one of the fundamental uses of EQ is to create space in the mix, so if you’ve set up two guitars, one on the left, and one on the right, and they’re both playing the same thing, you can have one where the EQ in a particular range is slightly boosted, and then in the other, you can, instead, decrease the frequency range.
For instance, the bass guitar commonly occupies the range between 50Hz and 700Hz, so for that reason, it’s wise to think about what other instruments are also occupying this range. Try to create room in the mix for them to play together.
This has the effect of allowing both instruments to shine through because they’re no longer competing for the same range at a similar intensity. Apply this concept to your mix in general, that way you have a full and clear-sounding song.
Another tactic to employ is to keep your boosts/cuts between 3dB and 6dB. This is big enough to make a difference but subtle enough where, in conjunction with other EQ changes, it will really go a long way.
With that said, adjusting by between 3dB and 6dB is a simple guideline to follow. You can, if you choose, increase or decrease by more than that.
In the following section, I’m going to talk about three different types of guitars, as well as some helpful concepts and tips to guide you in your mixes of each respective instrument.
Acoustic Guitars
Loudest Frequencies Range Between 70Hz and 1000kHz.
From 1000Hz to 5000Hz, are the quieter frequencies, and then past 5000Hz, there are the quietest frequencies.
The acoustic guitar is an instrument that can have a number of different important roles in the mix. It can serve as a rhythm reinforcement, or it can be one of the primary instruments that function as the foundational sounds of the mix in terms of the melody.
In the second case, where it acts as one of the more important sounds of the mix, a common practice is to have them sound very full and bright.
In the first case, where the acoustic guitar is serving as a back-up to the rhythm, the “fullness” of the guitar plays less of an important role.
One really common thing to do with an acoustic guitar is to introduce a high-pass filter, which means we’re dropping out all of the frequencies below 90Hz or so.

Interestingly, it seems like in many of the most popular songs, specifically when the guitar is serving as a rhythmic role, rather than a melodic/harmonic, the acoustic guitar will be EQ’d in such a way where all that’s left is the plucking of the strings and the actual chords aren’t even that loud.
In other words, it’s almost as if the sound of the actual notes aren’t even apparent, whereas the scratching and the plucking of the strings are quite loud.
This effect is achieved by setting up a very strong high-pass filter with the frequencies have been attenuated all the way up to the mid-range, to around 500Hz, or maybe even a little bit more.
A cool trick for mixing acoustic guitars revolves around finger squeaking, which is the sound of the player’s fingers moving across the strings and fret-board while doing chord changes.
To help eliminate this annoying sound, attenuate/decrease the frequency range around 1000Hz.
To adjust the “fullness” or the “resonance,” of the acoustic guitar, we can boost or cut the low-mid frequencies, between 200Hz and 400Hz.
Furthermore, the acoustic guitar tends to respond dramatically to boosts in the high-range frequencies.
For instance, a boost in frequency around 10,000kHz and above will create a very thin-sounding acoustic guitar, so if you want to increase the brightness of an acoustic guitar, it’s useful to employ a wide Q rather than what’s called a “shelving EQ,” where we increase the frequencies after a certain point all the way until the end of the spectrum.
A shelving EQ looks like what you can see below:

A wide Q looks like the image below:

To create clarity for the acoustic guitar, it’s a common practice to cut the range between 70Hz and 400Hz a little bit.
Or, to add a bit of body to the sound, we can increase the signal between 70Hz and 400Hz.
The more we increase it in this range, the more bass we introduce to the sound, which some people describe as “boom,” or even “rumble.”
Cutting the signal between 400Hz and 2500kHz will create a “hollow” sound, whereas a significant boost will create “woodiness” or “honkiness.”
Cutting between 4000Hz and 20,000Hz will steer the sound in the direction of lifelessness and a lack of brightness, whereas a boost will increase things like the presence, the attack, and the “sparkliness.”
Electric Clean Guitars
Loudest Frequencies Range Between 70 and 1000Hz
Less pronounced frequencies go from 1000Hz to 5000Hz and then past 5000Hz the frequencies are the quietest.
Clean guitars are typically EQ’d by the player before the track has even made it to the mixer. Think about it, most players already have their tone-knobs, both on the amplifier, as well as on the guitar itself, fully adjusted to their liking.
When it comes to mixing them appropriately, the idea behind it is to EQ them in such a way where everything is as well defined as possible, without causing any masking.
Masking is the term used to describe the way in which a sound overpowers another.
When EQing an electric clean guitar, we want to bring balance to the sound, that way when the player picks a low note, it’s as defined, clear, and as easy to hear as the higher notes.
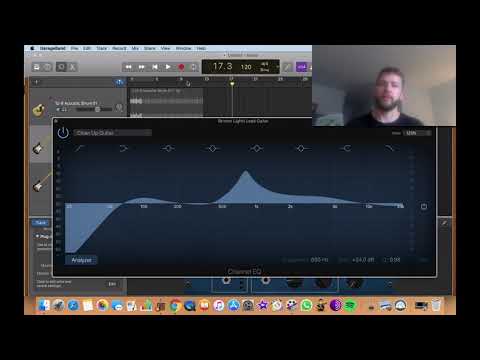
The electric guitar, similar to the acoustic, can sound a lot better with the elimination of some of the lower frequencies, which we can see reflected in some of the guitar-presets that come with Garageband, for instance, the “Clean-Up Guitar” preset which you can see below.
Similar to the Acoustic guitar, a small cut between 70Hz and 400Hz will create clarity, whereas a boost will introduce more body, and an even stronger boost will continue to create a rumbling bass.
From 400Hz to 2500kHz, a cut will tend to create “hollowness,” and the larger the boost, the more “woody” it sounds.
A cut between 900Hz and 20,000kHz will dull the sound, and an increase will push the sound in the direction of “sparkle” and presence.
Distorted Electric Guitars
Distorted guitars are without question one of the most frequency-heavy instruments, certainly more than acoustics and clean guitars. A cut or boost in the low, mid, and high frequencies will also play a significant role in how it sounds, which is both an advantage and disadvantage.
Essentially, it takes more time and customization to really balance the frequencies so everything sounds good.
The low-end is typically decreased or eliminated entirely. A good practice is to attenuate or remove them completely, and then give it a once-over and gradually increase the frequency until we like the way it sounds.
When EQing guitars, remember that there will most likely exist either a bass guitar or a bass synthesizer, so to make room for the bass frequencies is a good move.
The type of distortion plays as much of a role in how the distorted guitar sounds as the actual notes played, so that’s worth noting as well. The high-end can often have a brittle vibe to it, which could be decreased appropriately.
Furthermore, the mids are often decreased a little bit as well, however, the more the mids are scooped out, the more the guitar tends to sound like what one would hear in metal.
A consequence of scooping out the mids too much is that as the mix gets louder, the guitars tend to also raise in volume disproportionately to the other sounds in the mix, but this happens in terms of any instrument with scooped mids.
Cutting the frequencies between 200Hz and 1200kHz will tend to create more clarity in the distorted electric guitar’s sounds, whereas an increase in the low mids, between 80 and 300Hz creates boom and power.
Boosting the area between 300Hz and 1200kHz, on the other hand, will create more edginess and crunch.
Between 2500kHz and 20,000 kHz, we can either cut the range to make it more dull-sounding, or we can boost it a little bit for more presence. However, a boost that’s too high will tend to create more of a harsh sound.
Frequency Range of Each Open Guitar String
The frequency of each open guitar string in open tuning is something to keep in mind as well. It gives you an idea of where each open string is located, in relation to the Channel EQ’s frequency spectrum.
Standard Tuning
Low-E: 82 Hz
A: 110 Hz
D: 147 Hz
G: 196 Hz
B: 247 Hz,
High-E: 330 Hz.
Additional Tools
If you’re interested in picking up an Equalizer pedal, I suggest checking out the MXR 10-Band EQ. It’s great for really dialing in the sound of your guitar. There’s one thing that I really like about it which you can read more about here.
YouTube Video Tutorial
Conclusion
I hope this was at least somewhat helpful to you. There is a lot to unpack and discuss. Like many other aspects of mixing, a lot of it depends on you and your individual tastes, as well as what genre you’re playing in.
As I mentioned at the beginning of the article, the greatest starting off point is the Garageband presets, which you customize to your liking, and also familiarize yourself with the common practices that each preset illustrates.