I know how to import drum kits into FL Studio from third parties – it’s dead simple.
To add a drum kit in FL Studio
1) Store your labeled drum kit in your documents folder
2) Drag the file folder into the File Browser
3) Go to Plugins Database > Generators > Drum > FPC
4) Delete the samples on the pads
5) Drag the kit pieces onto the pads and choose which MIDI notes trigger them.
Adding Drum Kits to FL Studio – (Step-By-Step)
Adding drum kits, sounds, instruments, and samples into FL Studio is easier than it is in GarageBand. That much, I can say for sure. As I said earlier, FL Studio recognizes what you’re putting into the DAW and it stores them exactly how you had the file folder in your local documents folder or on your desktop.
Let’s walk through how to do it in detail, but first, here’s a brief video showing you how to drag files into FL Studio and then assign the sounds and samples to a MIDI keyboard/drum-pad (I prefer the MPD226 that I got on Amazon).
This video uses the Cymatics FM Lo-Fi Toolkit that I talked about as an example for this article. Additionally, I’m sharing it because the first part of the video demonstrates how to import drum kits.
1) Have Your Labeled and Organized Drum Kit Sitting On Your Desktop or Douments Folder
![Organized File Folder - How to Add Drum Kits in FL Studio [ANSWERED]](https://producersociety.com/wp-content/uploads/2022/01/Organized-File-Folder-How-to-Add-Drum-Kits-in-FL-Studio-ANSWERED.jpg)
How you store documents, folders, and files on your computer is up to you, but I prefer having them in a place where I can easily find them. One such place is in your local documents folder, but my other favorite place to put them when I’m trying to use them for music production is on the desktop.
This ensures you can find them easily when it comes time to drag them into your DAW. If you’ve downloaded your drum kit from a solid website or third-party like Cymatics.FM, for instance, you’ll receive the files labeled and organized.
Cymatics organizes their Lo-Fi Tool kit, for example, into one-shot drum samples, MIDI files, melody loops, and complete drum loops as well. You can see what I mean down in the image here for example.
![Cymatics File Folders - How to Add Drum Kits in FL Studio [ANSWERED]](https://producersociety.com/wp-content/uploads/2022/01/Cymatics-File-Folders-How-to-Add-Drum-Kits-in-FL-Studio-ANSWERED.jpg.jpg)
2) With FL Studio Open, Drag the File Folder into the File Browser on the Left-Side
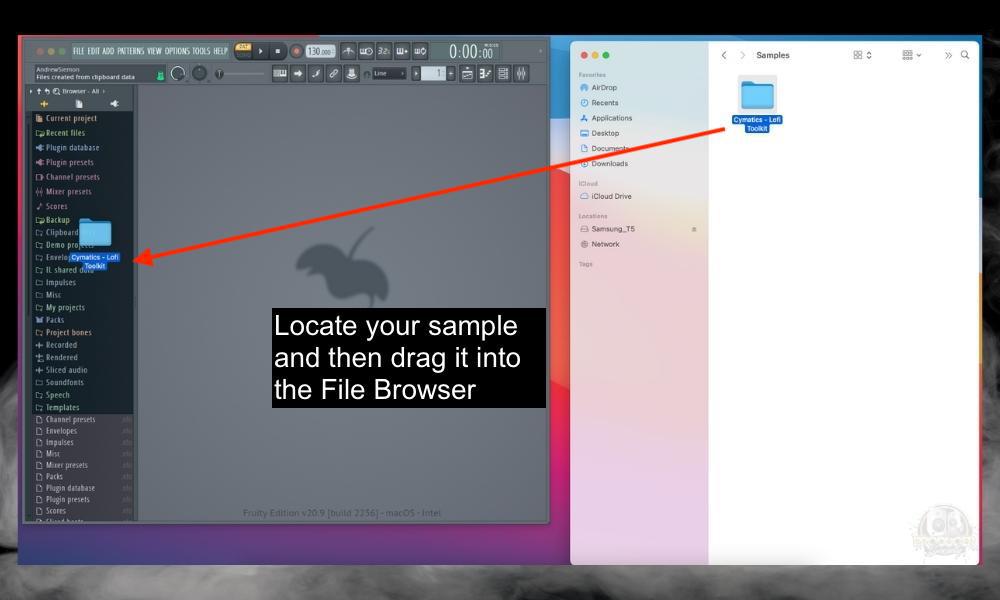
This part is pretty self-explanatory. Just drag your kit into the File Browser and FL Studio will organize the entire kit for you and have them sitting pretty for you.
3) Go to the FPC (Fruity Pad Controller) With Plugins Database > Generators > Drum > FPC
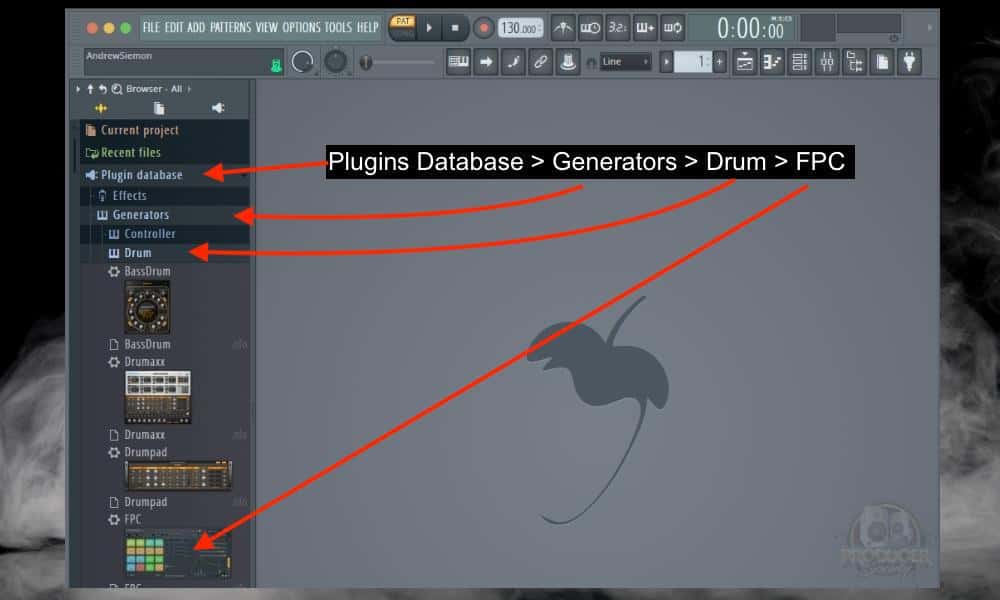
After navigating to the Fruit Loops Controller (FPC), drag the picture of it into the center of the FL Studio interface. Where the fruit symbol sits. This will prompt the FPC to open.
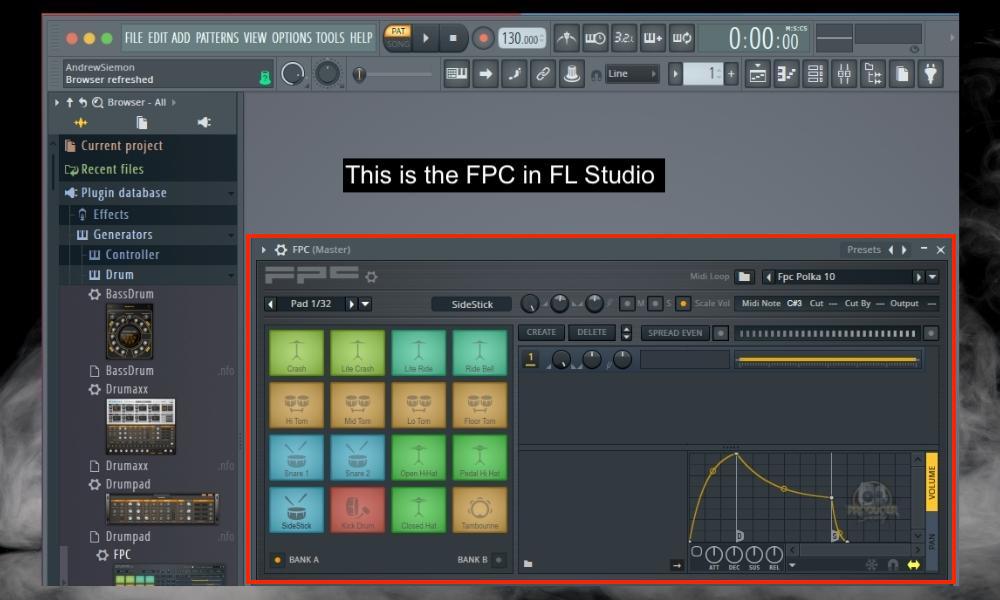
Make sure you’ve minimized other windows that might be in the way including the Piano Roll or the mixer. I said this in my other tutorial on assigning samples to a midi keyboard, but I initially struggled with the FPC due to other windows.
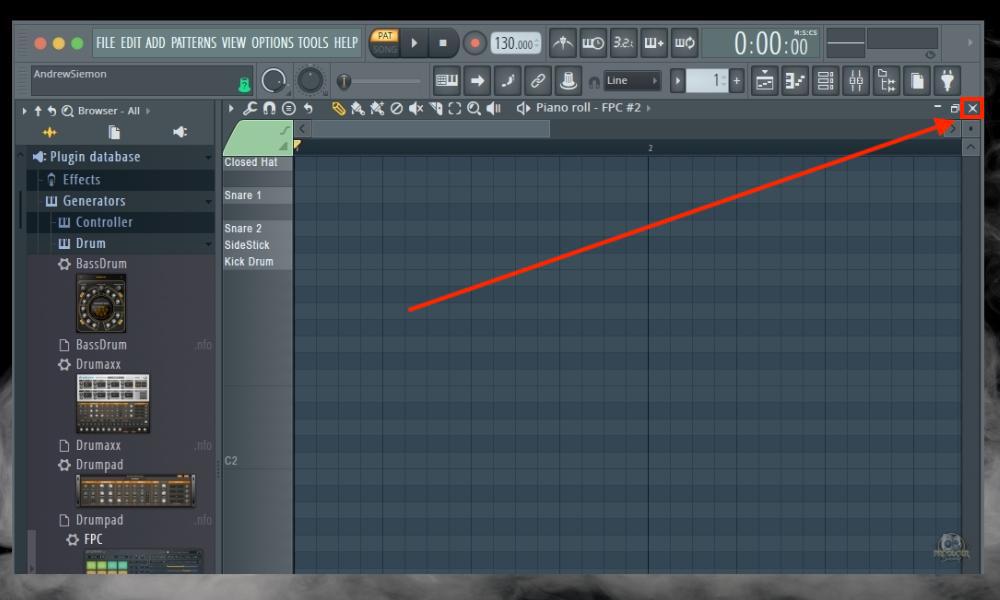
I had the Piano Roll open and then wondered why I couldn’t see the FPC. It kept popping up for a second whenever I dragged it into the center of the interface, but then it would disappear.
I thought there was something wrong with my computer. Turns out I just had the piano roll in the way.
4) Delete the Samples on the Pads
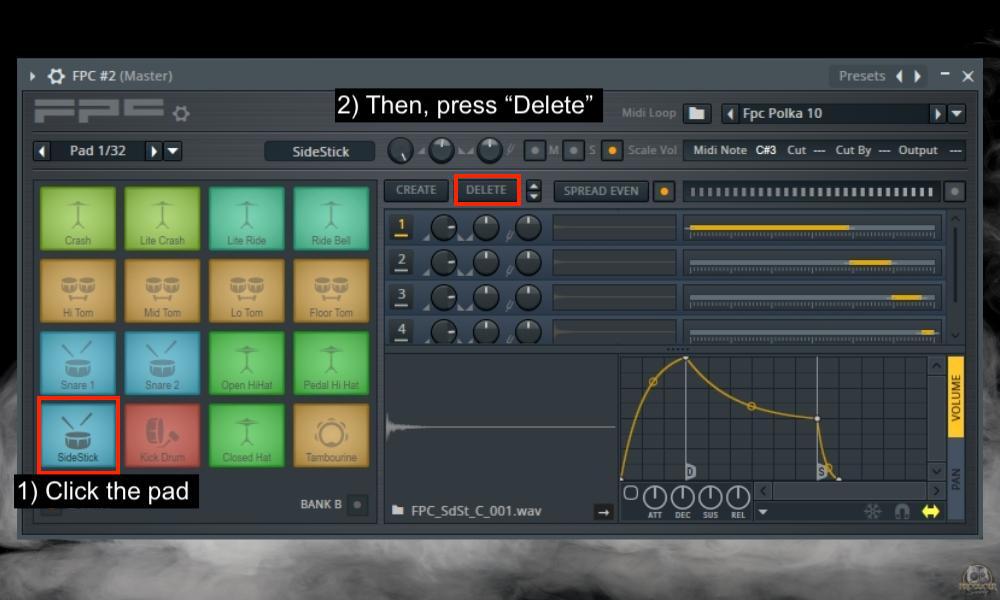
After you’ve gone through and deleted every single sample on all of the 16 pads, you can then move on to the next step. I’m not sure if there is a way to delete all of the samples on the FPC at once, but I imagine there has to be. I’ll let you know when I’ve figured it out.
5) Drag Each Part of the Drum Kit Onto the Pads
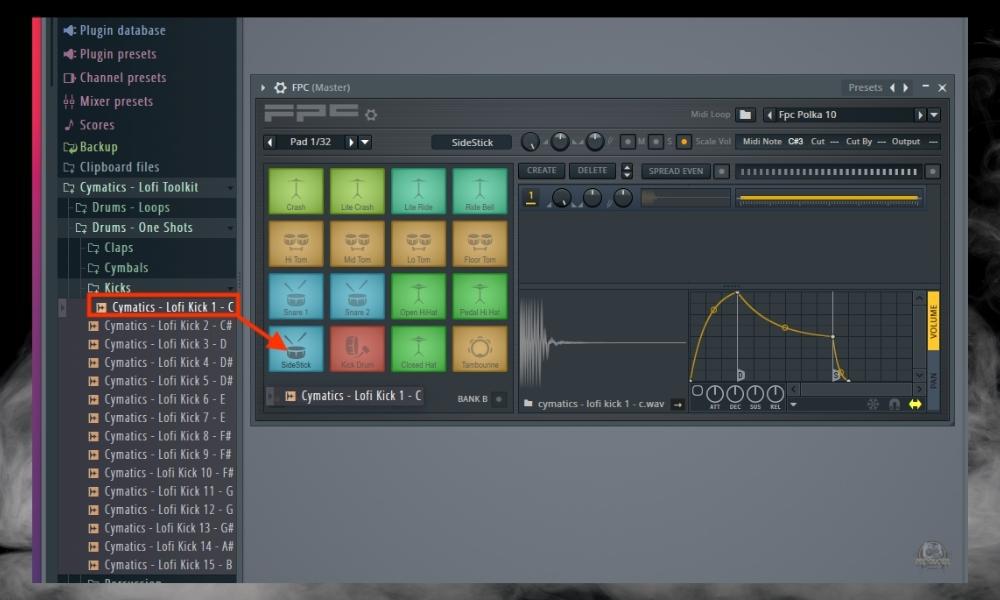
Drag the kick or your instrument of choice onto the pad after having deleted the original sample. It’s as straightforward as that, however, from what I understand, this will only work for audio recordings.
In other words, you can’t drop generators or other plugins onto the pad. Once you’re done loading the sample, you can start organizing the sounds and MIDI triggers.
6) With the MIDI Note Setting, Choose Which MIDI Notes Trigger the Samples
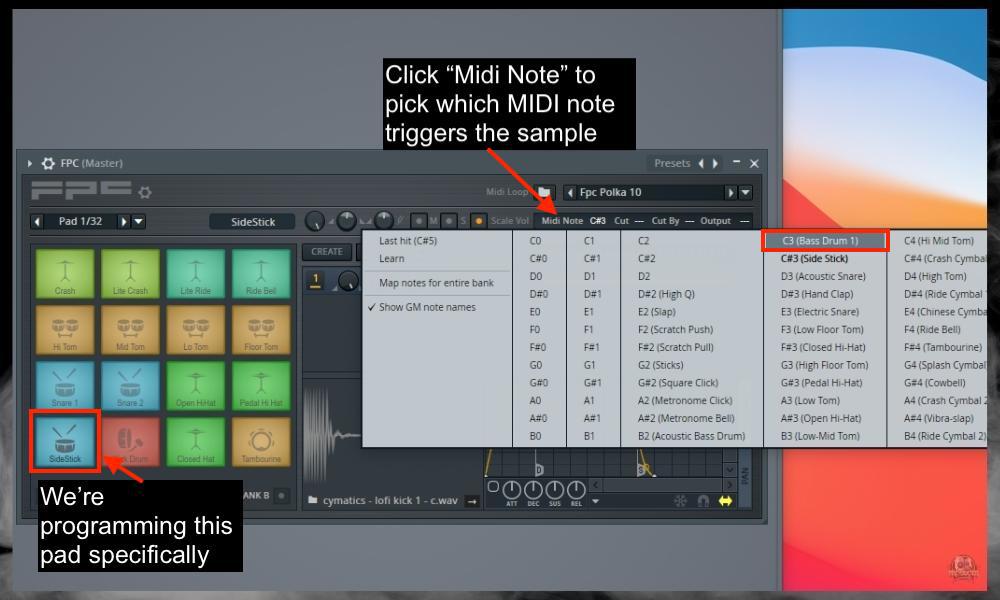
7) Repeat the Process Until You’ve Mapped The Pad/MIDI Keyboard To Every Part Of Your Kit
The FPC responds similarly to how the AKAI MPD 226 functions in real life. I’m referring to how the FPC has 16 pads and then 2 banks to choose from, each one containing 16 pads – so 32 in total.
![The FPC 2nd Bank - How to Add Drum Kits in FL Studio [ANSWERED].jpg](https://producersociety.com/wp-content/uploads/2022/01/The-FPC-2nd-Bank-How-to-Add-Drum-Kits-in-FL-Studio-ANSWERED.jpg)
This means you could program the next bank and another 16 pads to fit whatever other sounds you wanted. Pretty cool.
8) Save Your Preset So You Don’t Have To Do Everything Again
![Save Preset - How to Add Drum Kits in FL Studio [ANSWERED]](https://producersociety.com/wp-content/uploads/2022/01/Save-Preset-How-to-Add-Drum-Kits-in-FL-Studio-ANSWERED.jpg)
Once you’re done that, you may be wondering what’ll happen if you close the application and move on to something else. If you do this, you’ll delete all of your changes, so make sure that you save your preset first. So, you can see how easy all of this is, but what about when you want to import drum plugin VSTs?
Adding Drum Kit VSTs to FL Studio
I’ll show you how to install plugins in FL Studio in another tutorial, but know that adding a drum kit plug is a bit different because you’re dealing with software and not just audio recordings. That said, it’s not terribly difficult either.
As a matter of fact, if you’re familiar with how to do it in GarageBand (my guide on that), you should be able to do it easily in this DAW too.
Many of the plugins I downloaded for GarageBand – actually, probably all of them – showed up in FL Studio without me having to do anything. Although, FL Studio took a second to scan the presets, libraries, and other files.
The fact all of my GarageBand plugins work with FL really made me feel like the money I paid for it Plugin Fox was worth it.
![GarageBand Plugins in FL Studio - How to Add Drum Kits in FL Studio [ANSWERED]](https://producersociety.com/wp-content/uploads/2022/01/GarageBand-Plugins-in-FL-Studio-How-to-Add-Drum-Kits-in-FL-Studio-ANSWERED.jpg)
One thing that’s worth mentioning about the software is that FL Studio for macOS has the ability to load all types of plugins. Including AU plugins, VSTs, and VST3s.
Simply put, FL Studio can load all of the AU plugins from GarageBand and Logic Pro which is pretty cool. This includes the AUSampler, the AUDynamicsProcessor, the AUPeakLimiter, and pretty much everything else.
Other Articles You May Be Interested In
Important Things to Note About Adding Kits to FL Studio
1) Adding Drum Kit Samples to FL Studio is the Same As Any Other Audio Recording
Whether you’re choosing to import drum kits or 808 sounds, the process is the same. The drag and drop feature that I showed you in this article functions identically.
Gear Mentioned
1) Fl Studio 20
2) AKAI MPD226
3) M-Audio Oxygen Pro 61 (on Amazon)

 Written By :