Thankfully, the core concepts most producers use for boosting bass are similar across DAWs and probably even the hardware too. Once you figure out how to make it work with a multiband compressor and an EQ, you’ve pretty much got it down at that point. I’ll show you the simplest way first.
To bass boost in FL Studio
1) Create an empty project
2) Import your song
3) Use (fn + F9) or (F9 for Windows) to open the mixer track
4) Add a parametric EQ to the 1st slot of the mixer
5) Lower the high frequencies to accentuate the bass
6) Export your project with File > Export > Wave File
How to Bass Boost A Song With the Parametric EQ 2 in FL Studio
The first thing I’m going to show you is how to use the Parametric EQ 2 in FL Studio to bass boost a song or a track. Then, we’ll walk through 5 different methods (6 in total).
1) Open FL Studio
So the first thing you want to do first is actually to have your DAW open. Locate the FL Studio application launcher icon and double-click it to start the program.
2) Create A New Empty Project
In FL Studio select File > New from Template > Minimal > Empty.
![Create New Empty Project - How To Bass Boost in FL Studio [Very Easy]](https://producersociety.com/wp-content/uploads/2022/03/2-Create-New-Empty-Project-How-To-Bass-Boost-in-FL-Studio-Very-Easy.jpg)
Once you’ve created an empty template, you can import a pre-existing song into the interface. However, it’s important to note that you at least need the Producer’s Edition of FL Studio to make this happen. The Fruity Edition doesn’t have this capability.
3) Load An Existing Song Into FL Studio
Using your operating system file explorer application, locate an existing mixed song somewhere on your computer. Drag the file from the file explorer and drop it into FL Studio.
![Load Existing Song into FL Studio - How To Bass Boost in FL Studio [Very Easy]](https://producersociety.com/wp-content/uploads/2022/03/Load-Existing-Song-into-FL-Studio-How-To-Bass-Boost-in-FL-Studio-Very-Easy.jpg)
As I said, make sure you have the Producer’s Edition at least if you want to drag and drop a file into FL Studio in the quickest way possible.
4) Set the Target Mixer Track For the Song
To bring up the Mixer, use (fn + F9) in macOS. For Windows, just use the (F9) shortcut. Once you’ve brought up the Mixer Track, hover your mouse to the left of the track in the Channel Rack and there will be a “–” there to start with.
Click and move the mouse up, or use the scroll wheel and scroll up to route the channel to Mixer Insert 1.
![Set Target Mixer Track For Song - How To Bass Boost in FL Studio [Very Easy]](https://producersociety.com/wp-content/uploads/2022/03/Set-Target-Mixer-Track-For-Song-How-To-Bass-Boost-in-FL-Studio-Very-Easy.jpg)
5) Add a Parametric EQ 2 To the Mixer Insert by Clicking on Slot 1
Right-click the first empty Slot in Mixer Insert 1 to add a new Parametric EQ 2. It’s found under the “Filter” submenu which is the fifth option down. You can also use third-party EQs as well if you wanted, for instance, the Fab Filter Pro-Q EQ (on Plugin Boutique) is a great option.
![Add a Parametric EQ 2 To Mixer Insert For Song - How To Bass Boost in FL Studio [Very Easy]](https://producersociety.com/wp-content/uploads/2022/03/Add-a-Parametric-EQ-2-To-Mixer-Insert-For-Song-How-To-Bass-Boost-in-FL-Studio-Very-Easy.jpg)
If you’re using the macOS version of FL Studio, I notice that it’s better to click on the Mixer Slots on the right-hand side if you want to bring up dynamics processors like EQ, compression, etc.
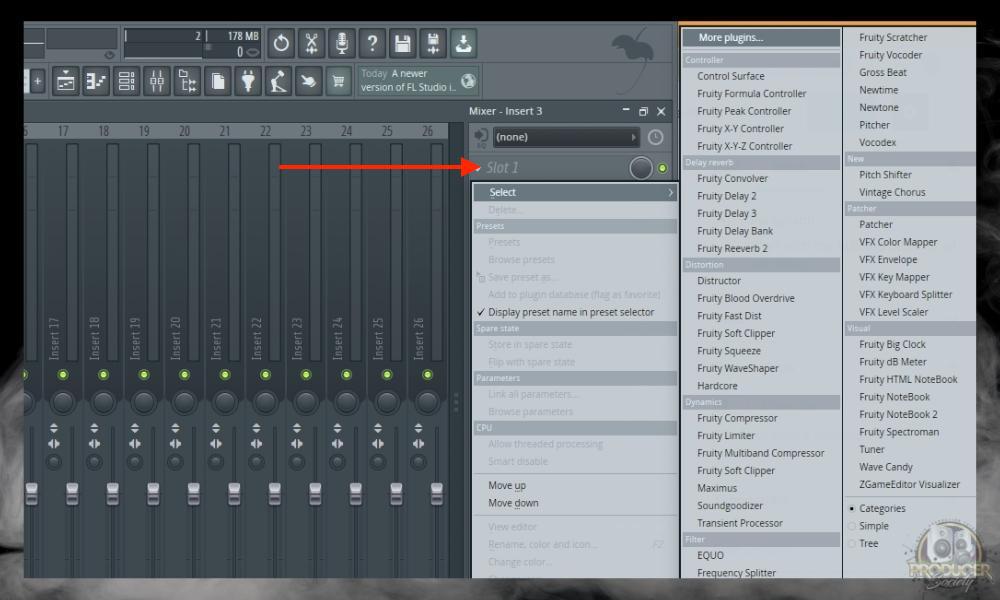
You can find pretty much everything in this menu, however, in this case, we want to go down to the “Filter” sub-section and choose Parametric EQ 2.
Important Tip: Additionally, it’s worth mentioning that you may have to add the Parametric EQ 2 to the Master Channel, rather than Insert 1.

It depends on what you’re doing though. If you’re bass boosting an instrument or a sound that’s part of a larger project, you’ll probably use one of the inserts. But if you’re bass boosting an entire song, It might be wiser to just use the Master Channel instead.
6) Reduce the Volume Of the High End Frequencies Using the Parametric EQ
To reduce the high-end frequencies in the song, click the small circle with the 7 on it and pull it down and to the left. The difference will be obvious almost right away.
Adjust until the bass has a fuller and more present sound. Use the image as a guide, each song will be slightly different so use your ears and your eyes (but mostly your ears).
![Reduce Volume Of High End Frequencies Using EQ - How To Bass Boost in FL Studio [Very Easy]](https://producersociety.com/wp-content/uploads/2022/03/Reduce-Volume-Of-High-End-Frequencies-Using-EQ-How-To-Bass-Boost-in-FL-Studio-Very-Easy-1.jpg)
You may ask why we’re reducing the high-end instead of increasing the low-end. The reason is that it makes mixing easier. As I explained in my guide to EQ, it’s called “subtractive EQ,” and it’s fairly self-explanatory. Instead of “adding” EQ, you subtract EQ. The end result is (sort of) the same, but how you got there is different.
7) Boost Overall Song Volume (To Make Up For the Loss in Total Volume)
As a result of dropping down the power of some of the high-end frequencies, you’ll notice that the song will be slightly quieter. This is totally normal. To counteract that, you can boost the overall song volume. But you could also do it with the Gain function on the EQ if you wanted.

Double click the waveform for your song on Track 1 in the Playlist. Click the wrench icon on the top-left, and not in the center. Increase the volume for the entire song to pick up any volume lost by reducing the high-end frequencies.
If you head back to the Parametric EQ, take a look at how much you attenuated the high-end in dB, and then you can use that as a rough guide for when you’re increasing the make-up gain as shown below.

Important Tip: This only works if it’s an audio recording, rather than a MIDI file.
How to Bass Boost A Song in FL Studio With Maximus
Another way of doing this is with the FL Studio Maximus. The FL Studio Maximum is basically a multi-compressor that compresses the signal across three different frequency bands. It’s similar to the default GarageBand multipressor.
In case you didn’t know, you can use a multipressor to boost bass and treble frequencies as well, for instance, the Fab Filter Pro MB (on Plugin Boutique) is probably the best way of doing this. But I digress, let’s jump into how this is actually done.
1) Open FL Studio > Create Empty Project > Load Song > Set Target Mixer Track
![Set Target Mixer Track For Song - How To Bass Boost in FL Studio [Very Easy]](https://producersociety.com/wp-content/uploads/2022/03/Set-Target-Mixer-Track-For-Song-How-To-Bass-Boost-in-FL-Studio-Very-Easy.jpg)
As I said a moment ago, to bring up the Mixer, use (fn + F9) in macOS. For Windows, just use the (F9) shortcut.
2) Add Maximus With (Right-Click the Channel Slot > Dynamics > Maximus) to the Mixer Insert For the Song
Click the first empty Slot in Mixer Insert 1 to add Maximus. It’s found under the “Dynamics” sub-menu which is the fourth option down. Check it out in the image down below:

3) Reduce Volume Of High End Frequency Ranges Using Maximus
Click the “Mid” icon which is the mid-frequency band button. Then click the Pre knob and drag the mouse down to decrease the volume. Repeat this process for the high-frequency band button.
![Reduce Volume Of High End Frequency Ranges Using Maximus - How To Bass Boost in FL Studio [Very Easy]](https://producersociety.com/wp-content/uploads/2022/03/Reduce-Volume-Of-High-End-Frequency-Ranges-Using-Maximus-How-To-Bass-Boost-in-FL-Studio-Very-Easy-1.jpg)
4) Boost the Overall Song Volume with Maximus To Account for The Volume Decrease
Click the Master band. Then click on the Pre knob and drag the mouse up to increase the volume for all frequency bands for the song.
![Boost Overall Song Volume - How To Bass Boost in FL Studio [Very Easy] (1)](https://producersociety.com/wp-content/uploads/2022/03/Boost-Overall-Song-Volume-How-To-Bass-Boost-in-FL-Studio-Very-Easy-1.jpg)

How to Bass Boost With the FL Studio Multiband Compressor
Rather than using the FL Studio Maximus, which kind of does the same thing albeit a slightly different way, we’re going to use the multiband compressor instead. The process is essentially the same, except we’re going to load a different plugin and then we’ll use the “Bass Boost” preset.
1) With FL Studio Open, Bring Up the Mixer Track (fn + F9)
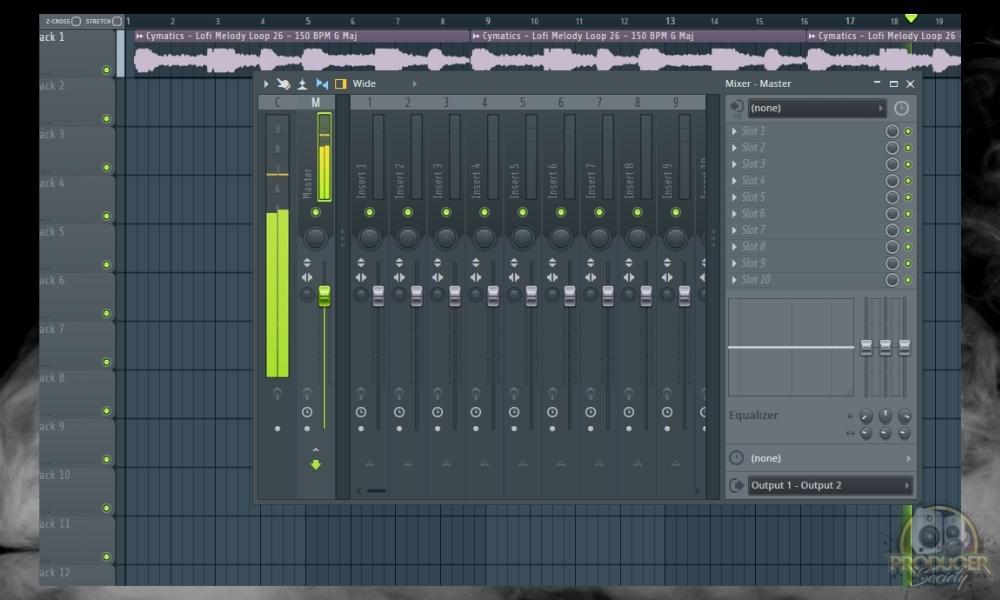
2) Click on the Mixer Insert or the Master Channel Insert
You have to do this to select to which track/insert you’re adding a plugin.
3) Scroll Down to Dynamics > Fruity Multiband Compressor

Load up the multiband compressor. It’s kind of like the Maximus, although, the two aren’t quite the same.
4) Load the Multiband Compressor, Then Use the Preset “Bass Boost”

Once you’ve clicked on Bass Boost, you’ll notice a significant increase in the bass frequencies. I think this may be my favorite way to get bass frequencies up thus far because it seems to do it in a way that sounds clean.
How to Bass Boost A Song With Fruity Bass Boost
1) Open FL Studio > Create Empty Project > Load Song > Set Target Mixer Track
You want to do the same thing that I talked about earlier. Open a new FL Studio project and then load your song into the project. Use the (fn + F9) shortcut to bring up the Mixer Track (just F9 for Windows), and then you can choose what plugins you want to use.
2) Open the “More Plugins” Menu
Click the first empty Slot in “Mixer Insert 1” to open the More Plugins menu. Click the “More Plugins” option, it’s the first selection available.

3) Add Fruity Bass Boost To the Mixer Insert 1 or the Master Channel
Double click Fruity Bass Boost from the list of options that appear.
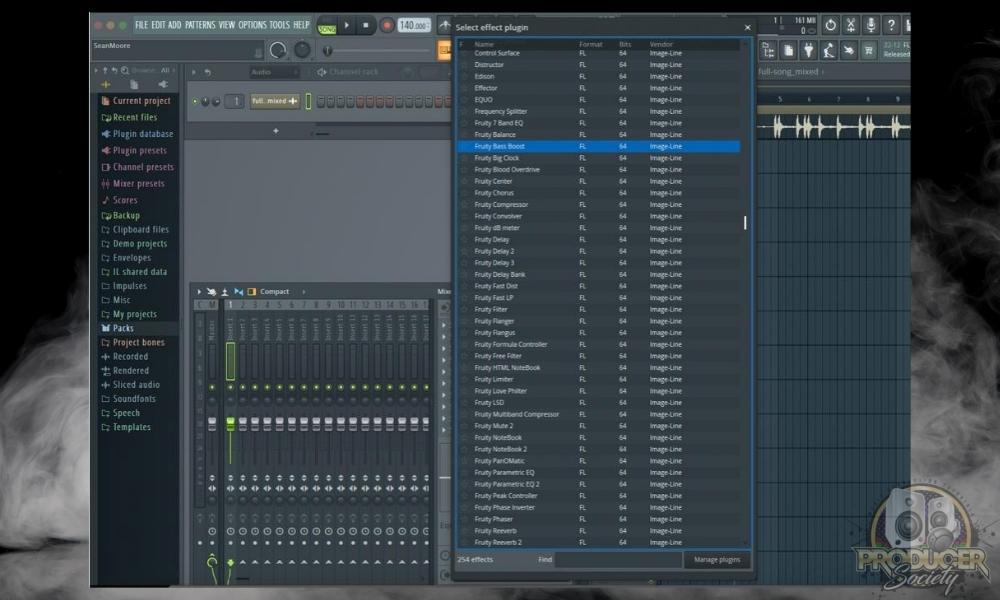
4) Adjust Frequency and Amount Knobs To Desired Levels
To boost the bass leave the frequency knob below 100 Hz. Then increase and decrease the Amount knob. Keep a close on the main volume meter to avoid clipping.
![Adjust Frequency and Amount Knobs To Desired Levels - How To Bass Boost in FL Studio [Very Easy]](https://producersociety.com/wp-content/uploads/2022/03/Adjust-Frequency-and-Amount-Knobs-To-Desired-Levels-How-To-Bass-Boost-in-FL-Studio-Very-Easy.jpg)
I find this to be the most subtle method. For instance, I don’t notice a huge difference after I’ve increased the bass frequencies, however, I’m also using a loop that doesn’t have a lot of bass frequencies, so that could be the issue.
How to Bass Boost in FL Studio With Stems Using WaveShaper
1) Open An Existing FL Studio Project Containing Stems
Open an existing FL Studio project that contains stems or at least a separated bass track.
![Bass Boost an Existing Song With Stems Using WaveShaper - How To Bass Boost in FL Studio [Very Easy]](https://producersociety.com/wp-content/uploads/2022/03/Bass-Boost-an-Existing-Song-With-Stems-Using-WaveShaper-How-To-Bass-Boost-in-FL-Studio-Very-Easy.jpg)
2) Add WaveShaper to Mixer Insert For Bass Stem
Click the first empty Slot in Mixer Insert 1 to add WaveShaper. It’s found under the “Distortion” submenu which is the third option down.
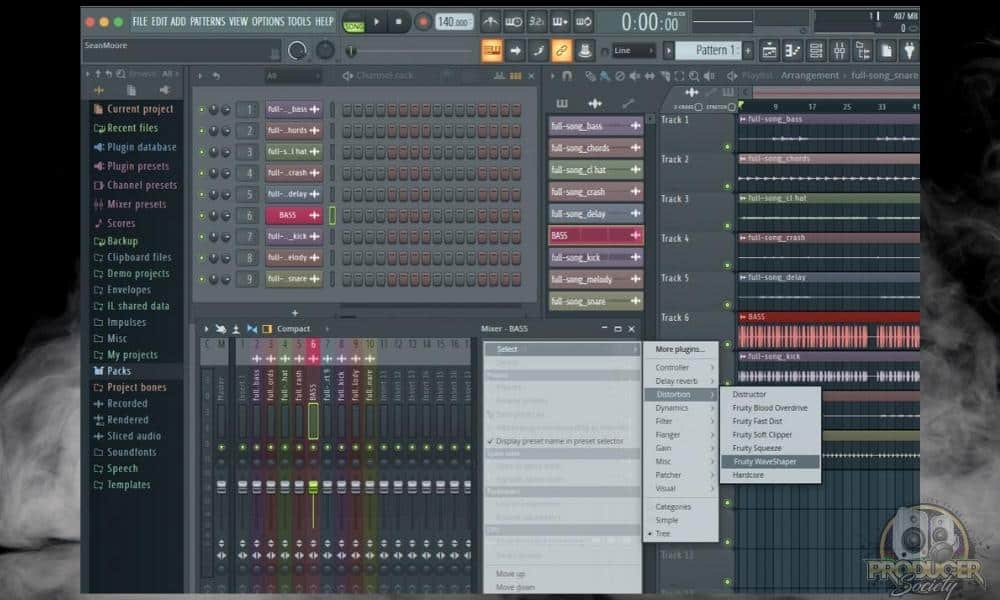
3) Add One Point To Adjust Saturation
Right-click the diagonal line one time to add a point. This point will be used to add saturation to the bass stem with WaveShaper.

4) Pull The Points Upward To Increase the Saturation and Bass
Left-click and drag the point around to desired saturation. Be careful with this plugin. Any type of distortion can damage your speakers or ears if you get carried away. Work slowly and methodically until you figure out which directions do what.

This is probably my second favorite way of boosting the bass. And I find it works especially well when you’ve used it on the kick. The image down below is a good example of how I’ve boosted the bass to really get it to sound fat and thumpy.

How to Bass Boost A Song With Stems Using Fruity Fast Dist
1) Open An Existing FL Studio Project Containing Stems
Open an existing FL Studio project that contains stems or at least a separated bass track. Another way to describe “stems” is that they’re just the original instrument files. You could also call them the project files.

2) Add Fruity Fast Dist to Mixer Insert For Bass Stem
Click the first empty Slot in Mixer Insert 1 to add Fruity Fast Dist. It’s found under the “Distortion” submenu which is the third option down.
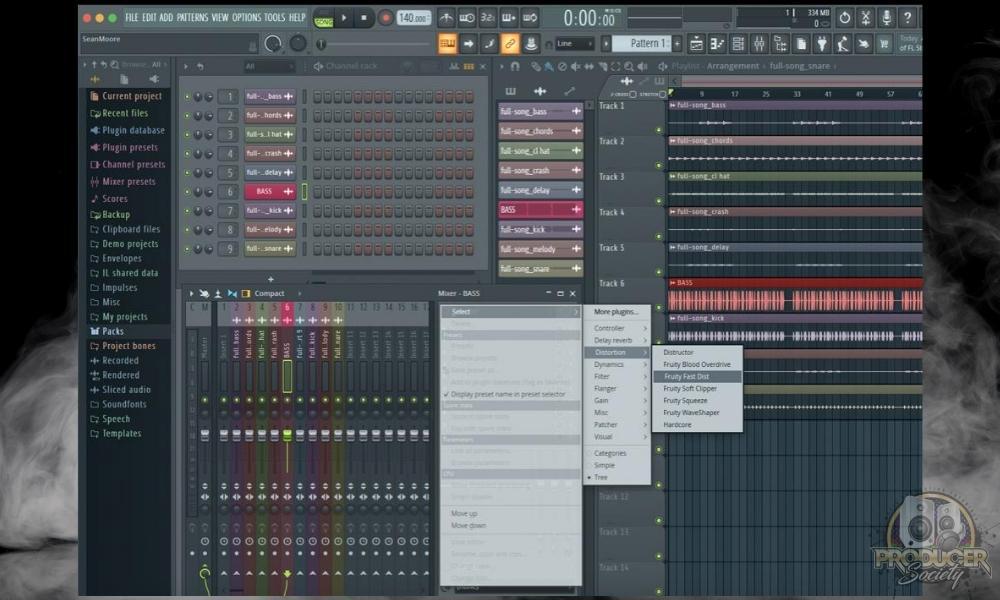
3) Use Presets Like “Warmth” or “The Heat” for More Bass
Fruity Fast Dist is one plugin I almost always check the presets on. The “warmth”, “Something” and “The Heat” are all usually pretty good choices. Of course, fine-tuning can be done from there using the knobs, although it’s usually not needed.

How to Lower the Bass in FL Studio With the Parametric EQ
1) Open FL Studio
2) Create Empty Project
3) Load Song
4) Set Target Mixer Track
5) Add a Parametric EQ 2 To Mixer Insert For Song
6) Reduce Volume Of Low End Frequencies Using EQ
To reduce the low-end frequencies in the song, click the small circle with the 1 on it and pull it down and to the right. You’ll notice a difference in the sound right away. Adjust until the bass has a dampened and less present sound. Use the image as a guide, each song/track will be slightly different.
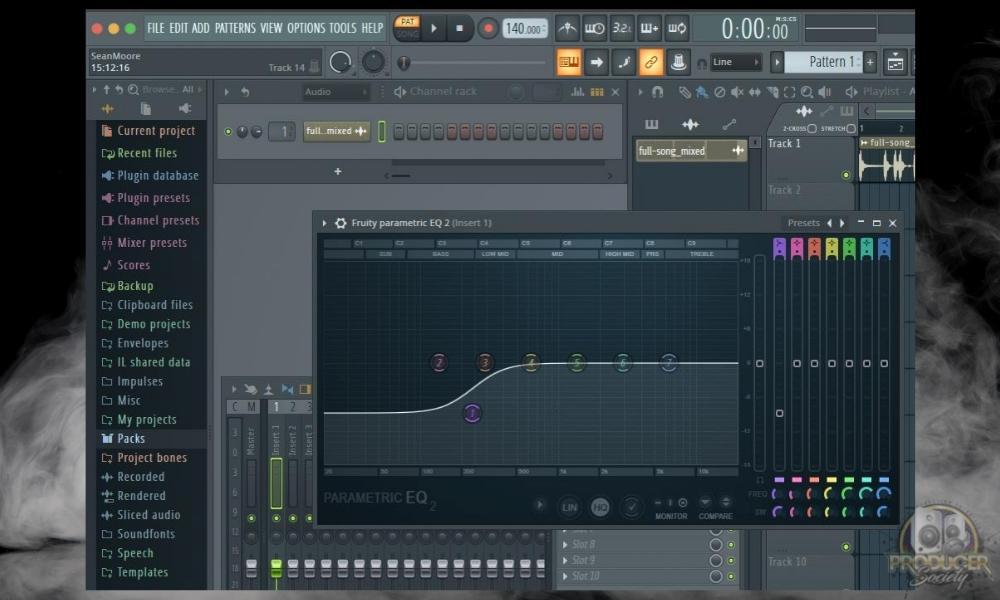
7) Boost The Song Volume To Makeup For Reduced Total Volume
Double click the waveform for your song on Track 1 in the Playlist. Click the wrench icon. Increase the volume for the entire song to pick up any volume lost by reducing the low-end frequencies.

Important Things to Note About Bass Boosting in FL Studio
1) Work Slowly & Methodically To Prevent Clipping (Maybe Possible Speaker Damage)
As I explained in my article all about EQ and speaker damage, boosting bass can result in damage to speakers. For this reason, it’s critical to work slowly and methodically. Pay careful attention to the amounts you’re adjusting the various controls when working with low-end frequencies.
That said, you probably have to be operating at fairly high volumes right off the bat in order for this to take place. EQ usually won’t pose any kind of a problem in this regard.
2) Decrease Mid & High-End Instead Of Increasing Bass
Actually boosting the bass is usually not the way to increase the low-end frequencies of a song. The mid and high-end frequencies should be decreased, and then the overall volume of the entire song can be increased slightly.
As I said earlier, this is called “subtractive EQ” and you’ll notice that a lot of engineers and producers recommend it to you. It depends on what you’re doing though. There are no rules. There are just common ways of doing things.
3) Merge Low End To Mono
Merging the low-end frequencies to mono is standard practice across the music production field. There are certainly cases where it isn’t desired but for the most part, it’s something you’ll do to just about every song you create.
In Fl Studio this can be done using Maximus or the Stereo separation knob below each mixer tracks volume fader. The process is identical for both, click and drag the mouse down. This will move the knob to the right and merge the low end.
This means you’re taking all of the left, right panning information out of the low end for the song and placing it all together in the middle of the stereo field. More on mono mixing in my guide.
Gear Mentioned
1) FL Studio – Producer’s Edition
2) Fab Filter’s Pro-Q EQ
3) Fab Filter’s Pro-MB Multiband Compressor


 Written By :