To create silent space at the start of your Garageband tracks:
1) Move all tracks ahead in the workspace
2) Hit ‘C’ to mark every recording with the Cycle feature
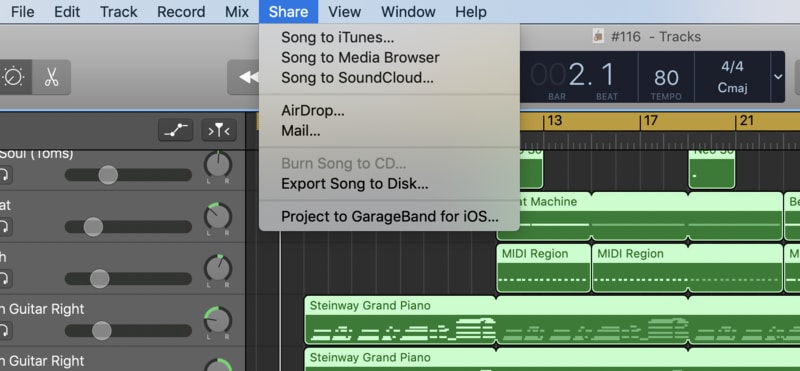
3) Hit Share > Export Song to Disk
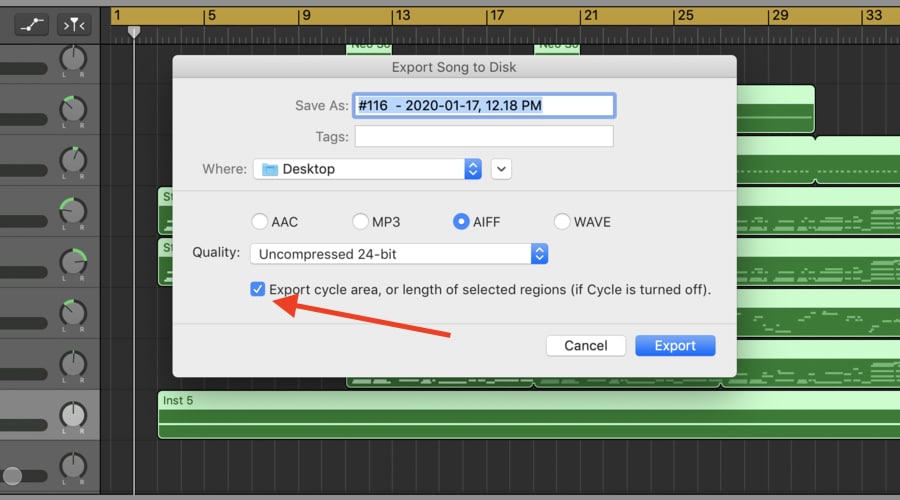
4) Check the box “Export Cycle Area, or Length of Selected Regions”
5) Export it to the Desktop
Adding a silent space before your music starts playing in Garageband is incredibly simple, however, if you try to create space through the method that seems the most intuitive, it won’t work as well as you thought. If you’re anything like me, what you tried first was simply moving all of the track regions forward in the workspace.
After you export the song to your desktop or iTunes, you discover that Garageband automatically renders the song from the beginning of the MIDI/Audio/Drummer Track regions. Here are the appropriate steps in more detail.
1) Select Each Track Region
This part is obviously self-explanatory.
All you have to do is use the cursor as you normally would, and select every single track region. Make sure to grab every single one, that way you don’t move things around improperly.
2) Drag and drop every single track region
Now that everything has been selected, you’re good to start moving everything all as one big chunk.

Drag and drop everything as far or as short as you want, depending on how much silence you want there to be.
Make sure to pay close attention to how you’re moving everything. You also want to be certain that you grabbed each track region, and didn’t miss anything.
Another point that’s worth mentioning is that you may have to re-do any automation that you’ve set up on the music.
If you know how automation works which you should if you’ve read my guide, you know that it doesn’t simply move through a drag-and-drop way. Everything has to be moved around manually.
3) Bring up the ‘Cycle’ option by clicking on the ruler.
If you’ve never used the ‘Cycle’ option before, essentially, it’s the function where you can loop a particular part of the song over and over again, during both the recording process or the mixing phase.
It’s a very useful feature for both mixing (my guide) and recording (also my guide), but the cycle option also responds to the “Export” feature.

In other words, you can actually select parts of the song individually to export using the ‘Cycling’ option.
4) Cover everything that needs to be exported with the ‘Cycle’ option.
This looks like what you can see in the image below. The image is actually two pictures combined, to show the beginning and end of the same track regions.

As you can see, I’ve selected every part of the music that needs to be exported.
5) Click ‘Share’ And Then ‘Export Song To Disk.’
This part is obviously quite self-explanatory, but you can see what it looks like in the image below:

6) Check the box of the option that says, “Export Cycle Area, or Length of Selected Regions (if Cycle is Turned Off).”
This part is crucial, so make sure you select the box that says, “Export Cycle Area, or Length of Selected Regions (if Cycle is Turned Off).
This is the last important part that’s going to ensure Garageband exports the song with the silent space included.

7) Hit “Export,” and send it to your desktop
Once everything is good to go, you can hit “Export.” Do yourself a favor and send it to your desktop, that way you can easily find the song later. This is a good practice to always follow, regardless of what you’re doing.
Another good thing to do is to use the YouLean Loudness metering plugin so you know exactly how loud the track is which is a great tool for mastering (Fab Filter has the best mastering plugins).
Now that we’ve explored the best way of going about this, I’m also going to show one other process for accomplishing the same goal, albeit, in short-form format, due to the fact that I consider it inferior. The following guide isn’t as good as the first but it does the same thing, nonetheless.
Alternative Method
1) Select every software instrument/audio/drummer track.
2) Drag and drop everything a few grid-lines ahead, depending on how much silence you want there to be.
3) Open up a new software instrument track
4) Create a MIDI region with no notes in it.
5) Hit ‘Share,’ and then ‘Export Song To Disk,’ and you’ll have a silent space at the beginning of your recording.
I would argue that this method is used in the case that the cycling option doesn’t work quite as well as you wanted, for whatever reason.
Additional Thoughts
From what I understand, the two aforementioned methods are the best way of going about it, but I’m sure there are other ways of doing it as well.
The same tactics also work for extending the length of the song as well. In other words, it works for adding a silent space at the end of the song too.
YouTube Video Tutorial
Conclusion
And that’s everything. Obviously, there are some functionality limitations to using Garageband, however, there are usually ways to work around each one.
In terms of which one I would use, I would recommend using the Cycle option, because it seems to be the most efficient.
However, it’s really up to you, because it’s not uncommon for users to need very specific things for their music, that are unique to their own situation.
Make sure to share this on your social media if it helped you a lot, and also subscribe to my YouTube channel and my email list.

 Written By :