I think Apple is getting more into mobile production because GarageBand iOS gets updated often. In some cases, it may be wise to have a look at the websites for your 3rd party plugins to make sure you won’t encounter any incompatibility issues. Updating to get these features is super easy too.
To update GarageBand for iPad, iPhone, and MacBook, delete the software from your device and then reinstall it from the App Store. However, in the macOS version, you can click on the Apple icon and then upgrade it from the Settings menu. You may have to update your operating system as well.
How to Update GarageBand for All Devices (Mac, iOS, iPad)
Before updating, make sure you have a look at third-party websites to ensure you won’t encounter any incompatibility issues. Sweetwater is good for this.
How to Update GarageBand for iPad
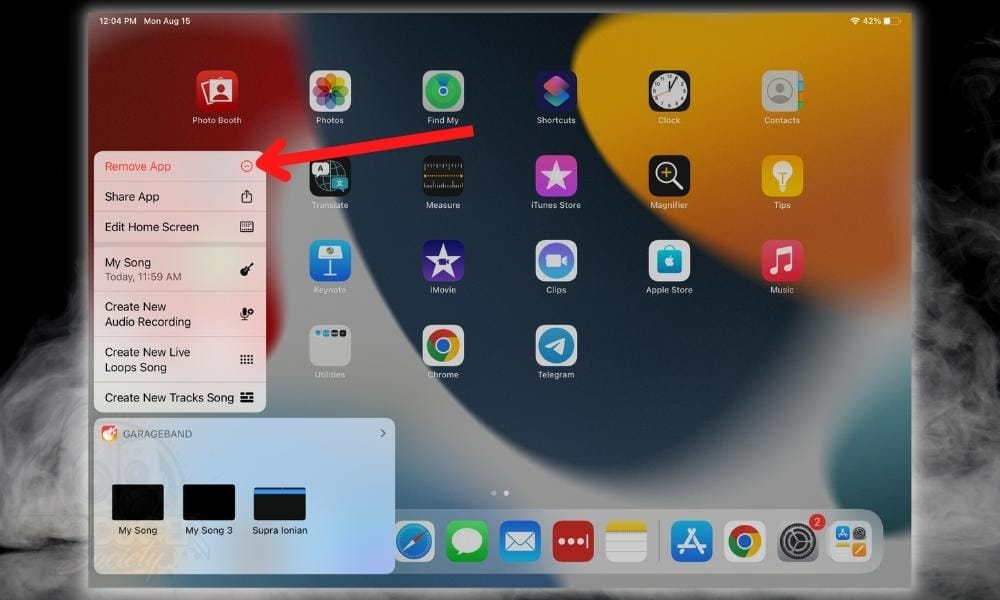
1) Delete GarageBand by Long-Pressing the Icon and Selecting ”Remove App”

Ensure you’ve chosen ”Delete App,” and not just removed it from your home screen. Wiping your drive clean of the GarageBand application will only remove the app, and not the Sound Library. The Sound Library has to be removed by going into the System Preferences as I explained in this guide.
2) Open App Store and Search for “GarageBand”

Because I’ve already downloaded GarageBand before, it’ll appear as a cloud symbol. It’ll more than likely appear the same way for you.
3) Select the Download Icon and Wait For It to Download

Because GarageBand iOS is approximately 1.5 GB, it’ll usually take 5 minutes or more to download it depending on your device and internet connection. The same thing goes for iPhone, which we’ll do right now.
However, if you’ve only downloaded the Essential Sounds, you won’t have to wait as long. The entire sound library takes up a lot more space.
How to Update GarageBand for iPhone (iOS)

1) Delete GarageBand by Long-Pressing the Icon and Selecting ”Remove App”
All you have to do is remove the application like what’s shown in the 3-picture diagram above. Of course, just as it is for iPad, you want to delete it from your device rather than simply removing it from the Home Screen.
2) Open App Store and Search for “GarageBand”
Search for GarageBand again in the App Store and re-download it once it comes up.
3) Select the Download Icon and Wait For It to Download
Because you’ve already had it on your device at one time, you can click on the cloud icon next to it to re-install it. Because iOS stores files differently than macOS, you’ll have to re-install your Sample and Sound Packs too which we’ll talk more about later.
How to Update GarageBand for (macOS)
For macOS, it’s a bit different because you actually have more than one option. Assuming you’ve upgraded to the latest operating system, you should be able to access all available updates directly from the Home settings menu.

Another thing you can do is go right into your App Store and click the “Updates” icon as you can see in the second image in the above diagram.
You can see that I have a System Preferences Update because I haven’t yet upgraded to macOS Monterey. Usually, when you click on the Apple icon, you’ll be reminded of updates.
However, this doesn’t always work for some reason. I assume this to be the case because there have been times when the operating system hasn’t let me know that such an update is available. In this case, delete your application and then re-install it as I showed you for iOS/iPadOS.
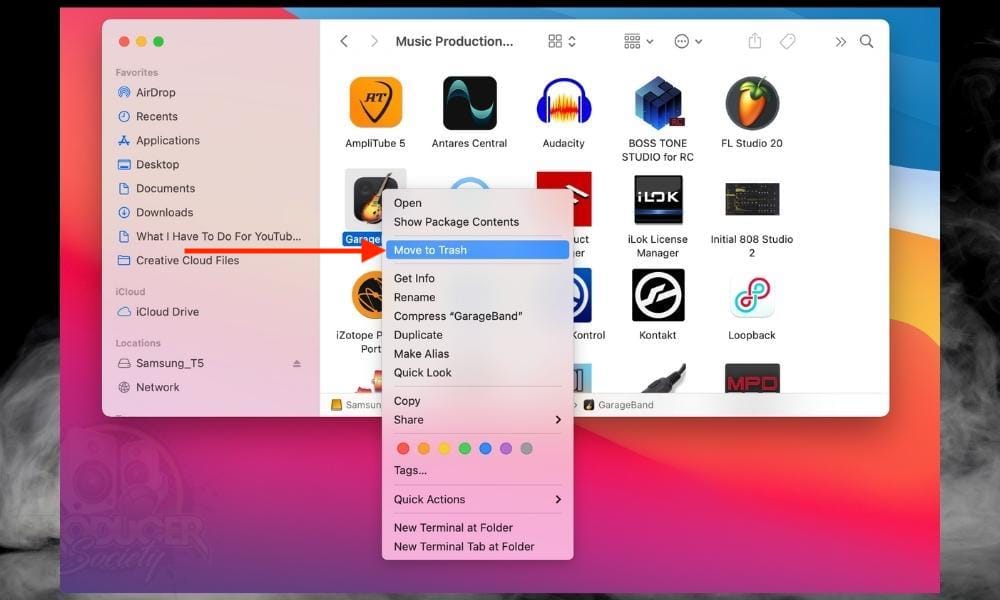
1) Find the GarageBand Icon, Right-Click It, and Then Delete the Application

Move it to Trash and then go into your Trash and actually get rid of it for good from your computer’s local drive. In my case, I’ve got mine on my external SSD so I don’t really have to do anything with it, considering there isn’t a copy of GarageBand on my actual drive.
I recommend you do the same, by the way, because then you can host all ~17GB of sounds and instruments on an external drive. This will free up a ton of space.
2) Open Your App Store and Search for GarageBand

3) Re-Install GarageBand and Wait For It To Download

Other Articles You May Be Interested In
Important Things to Note About Updating GarageBand
1) In Most Cases, Your Files Will Be Safe
If you’re concerned about your files, projects, and plugins disappearing, you don’t have to worry because your operating system stores these files in places separate from where the App, itself, is stored. That’s why after you’ve deleted GarageBand, you can re-install it and have access to all of your old stuff.
However, this is not the case for GarageBand iOS. If you delete GarageBand iOS, you won’t retain all of the old Loops, Sounds, and Sample Packs. You will retain all of your project files, samples, and other files though, just not the Loops and Sample Packs that you get from the App Store.
For some reason, I find that when you go to re-install your Sound and Sample Packs, the download goes much faster than if you were getting everything for the first time. To reaccess these Sound Libraries, you just have to click the Loops Icon and then choose Sound Library.

And that’s it for updating GarageBand for all 3 platforms. Good luck and have a nice day.

 Written By :