 Written By :

You don’t need a recording studio to record guitar, that much is certain. Among many other DAWs, you can use GarageBand (iOS/macOS) and it’s really easy too if you have the right equipment. Here’s the TLDR:
To connect a guitar to GarageBand, connect the computer to an audio interface like the Scarlett 2i2. In GarageBand’s Settings, set the Input to the Interface and the Output to “Built-in Output.” Plug the guitar in and select the Audio track, then click the monitoring button to hear playback.
How to Plug Your Guitar Into GarageBand


What Gear You Need to Connect Your Guitar to GarageBand
- USB 2.0 Printer Cable [old devices] or USB to USB-C cable [new devices]
- Scarlett 2i2 Audio Interface
- USB-C to USB Adapter
- Ernie Ball Right-Angled Guitar Cable
- GarageBand macOS/iOS – On either your PC or iPhone
- Each link takes you to my Product Page
If you’re new to music production, understand that a lot of this equipment will come in handy for years to come.
If you’re serious about recording and producing, much of this equipment and more are a necessity, so just grab some of it off Amazon and be done with it. Without further ado:
1) Connect Your USB 2.0 Printer Cable to Your Computer
Connect your Firewire cable to your MacBook Pro. In most cases, this cable will come with your purchase of an audio interface or a MIDI keyboard. However, if you don’t have one for whatever reason, I’m sure you can pick one up from Amazon for cheap.
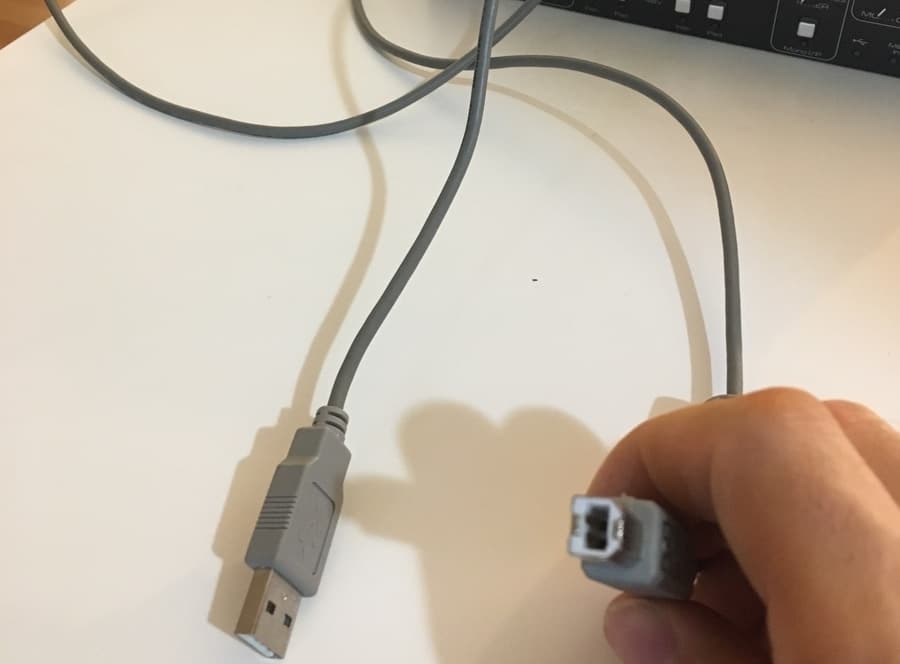
2) Connect the Other End Into the Audio Interface
Usually, the port for the firewire cable is on the back of the Audio Interface. Plug the other part of the firewire cable into the back of the Audio Interface. In my case, the Firewire to USB has to go into the USB-C adapter that I mentioned earlier.

Now, assuming you have the Focusrite Saffire 6USB, it should be powered by your computer. You don’t have to plug it in or anything like that, so all of its lights will turn on which you can see on the front of the unit.
3) Open GarageBand and Select “Open Project”
Click “Open Project,” or one of your old existing files. It doesn’t matter.
4) Choose “Input 1” in the “Choose A Track Type” Page
Once it brings up the “Choose A Track Type Page,” Click on where it says: “Built-in Input.”

5) Select “Built-In Output” for Your Output
However, assuming this is the first time that you’ve ever done this, it wouldn’t be a bad idea to click on where it says, “Built-in Output.” This should be all that’s needed for this part of the process.

That should bring up your “Output” and “Input” Devices under the Audio-MIDI region preferences.
Make sure you’ve selected “Built-in Output,” if you’re using your computer as your speaker, or the speakers that are hooked up to your laptop.
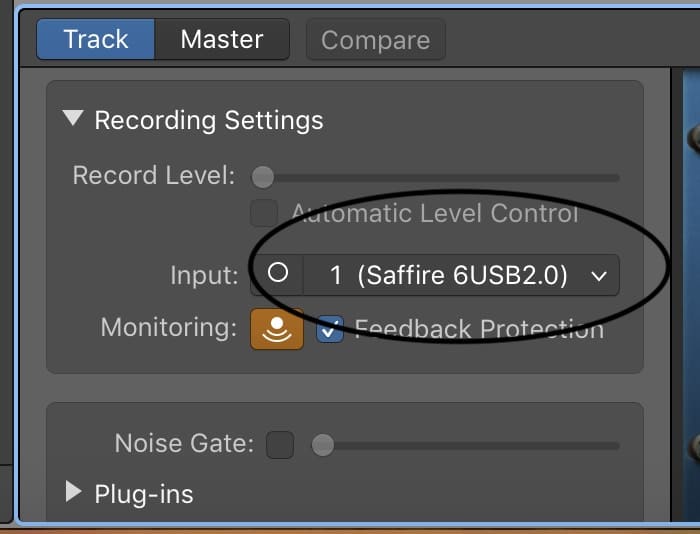
6) Select Your Audio Interface for the “Input Device”

Now, once you’re back at the “Choose A Track Type Page,” then click on one of the two subheadings below, either the “Guitar option,” or the “Microphone option.” This should bring up your MIDI Region and all of your controls.
In the “Smart Controls Area,” make sure that you’ve selected your audio interface where it says, “Input.”
7) Plug Your Guitar Into the Audio Interface

8) Turn on the Monitoring Button

Click on the “Monitoring Button,” which looks like an upside-down Wi-Fi symbol. This part is important, otherwise, you won’t be able to hear what you’re even playing.
9) Set The Gain on the Audio Interface

The best way to set the gain properly is the following: strum the guitar as hard as you would if you were playing the guitar during a tense, loud section. Pay attention to whether you go into the Green, Orange, or Red.
You want to go into the Green although you could get away with going into the Orange just a little bit if you’re strumming especially hard.
10) Choose Your Guitar Amplifier Sound

You can now select whatever kind of amp you want, whether it’s a “clean guitar,” “crunch guitar,” “acoustic guitar,” “distorted guitar,” “experimental guitar,” “clean bass,” “crunch bass,” and “experimental bass.” More on utilizing the amp designer in my guide.
You want to hit the “Monitoring” button beside your track header as well. I’ve highlighted the upside-down Wi-Fi-looking symbol with a black circle. It’ll turn orange once it’s been selected.

Under each heading, there are quite a few options that all sound pretty good, especially after you tweak them to your preferences. And it’s pretty much as simple as that.
There are some problems that you can run into when doing all of this for the very first time. For that reason, I’ll explain some of the problems that I had when I first started out.
How to Fix the Most Common Problems When Connecting Your Guitar to GarageBand
1) Use Direct Monitoring If You’re Experiencing Bad Latency

I’ve never actually had latency problems when using an Audio Interface, but some people do have this problem, and the solution – as I’ve explained in my article dedicated to the subject – is usually fairly straightforward.
Essentially, if you’re having latency issues, there could be a number of different causes, however, most of them will be a result of your setup and incorrect settings for your gear.
For instance, you want to make sure that – if you’re running more than one track – you have the monitoring button turned on for only one of them, rather than every single track.

An unfortunate side-effect of this though is that you won’t be able to the effects of your guitar amplifier simulators or plugins. If you’ve mic’d a guitar amplifier though, it’ll work perfectly.
2) Don’t Use Bluetooth Headphones for Monitoring

As of now, Bluetooth technology isn’t good enough to use while recording or monitoring. It’ll produce too much latency and make it impossible to record properly. However, this is going to change fast as technology improves every year. In fact, I’ve already seen people use Bluetooth MIDI keyboards so it’s going to come quick.
Other Ways Of Recording Your Guitar In GarageBand
1) Using The MacBook’s Microphone (Built-In Microphone)

You can also use your MacBook’s microphone. This is for very rough demos, obviously, because this way of doing it is going to make a very low-quality recording. However, if you’re desperate, and want to record something, this method will work.
- To do this, you just open a new “Audio” track in your workspace.
- And then click on the “Record” button.
- Start playing the guitar with your amplifier close to it, and that should be enough for a very rough demo.
2) Using A 1/4″ Guitar to USB Cable

You can also purchase a Guitar to USB cable and hook your guitar directly up to GarageBand. This is an inferior way of recording guitar tracks as well, but it works if you’re running on a string budget.
GarageBand will immediately recognize this as an input device, so you don’t have to worry about there being compatibility issues. However, like the method above, you’ll likely run into latency.
3) Use A Portable Audio Interface Like the iRig HD 2, iRig Pro I/O, or Apogee Duet

Use a small portable audio interface like the iRig HD 2 (my dedicated review) if you plan on only running one instrument through your DAW. This is pretty much the same as the main method which I described in detail above.
The only difference is that you’ll be using a much smaller, and likely, limited audio interface. The good thing about this is that it’s relatively inexpensive. Small interfaces are becoming exceedingly popular, like the iRig for example.
I haven’t picked one of these up yet, but once I start travelling around Europe, I imagine I’ll eventually purchase one. I’ll make sure to write a review on it once I do.
Update: You have to use the iRig HD 2 if you want it to work with a PC computer or Mac. The iRig 2 is only good for mobile.
4) You Can Also Use A Microphone With Your Guitar Amplifier

Another popular way would be to mic your guitar amplifier up to your audio interface and then through GarageBand. I took my giant Hughes and Kettner amp back home a long time ago and replaced it with a much smaller amplifier which I now use with the same SM57 and a pedalboard.
I like having the option of using amplifier simulators and a real guitar/amplifier combination. If I do choose to use a guitar amp sim, I’ll use the Blue Cat Audio Axiom and my current guitar of choice is my Epiphone Les Paul Custom, although, I switch between that and my PRS SE Custom 24 all of the time.
Before playing your guitar in GarageBand, know that there’s a default tuner right in the DAW, although, Blue Cat Audio’s Hot Tuna is much better. There was a time when I would use the default tuner on occasion.
But these days, I use the Hot Tuna instead because it’s way better, or I use my BOSS TU-3.
8 Tips for Connecting Your Guitar Into GarageBand
1) Get A Long USB Cable (USB 2.0 Printer Cable or USB to USB-C)

Make sure the cable that connects from your PC to your audio interface is long enough. I have a 10-foot cable and it’s perfect. You could even go longer. You want this because then you can be more flexible with where your computer or your interface sits.
2) Turn Your Pickups Down

As a kid, I only played metal in my bedroom and everything was always cranked to 10. Turns out that isn’t the best way to record. You’ll find yourself with a clipping signal and other miscellaneous problems if you’re sending a signal that’s too hot into your DAW for recording.
3) Turn Your Pickups Down Even More If They’re Active Pickups (High Output)

If you’re using active pick-ups, #1 applies even more because these pickups are already high-output. In other words, the signal they send into the audio interface or into your amplifier is much stronger than passive pickups.
This is awesome for metal, but you have to compensate by turning them down sometimes. Especially if you’re using amplifier simulators and an audio interface. Sometimes I find that I even have to turn the pickups down to half-way and drop the gain on the audio interface.
4) Don’t Forget to Use the INST (Instrument) Button

I’ve explained this in detail in my other article, but in simple terms, the INST button is for instruments connected with a 1/4″ instrument cable and when the button is turned off, you’re in Line Level mode.
Instrument Level is for guitar, bass, and other instruments, and the Line Level option (when the button is disabled), is for microphones. The difference is that instruments have a quiet signal and need to be boosted a bit to be brought up to line level.
5) Use A Quality Amplifier Simulator

The Axiom came out a few years ago so there could be better amp sims on the market, however, this one still does the job for me. It has everything that I need (and more).
I would recommend using a premium amplifier simulator if you’re not micing your guitar amp. The Axiom will work perfectly in GarageBand without any problems at all.
6) Use A Right-Angled Guitar Cable (For Sitting Down)

I recommend using one of these cables for a few reasons. The first one is that if you’re sitting down on a couch or chair, you’ll need a cable that won’t stick out of your guitar’s input jack and press into the couch or your chair.
The next reason is for guitar pedals. If you’re using guitar pedals, you’ll need a guitar cable that allows the pedals to sit beside each other without the instrument cable getting in the way. Do yourself a favor and get a couple of right-angled guitar cables.
7) Get An Even Better Audio Interface

If you’re serious about getting high-quality recordings, you’re better off getting a really nice audio interface than anything else. Like most guitar players, myself included, we’ll think nothing of spending $2,000 on a guitar, but we won’t spring for a $600 audio interface, even though this would do more for our recordings than another new guitar.
8) Get A Quality 1/4″ Cable to Headphone Adapter

I was in the mall the other day and I almost bought a new headphone adapter that was around $2. It’s best to spring for a better quality adapter because this is an important part of your set-up.
If the input for your monitors is messed up, you’re going to have a terrible time. The audio will cut in and out. You’ll have to position the adapter or headphones in the perfect spot to get it to work properly. It’ll be an extraordinary inconvenience.
How To Tune Your Guitar Using GarageBand
1) Your guitar is plugged into your audio interface in the computer, so it’s as simple as clicking on the tuning fork beside the center of the DAW where it shows the time signature, tempo, and key signature.

2) When you click on the tuning fork icon, it’ll bring up the meter where you can tune your guitar.

Other GarageBand Features
One of the great things about using a DAW for your guitar is all of the great VST plug-ins that you can use for your guitar. For example, you can download amplifier simulators and cabs for your setup using my tutorial here.
There was a time when amp sims weren’t that great, but now they’re awesome. Here’s my Guide to Guitar Plugins For Garageband (Free and Premium) article if you’re interested.
Other Articles You May Be Interested In
- How To Connect Your Guitar to Garageband iOS
- How To Record Acoustic Guitar in Garageband
- How to Make Guitars Sound Better in Garageband
- The Best Guitar Audio Interface For Garageband
- How to Record Guitar in FL Studio Mobile [Step-By-Step]
Gear Mentioned
1) USB 2.0 Printer Cable
2) Scarlett 2i2 Audio Interface
3) USB-C to USB Adapter
4) Ernie Ball Right-Angled Guitar Cable
5) Behringer Guitar to USB Cable
6) iRig PRO I/O
7) Orange Crush 35RT
8) BOSS TU-3
9) SSL 12
Thank you!